This article analyzes two popular screenshot applications. Each application has benefits. It will be hard to choose. As a writer and instructor, I’m regularly asked to provide computer how-tos, and screenshots make this easier. They are helpful for preparing presentations, publications, technical guides, etc.
Here are some things to consider before we begin. With these tools, you’ll probably utilize the simplest one most of the time. This means you want a tool with hotkeys, format-saving, etc. You should also search for a light tool so it won’t slow down your computer, which is vital if it lacks memory or processing power. With that out of the way, let’s compare the two tools, Greenshot and Snipping Tool.
Also Read:

Greenshot VS Snipping Tool
Table of Contents: hide
Greenshot VS Snipping Tool – Key Features
Greenshot VS Snipping Tool – Pros & Cons
Greenshot VS Snipping Tool – Pricing
Greenshot VS Snipping Tool – Users Rating & Reviews
Greenshot VS Snipping Tool – Similarities & Differences
Greenshot VS Snipping Tool – Which to Use and Why
Feature of Comparison
Want to know more about Greenshot VS Snipping Tool? Before starting, let’s have a quick preview first.

Greenshot VS Snipping Tool Comparison
What is Greenshot?
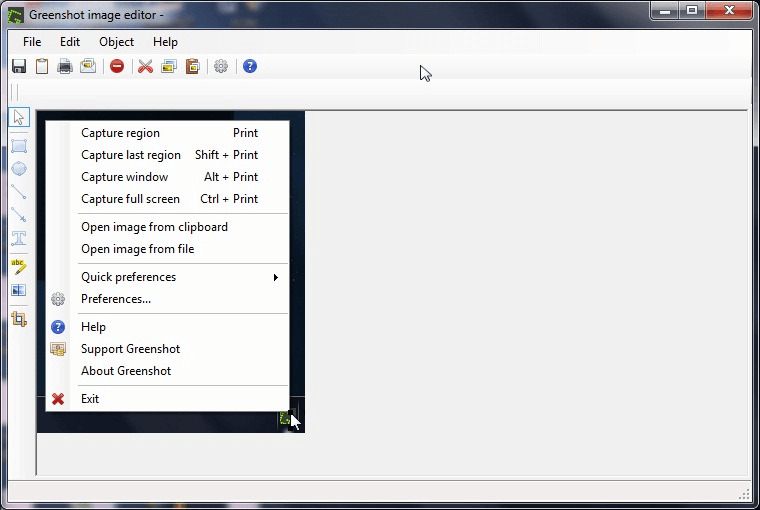
Greenshot is a screenshot software that allows administrators to customize their shortcut keys and set wait periods before collecting screenshots. Using the image editor, professionals may copy and paste the screenshot from the clipboard into the program and add text, shapes, and comments to the collected screen recordings. A user-friendly interface that allows users to drag and drop photos and graphics into screenshots gives users the ability to personalize their experience to meet their own needs.
Greenshot Interface
Greenshot is an on-premises screenshot editing tool that allows professionals such as technical writers, software engineers, project managers, and others to take screenshots of complete web pages and specific screen sections. Greenshot is a component of the Greenshot suite of products.
This functionality will only be accessible to trained professionals. In addition, software engineers can preserve screenshots inside files and construct shapes by using various tools to emphasize certain areas of code. Greenshot may be downloaded for free at any time, and further support is offered via the website in the form of frequently asked questions, video courses, and other relevant resources.
What is Snipping Tool?
The Microsoft Snipping Tool, as a powerful Windows snipping tool, has several features and functions that are popular. The Microsoft Magic Eraser is the Function of the Microsoft Snipping Tool that sticks out as being the most exciting and powerful among all of these other capabilities. It is located in the Microsoft Snipping Tool. Magic Eraser This is one of the most useful tools that can be used in designing graphics for professional purposes, such as logos and other types of designs.
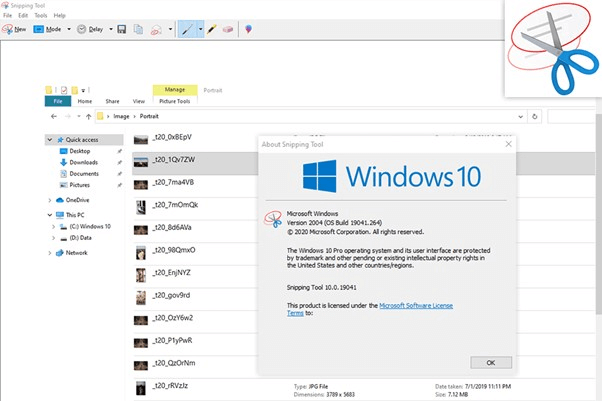
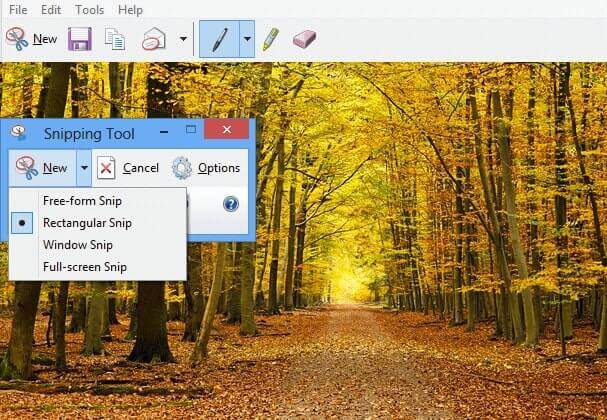
Snipping Tool Interface
On top of that, it is often used to resize JPEG files. If you try to save a file using a format such as PNG, just the first one hundred percent of the file will be saved, and the rest of the file will keep its original size. If you save a picture as a PNG file rather than a JPEG file, the resulting file will be smaller and will not need compression to be applied. Because of this, the bandwidth used by the network will decrease. As a consequence of this, it contributes to the enhancement of the network’s bandwidth.
Greenshot VS Snipping Tool – Key Features
In this part of the article, we will review some of the best features of the two programs that set them apart. Bear in mind that these programs might also have a lot of similarities between them. Let’s take a look at them.
Key Features of Greenshot
- File Formats
Greenshot allows it to save screenshots in various file formats, including PNG, GIF, JPG, and BMP. This gives you additional alternatives for saving screenshots and allows you to copy particular material from those photographs so that you may paste it on other platforms. In addition, it offers you extra space to save screenshots.
- Quick Menu
Greenshot can be accessed quickly via the system tray and shortcuts on the keyboard, and it also features a pleasant user experience for anybody who is going to be using it for the first time.
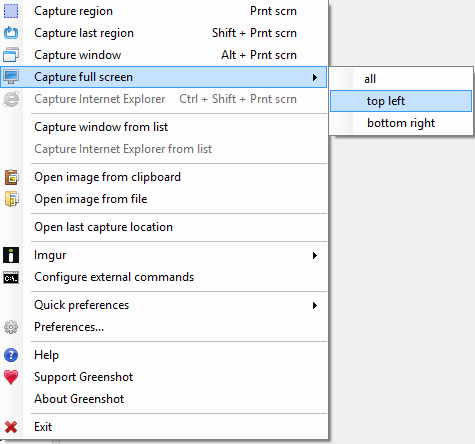
Greenshot Quick Menu
- Screen Capture
When you take a screenshot using Greenshot, you have the choice of capturing the whole screen or just a specific region of it. The “Print Screen” key on your keyboard will be used by default as the shortcut for this software.
You may also take screenshots by hitting this key with another key of your choosing and holding both of those keys down simultaneously. You may take a screenshot of the screen by pressing the Ctrl key and the Print Screen key on your keyboard.
Aside from that, if you hold down the Shift key while simultaneously pressing the Print Screen button, you can take a screenshot of a certain portion of the display.
To get started with the application, all that is needed of you is to click a few buttons at the appropriate times. Using the program, the user may also take an image with a green overlay.
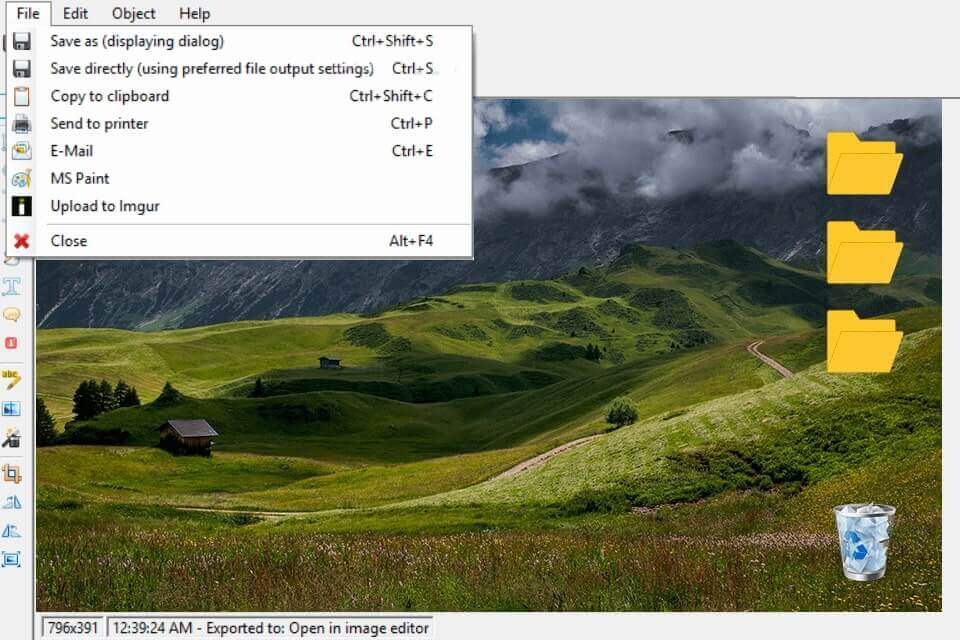
- Image Editor
Screen captures and video recordings may be annotated or otherwise marked up in various ways, thanks to the capabilities and tools that Greenshot provides for its users. Everyone interested in annotating their screenshots for free could find these tools handy.
Greenshot Image Editor
- MP3 Recording
After making a recording using Greenshot, you can modify it and save it in whatever format you like. You can download the audio file, even if you don’t want to.
- Open Last Capture Location
You now have the opportunity to locate any videos or photographs that you have previously saved. you won’t have to waste time searching for the last location, saving you a significant amount of time.
Key Features of the Snipping Tool
- Screenshot Features
Even while the Snipping Tool’s functions are not particularly difficult to use, they represent a significant advancement compared to its predecessor, which was available in Windows Vista and was included in the operating system at that time.
The Snipping Tool provides an option for a delay that can be modified to be anywhere between one and five seconds in length; using this delay; the user may ensure that all tasks have been finished before taking a snapshot by delaying the photo-shooting process.
When working with this tool, you can modify the geometry of a snip by selecting either the Free-form Snip, the Rectangular Snip, the Window Snip, or the Full-screen Snip from the drop-down menu. You have access to every one of these choices.
The Snipping Tool only provides a few settings that may be customized, such as generating a simple capture of the selected area of the image. Nevertheless, it comes with many additional options and features, all of which are at your disposal.
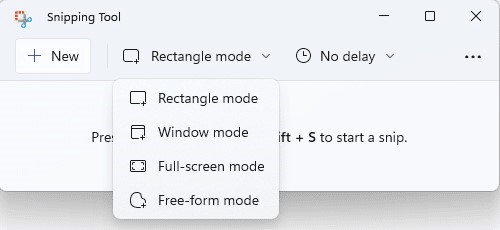
Snipping Tool Screenshot
- Image Editor
The Microsoft Snipping Tool allows you to annotate a screenshot as soon as it has been taken using your desktop screen. By selecting the Pen option located at the very top of the software, you will have the ability to write and draw around the image.
You may also highlight crucial components or information. If you make a mistake, you can fix it by using the Eraser symbol, which will remove the lines you’ve generated and allow you to start over again.
In addition, the Microsoft Snipping Tool makes it possible for you to make modifications in Paint 3D. These edits include modifying an item’s size, color, or text and adding 3D stickers or shapes. This feature will result in a depiction of you that is more appealing to others.
Snipping Tool Image Editor
- Image Quality
Regarding the quality of picture outputs, the pictures are pixelated and sometimes fuzzy. This is particularly true when you added an excessive number of forms or items to the screenshots shown on the image.
You will observe this phenomenon when you add more than one form to a picture. Even though the skills are rather impressive, they usually have some downsides. Please ensure you use caution when adding context and give your screenshots the careful attention to detail they deserve and take a high-quality screenshot.
- Ease of Use
The Microsoft Snipping Tool is designed to be easy for users of Windows 10, Windows 8.1, and Windows 7. Users may reap the benefits of this design. Even though it has a few simple features, its usefulness may be used in diverse contexts. You need a few clicks to capture a screenshot of your windows, and as soon as you’ve done so, you’ll have the option to annotate the picture with more information.
Greenshot VS Snipping Tool – Pros & Cons
Pros & Cons of Greenshot
Pros
- Easily downloadable at no cost to the user
- User-friendly
- Included onboard with an image editor
- OCR and obfuscation are only two of the many advanced tools included.
- Multi-language support
- Free and available to the public source
- Multiple capture techniques
- Take screenshots of the scrolling action.
- Light-weight
- Annotation of screen capture
- Modify the shortcut keys.
- File sharing and storage in the cloud
Cons
- Mediocre screenshot quality of complete scrolling web pages
- Unable to record video
Pros & Cons of Snipping Tool
Pros
- Easily capture and annotate screenshots
- Eraser, highlighter, and measurement tools
- Save and export shots to social media
- Includes image-editing
- Can send screen grabs as email attachments
- Saves in several different formats
- Useful for different screenshot types and sizes
Cons
- No video capture
- It does not include a voice recording.
- Does not record the movement of scrolling windows
- Lacks advanced features, such as OCR support and a GIF creator
Greenshot VS Snipping Tool – Pricing
Pricing of Greenshot
- Free Plan – $0 member/month [Windows]
Greenshot is free to download, install, and use on any device that operates under the Windows operating system!
- Paid Plan – $1.99 [Mac]
Users using MacOS machines must pay $1.99 through the Mac App Store. The cost mentioned above must first be paid to use the program.
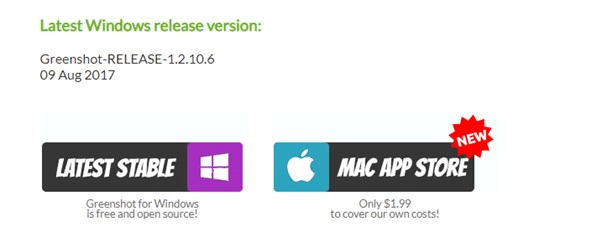
Greenshot Pricing Plan
Pricing of Snipping Tool
- Free Plan – $0/month
The Windows Snipping Tool is included in all versions of Windows Vista and later by default. Because it is included with Windows, there is no charge for using it.
Greenshot VS Snipping Tool – Users Rating & Reviews
Users Rating and Reviews of Greenshot
- G2: 4.8/5 (142 reviews)
- Get the app: 4.9/5 (15 reviews)
- Sourceforge.net: 4.9/5 (177 reviews)
What User Says about Greenshot:
“Greenshot integrates with my web browser smoothly. I knew exactly how to use it within minutes of installing it. I could take various types of screengrabs with Greenshot. I can grab entire screens, partial screens, or particular browser windows.” – A user from G2
“It doesn’t have extended features to the degree I’ve seen in some other screenshot software. It is great at doing what it does.” – A user from G2
Users Rating and Reviews of the Snipping Tool
- Pcmag: 3/5 (0 review)
- Sourceforge.net: 3/5 (1 review)
What User Says about Snipping Tool:
“Seems intuitive and easy to use. Has a ruler and protractor (but they do seem buggy). Liked the ability to save and clip and paste easily the annotated images. Could not, despite internet research, remove the overlaid ruler (or protractor) from the screenshot file, nor could I erase just one drawn object created by using those two tools. I uninstalled and reinstalled. No other suggestions found.” – A user from Sourceforge.net
Greenshot VS Snipping Tool – Similarities & Differences
Similarities of Greenshot and Snipping Tool
- Price
Greenshot and Snipping tool are two examples of open-source software designed to grab images from a computer screen, and better yet, they are free to use.
- Screen Capture
When using either the Snipping tool or the Greenshot, users can quickly capture screenshots of the whole screen or a specific display region. In addition, you may use any of them to extract text from pictures and store it on your Windows desktop. You can do this using any image editor.
- Image Editor
The built-in image editor that comes with Greenshot is capable of doing all of the necessary tasks. And with the help of the Snipping tool, it is possible to achieve several different goals, including adding text to a chat bubble and creating an animated movie from a still photograph.
- Scrolling screenshot
Greenshot and the snipping tool allow users to capture a complete screen while scrolling. It is possible that a screenshot will not be able to catch a whole window depending on the size of the user’s screen. The ability to grab a snapshot of a scrolling screen is included in both of these tools. Scrolls may be recorded in either vertical or horizontal orientation.
- Screenshot Annotation
You can start annotating with Snipping Tool directly. The basic toolkit includes a pen, an eraser, a ruler, a protractor, etc. Greenshot also supports annotation. you have the option of adding arrows, text, callouts, shapes, stamps, and even the ability to conceal sensitive information by utilizing the blur tool.
Differences between Greenshot and Snipping Tool
- Screen Capture Mode
Four modes are available for use with the Snipping Tool: Free-form Snip, Rectangular Snip, Window Snip, and Full-Screen Snip. Greenshot, on the other hand, only enables you to generate screenshots of a window or the whole screen of your computer. Internet Explorer also allows you to record complete web pages, which may be scrolled through.
- Time-lapse Screenshots
Snipping Tool Plus allows you to snap screenshots at predetermined intervals, which you can choose from the main menu. Greenshot, on the other hand, is restricted to simply being able to capture certain portions of your screen without any intervals.
- Supported Platforms
An application is known as the Snipping Tool is included in the base installation of Windows. However, if you are using a Mac, you will not have access to this program (though MacOS has its solution). On the other hand, the Greenshot program was developed with compatibility with the Windows and Mac operating systems as a primary design goal.
- User Interface
Microsoft has modernized the Snipping Tool’s graphical user interface (GUI) to make it perfectly matches the rounded corners and big buttons utilized throughout the rest of the Windows 11 user interface. The program also supports a nighttime mode. In contrast to the Snipping Tool, Greenshot has an old-fashioned look and feels throughout its whole.
Greenshot VS Snipping Tool – Which to Use and Why
Greenshot is a lightweight screenshot software program for Windows. You may record whole web pages from Internet Explorer by using this feature, which allows you to snap screenshots of a specific area, window, or the full screen in a matter of seconds. The ability to annotate or obscure portions of the snapshot is provided with ease. And exporting the screenshot can be done in several different ways, including saving it to a file and sending it to a printer, email, website, etc.
However, the Snipping Tool is more flexible for capturing a Windows 11 screen and it generates high-quality images. The data you’ve worked hard to protect will remain accessible, legible, and clear when you save it. As a result, the different settings allow you to zoom in and get a clear image of what you’re looking for, reducing any visual clutter in the process. The time it takes to edit an image may be enormous. In most situations, this will include transferring your image into another program, highlighting the information you need using the right tools, and ensuring that it is in the proper format for the intended usage.
Hence, we would advise our readers to choose the Windows snipping tool, which is far more versatile and efficient if you’re looking for an easy-to-use and free screen capture tool. However, if you require this software for professional purposes, Greenshot is the one for you!
An Alternative to Greenshot and Snipping Tool
After comparison, you have some idea about Greenshot and Snipping Tool. If you feel that these two screenshot tools can’t meet your needs or are inconvenient to use, then we highly recommend Gemoo Snap to you.
As a free and lightweight app for taking quick screenshots, Gemoo Snap can provide you with a variety of screenshot needs quick screenshot, screenshot, and feedback, screenshot immediately beautify the image, pin screenshot top, screenshot upload to the cloud, etc. You can easily take full-screen or specific-area scrolling screenshots for the Website and stop at any point you need.
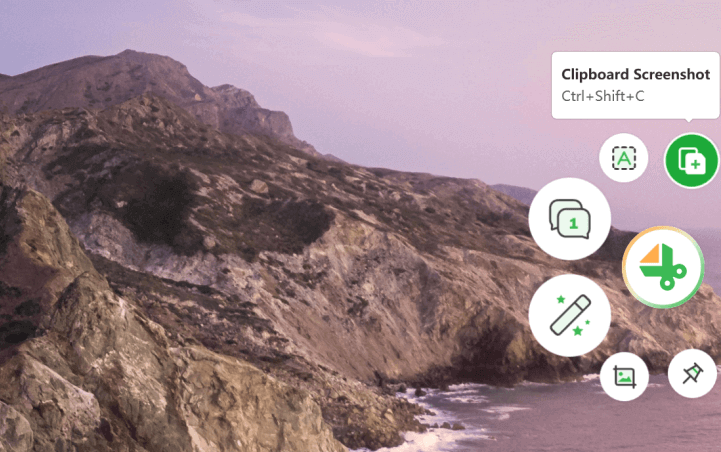
Gemoo Snap Overview
Gemoo Snap Features:
- With Gemoo Snap, you just need to take a screenshot, annotate images with texts, lines, or shapes, and hide sensitive information with mosaics.
- Beautify your captures easily by adding backgrounds, rounding corners, and drawing shapes.
- Help you extract uncopyable texts from images, videos, PDFs, websites, etc. Capture, copy, and paste. Just that easy.
- Extract uncopyable texts from images, videos, PDFs, websites, etc. Capture and copy. Just that easy.
- Take a full website screenshot or URL screenshot.
Frequently Asked Questions
1. What is the shortcut key of the Snipping Tool?
If you are using Windows 10 or 11, you may launch the built-in Snipping Tool by pressing the Windows key followed by Shift and S on your keyboard. When the tool becomes active, which will be shown by the screen becoming darker, you will see that there are five icons located at the very top of your display. Four of these icons allow you to choose the format for your screenshot.
2. How do I get to the Snipping Tool?
When you have a mouse and a keyboard, you may utilize the Snipping Tool by following the step below:
Way 1: Press the Windows logo key, followed by Shift, and then S.
Way 2: Click on Windows Search Bar and type ‘Windows Snipping Tool.’
3. Is Greenshot safe and legit?
It is a legit and completely safe software, but in case you want to check the software’s legitimacy; you can do so by following the instructions below:
Locating the executable will tell you a lot about the file’s legitimacy inside Windows and whether it’s a virus or not. For example, a process like Greenshot.exe should run from C: Program FilesGreenshotGreenshot.exe and not anywhere else.
Adding a location column to your Task Manager may be done by opening the Task Manager, going to View -> Select Columns, and selecting “Image Path Name.” Investigate this method further if you come across a suspect directory.
Final Words
In conclusion, we hope this article has provided you with all the information you need to make an educated choice on the most effective productivity tool for your specific requirements. You can complete the task in record time using the Snipping tool and the Greenshot feature.
Both are great choices for any user since they provide a broad variety of annotation and editing features that are simple to use. This makes them both fantastic selections.
In any case, we urge that you completely review the article to determine which one is most suited for your personal and professional needs. Using all of these applications is also free of charge, making it easy to discover which one is most suited for your needs. Ultimately, select the application that best meets your requirements!
