Any MacBook computer can produce high-quality screenshots, which can be further processed and distributed as desired. If you have a Mac that was released in 2018 or later, you can use the more sophisticated screenshot option to copy and paste a screenshot directly into a chat window and email it to a friend. If you have a Mac and are curious about how to paste a screenshot, you have already done some reading on the topic.
How to Copy and Paste a Screenshot on Mac?
You’re already familiar with computers running macOS and come with preinstalled software like browsers, media players, and other utilities to assist you complete tasks. Still, you’re probably also familiar with the constraints and restrictions such tools impose. When using Mac tools like the clipboard or the Previewing program, there’s no easier way to sreenshot the whole page and copy it elsewhere. Given this, we’ve compiled the easiest ways of useful Touch Bar and Keyboard Shortcuts to get you rolling.
Recommended Tools:
Table of Contents: hide
Is There a Snipping Tool on Mac?
How to Copy and Paste a Screenshot on Mac?
Way 1. Copy and Paste a Screenshot on Mac via Gemoo Snap
Way 2. Copy and Paste a Screenshot on Mac via Keyboard Shortcuts
Is There a Snipping Tool on Mac?
It’s possible that the Windows Snipping Tool won’t be immediately obvious to you if you’ve just switched from a Windows PC to an Apple iMac or Mac using Apple’s macOS. To counter this, Apple has included a snipping application in macOS that is functionally identical to the one found in Windows and has the same keyboard keys.
Mac users can take a snapshot and screencasts using this flexible and simple snipping tool. To use the Mac snipping tool, hold down the buttons Shift + Command + 5. You can take screenshots, record movies of your screen for use in demonstrations and educational courses, and even record a part of the screen. All these functions are accessible via this screen capture tool. Apple has also included various helpful features that allow you to personalize your workflow further, should the need arise.
Also Read: How to Fix Command Shift 4 not Working >
How to Copy and Paste a Screenshot on Mac?
All you need to capture screenshots is already installed on your Mac. There seem to be several straightforward methods available for taking screenshots of the whole screen, a selected screen region, or a single window.
However, how will you copy and paste that screenshot before sending it to someone? The issue is that these functions are concealed behind keyboard commands which, to put it mildly, aren’t exactly straightforward. Thus, follow the methods below to learn the easiest way possible.
| Solutions | Operating Systems | Quick Steps |
| Gemoo Snap | Windows/Mac/Web | Open Gemoo Snap > Tap Clipboard Screenshot > Copy to clipboard > Paste the screenshot |
| Mac Keyboard Shortcuts | Mac | Activate the screenshot function > Choose the area to capture > Click Command + V to paste and share the screenshot |
| Mac Touch Bar | Mac | Customize Control Strip under Settings > Use the space bar to catch a screenshot > Paste and share the screenshot |
Copy and Paste a Screenshot on Mac via Gemoo Snap
In some cases, keyboard shortcuts may not work well on Mac. As a professional screenshot toolkit, Gemoo Snap can help you to copy and paste a screenshot on your Mac or Windows machine with simple clicks. Using Gemoo Snap to capture your screen, you can enjoy various different features while capturing content on your computer interface. You can launch a quick screenshot, a website screenshot, annotate images, pin your screenshots, and even recognize words on the screenshots. The captured screenshot can be immediately uploaded to and saved in the cloud, and you choose to share your output by copying and pasting the screenshot or via a simple link.
Free install Gemoo Snap on your Mac computer and take the following steps to see how to copy and paste a screenshot on Mac with the help of Gemoo Snap.
Step 1. Launch Gemoo Snap on your computer and sign in to it based on the on-screen instructions. Click on the Clipboard Screenshot mode and capture the specific area on your screen.

Gemoo Snap Interface
Step 2. After taking the screenshot, you can add text to the screenshot and beautify it via the right toolbar. Then please choose the Copy to Clipboard option to copy the screenshot.

Copy and Paste a Screenshot on Mac via Gemoo Snap
Afterwards, you can paste the screenshot so as to share your output with others.
Copy and Paste a Screenshot on Mac via Keyboard Shortcuts
On a Mac, you can quickly and easily copy any screenshot to the clipboard using a simple keyboard shortcut technique. After that, you can paste it anyplace on your Apple device and in iMessage and some other programs from third-party developers.
The following is the best-explained method you will find on the internet:
Step 1: Keep the Control key pressed while you take the snapshot of your screen.
Step 2: To take a snapshot of a portion of the display on your Mac, you must first activate the screenshot function by pressing the Command key, followed by Shift, and then the number 4.
Step 3: The next step is to choose the area of the screen you wish to record while simultaneously depressing and holding the Cntl key.
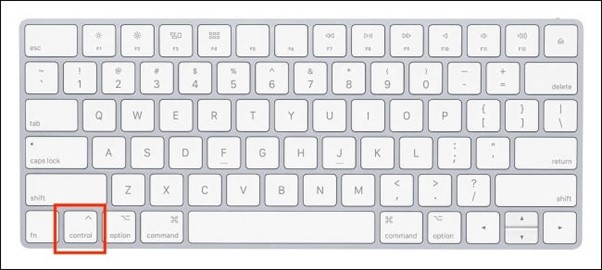
Press and Hold Control Key
Step 4: The screenshot you took has been copied to your clipboard. It is possible to send it to another user using Messages or any other chat or file-sharing program installed on your Mac.
Step 5: You can paste an image into the message box by selecting a discussion and then using the hotkey for “Command + V.” To submit the screenshot, press the Enter key on your keyboard.
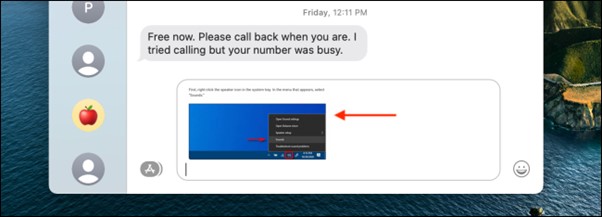
Click Command and V
Step 6: You can also launch Preview and make further edits to the snapshot there. Launch the Preview application and choose “File” from the menu bar’s list of options.
Step 7: Select “New From Clipboard” from the list of options. You also have the option of using the Cmd+N hotkey as an option. The screenshot should appear in a new tab labeled “Preview.”
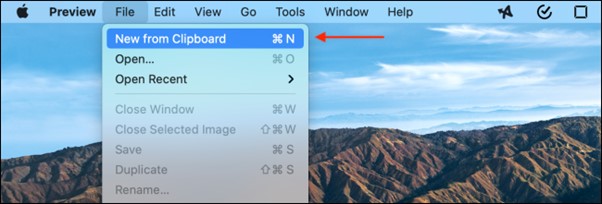
New From Clipboard
Further Reading: How Fix Mac Preview Not Working >
Copy and Paste a Screenshot on Mac via Touch Bar
You don’t need to memorize keyboard shortcuts to capture screengrabs if you are using a more recent model of the MacBook Pro, which comes equipped with a Touch Bar. Alternatively, you can take a screenshot of any object with a few clicks by adding a camera button to your Touch Bar and then saving the image.
Step 1: To begin, go to your settings for the Keyboard and choose the “Customize Control Strip” option from the drop-down menu at the bottom of the screen.
Note: This will display all the choices available on your Touch Bar.
Step 2: You can always access a method to record something on your display with just one touch by clicking and dragging the camera icon to your Touch Bar, then saving the modifications when you’ve done so.
Touch Bar on Mac
Step 3: You can copy the picture or save it to a folder from the Touch Bar settings.
Step 4: The moment you hit the camera button on your Touch Bar, your pointer transforms into dots, allowing you to take a snapshot of any portion of your display by selecting it with the crosshairs.
Step 5: To save a screenshot of the window, use the space bar on your keyboard and select the screen you want to capture.
Step 6: Alternately, you can copy what you see on the Touch Bar to your clipboard to paste it into an application by hitting Control, Shift, and Command 6.
FAQs About Copying and Pasting a Screenshot on Mac
In this part, we’ll answer several frequently asked questions about copying and pasting a screenshot on Mac.
Can I edit a screenshot before pasting it?
Yes, you can edit a screenshot before pasting it. After taking the screenshot, it will appear as a thumbnail in the bottom right corner of your screen. Click on the thumbnail to open it in the Preview app, where you can crop, resize, annotate, and make other edits to the screenshot. Once you’re done editing, save the screenshot and then copy and paste it into the application where you want to use it.
Can I save a screenshot as a file instead of copying and pasting it?
Yes, you can save a screenshot as a file instead of copying and pasting it. After taking the screenshot, it will appear as a thumbnail in the bottom right corner of your screen. Click on the thumbnail to open it in the Preview app, where you can make any necessary edits. Then, go to File > Save or File > Export to save the screenshot as a file on your computer.
Where does the screenshot save on a Mac?
Your screenshots will be saved to your desktop using the following naming convention by default: “Screen Shot [date] at [time].png.” If you are using macOS Mojave or a newer version, the Options section of the Screenshot program will allow you to alter the usual place that pictures are stored. You can also drag the image to a different document or directory.
Why is my screenshot not pasting on Mac?
There could be a few reasons for this. Your Mac will not load some applications when it starts up when you choose the Safe Mode option. This includes login stuff, network extensions that macOS do not need, and typefaces not loaded by macOS. Secondly, if the Universal Clipboard option is disabled in Settings, it will not be available in all the Mac apps to paste things from. Therefore, these could be the major reasons you’re unable to paste a screenshot.
Final Thought
As shown above, there are a couple of ways that you can use to copy and paste a screenshot on Mac. Simply press Command, Control, and Shift-4, and a section of the screen will be copied to the clipboard. You will see a crosshair pointer; you can click and drag the mouse to pick the area you want to take a screenshot of.
From there, press the save clipboard option. Alternatively, you can use the Touch Bar tool to make things even easier. All in all, we hope you’ve enjoyed your stay here. Try out these two methods and let us know in the comments below!