How to Screenshot a Portion of the Screen on Mac and Windows

All personal computers based on Windows or MacOS have built-in screenshot functions that can be called upon whenever you want to save the content of your screen. Screenshot tools are very simple and there is no need to download or configure any additional software, which is why a majority of users never serious;y think about getting any other screenshot app.
Depending on the version of your OS, built-in tools could also be able to capturing only the selected portion of the screen, such as capturing a long screenshot. How exactly to accomplish this task depends on the tool you are using and the type of content you want to capture. If you can’t get the job done with native applications, you always have the option of installing a third-party screen recorder app that offers more possibilities. Since many such apps have free versions, there is no risk in trying them out and checking whether they meet your expectations in terms of advanced features.

How to Screenshot a Portion of the Screen
This article will present different ways to capture a selected area of the computer screen for Windows as well as Mac users. Since the idea is to educate the readers who don’t have a lot of experience with tasks of this nature, the focus will be on making the screenshot – the possibilities for its annotation and improvement are a separate topic that is best explained elsewhere.
Also Read: How to Screenshot on Microsoft Edge >
Table of Contents: hide
How to Select Screenshot on Windows
1. Select Screenshot by Using Hotkeys
2. How to Select Screenshot on Windows with Snipping Tool
3. Use an App to Screenshot Selected Area on Windows
How to Select Screenshot Area on Mac
How to Select Screenshot on Windows
Snapping content from your screen in Windows is very easy, and you can precisely control what you are capturing. Selecting the window or area of the screen that should be saved is a basic feature that almost every screenshot app has. The exact procedure depends on the type of tool you are using, but this action is so basic that practically every user can easily complete it. In this review we will cover several possibilities and explain how to screenshot selected area on Windows with each of them.
Select Screenshot by Using Hotkeys
Every Windows computer has a Print Screen button on the keyboard, which is reserved for instantly taking a current screenshot and saving it to clipboard. The image can later be pasted into any Windows app and processed or changed in any way the user sees fit. Unfortunately, this function always snaps a full screen screenshot and it doesn’t offer any customization or cropping options. Thus, it won’t be possible to accomplish the intended action of taking a snip of only one part of the screen if you are only using pre-set hotkeys in Windows.
However, if your machine is running Windows 10 there is another combination of keys that could produce a better result. If you simultaneously press Windows key, Shift and S, the screen will change color and you will be asked to drag and drop the boundaries of the intended screenshot. This way, you can easily define the portion of the screen that you want to appear in the image without having to run any app. Once you have done it, everything within the lines will be instantly captured and you will be notified that your new snip is copied to clipboard, from where you can simply paste it into the application of your choice. This is probably the quickest way to screenshot a portion of the screen.
How to Select Screenshot on Windows with Snipping Tool
Using Snipping Tool is probably a better idea if you would like to capture a limited area of your screen, as this built-in tool has this capacity. This function is present on all currently used versions of Windows, although on Windows 10 and later it’s called Snip & Sketch and has some additional functions. Snipping Tool provides the user with some options to choose what will be captured, including the area of the screen. While its functionalities are still pretty simple, users can still control the screenshot much better compared to the simple print screen option.
If you don’t know how to select screenshot on Windows using the Snipping Tool, just follow this simple succession of actions and you will have the desired content captured and saved.
Step 1. Click on the Start button and type Snipping Tool in the search field
Step 2. Find the Snipping Tool application in the search results and click to open it
Step 3. Enter the Mode menu, then select Rectangular snip option from the drop-down menu
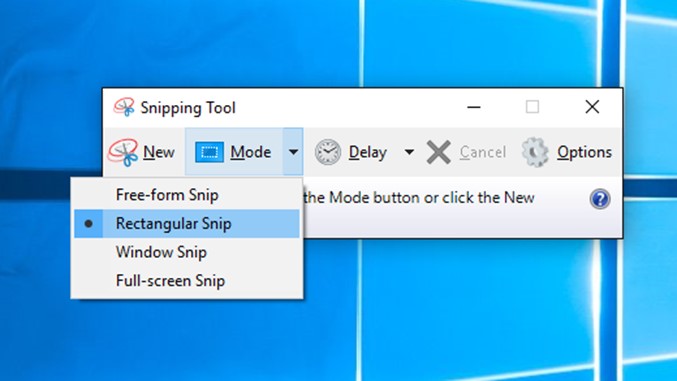
Choose Mode in Snipping Tool
Step 4. Use your mouse to draw a rectangle around the area of the screen you want to capture. When you release the mouse button, the screenshot will be snapped.
Step 5. Click on the Save snip button to save the image to any folder on your computer
Use an App to Screenshot Selected Area on Windows
It’s fair to say that built-in tools in Windows provide pretty basic screenshot functionality. If you would like to expand your range of capturing and editing options, you will need to install an external application designed specifically for this purpose. There are numerous screenshot apps and screen recorders that would serve you well in this role, so users should compare their features, usability, pricing, and other factors before choosing the best one.
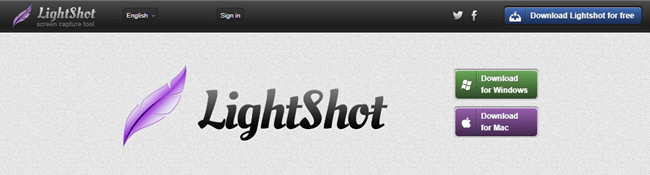
Snipping Tool for Mac and Windows -Lightshot
Lightshot is a simple app that can serve as a designated screenshot tool without overwhelming you with a huge number of features you don’t really need. This software can be downloaded for free and requires a minimal amount of resources to run normally, so it can be expected to work well even on older computers. The main commands are very easy to find in the interface, so beginners can achieve spectacular results without having to spend a lot of time becoming familiar with the app.
In case you are wondering how to screenshot selected area on Windows with Lightshot, that won’t be a problem at all. Here is what you need to do to quickly accomplish this task:
Step 1. Install and open Lightshot on your computer
Step 2. Use your mouse to select the area you want to be captured
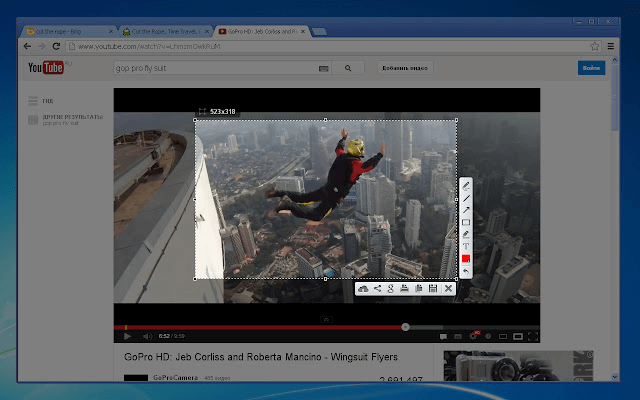
Select the Screenshot Area
Step 3. Use the toolbox option appearing under the selection to save or share your screenshot
How to Select Screenshot Area on Mac
If you own a Mac computer, you have a different set of tools on your disposal to complete the action discussed above. Most importantly, there is a built-in screenshot tool that is capable of capturing only the section of the screen selected by the user. This tool is very easy to use and can be activated with a combination of hotkeys, allowing the users to take screenshots while they are working in another app. In practice, that means you don’t have to worry about installation of new software or learning how to select screenshot on a Mac – this action is so intuitive you’ll get it right on your first try.
Here is the procedure you need to follow in order to capture portion of your screen on a Mac:
Step 1. Press Shift, Command, and 4 keys all at the same time
Step 2. Mark the selected area by dragging the crosshair symbol with your mouse.
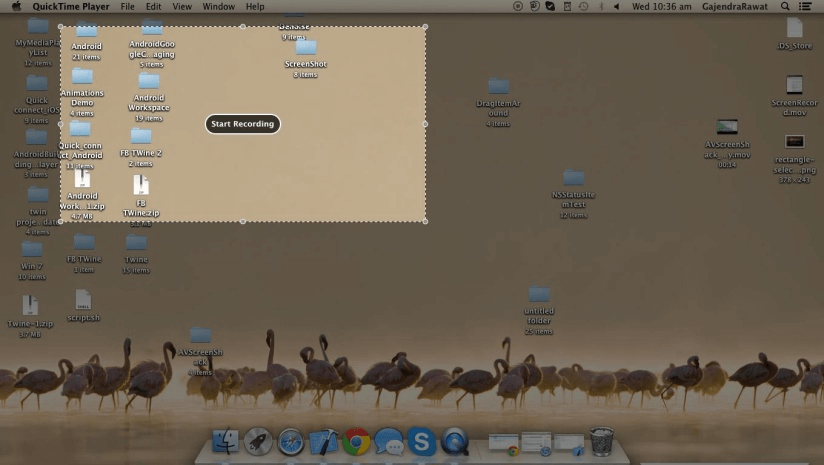
Select the Screenshot Area on Mac
Step 3. Release the mouse button to take the screenshot
Step 4. Click on the icon appearing underneath the image to save or edit your screenshot
As you can see, native function for screenshots in MacOS lets you select which area to include and doesn’t take more than a few keystrokes to execute. There are also numerous third-party apps for Mac that give you even broader range of features to work with, so you can download Greenshot, CloudApp, or Snagit if your needs go beyond merely capturing the selected area.
Also Read: Snipping Tool VS Snagit >
How to Select Screenshot Area with Gemoo Snap
If you’re unsatisfied with any of the built-in Windows methods, there are third-party screenshot tools worth considering, each with its own extra offerings. Gemoo Snap is a powerful screen capture tool that allows you to take/annotate/beatify/pin/share screenshots, as well as recognize text from it. With the floating-action-button design, you will get a unique experience. In addition, you can upload the images you need to the Cloud by manually selecting them. At the same time, Gemoo Snap supports both Windows and Macs system, so if you want to screenshot a portion of the screen on Mac and Windows, Gemoo Snap must be your best choice. If you want to screenshot the whole page, you can also choose this software.
Now, we will introduce you to how to screenshot selected area on Windows and Mac.
Step 1. Please download and install Gemoo Snap on your computer first. Launch Gemoo Snap on your computer. Then please enter your account and password to log in Gemoo Snap.
Step 2. Click the button Quick Screenshot on the main interface. And you can also tap the shortcut key PrintScreen to launch the function.
Step 3. click and drag your mouse to customize the desirable region, then release it.
Frame The Screen
Step 4. After you complete the screenshot, Gemoo Snap will upload it to Gemoo Cloud automatically.
Let’s download Gemoo Snap and try it free.
Frequently Asked Questions
How do I make a screenshot of a specific area in Windows 11?
If you are using a computer with Windows 11, you should have Snip & Sketch app pre-installed on it. Run this app and it will give you the option to capture a specific area or screenshot only one monitor. You can do this even faster if you use the Windows +Shift +S combination of keys to initiate a screenshot.
How do you copy and paste a screenshot on a Mac?
When you take a full screen or partial screenshot on a Mac computer, the image will automatically be copied to clipboard and kept there until you shut down the computer. Simply open the application into which you want to paste it (i.e. Word or Skype), choose the position, and press Command + V. The screenshot will instantly appear at the chosen location.
Is it possible to make a screenshot of the active window?
Many screenshot applications allow you to capture only the content of a single window, including the one that is currently active. To do this, you should select the appropriate mode from the menu. In some apps, you might be able to set up a delayed screenshot, giving you enough time to perform the desired action in the active window.
Is it possible to capture non-rectangular areas of the screen?
Windows Snnipping Tool and some other screenshot apps allow for the creation of irregularly shaped snips. Using the free-form snip tool, it’s possible to outline any part of the screen with your hand and capture the content found with this area.
Which OS has better screenshot tools, Windows or Mac?
It’s always tricky to compare functionalities across different platforms, especially ones that are as basic as taking a screenshot. In this case, both platforms have solid native tools that can capture any part of the screen, requiring only a few simple actions. Still, some observers would say that Windows might have a slight edge after the introduction of the Snip & Sketch feature.
Final Thoughts
If you didn’t know how to screenshot a specific area on Mac or Windows, this article demonstrated the best way to do it using the built-in function. You don’t need any skills to do that, as it’s literally enough to drag your mouse across the screen and mark the selected area. Alternatively, it’s possible to use one of many screenshot tools available on the internet that offer additional possibilities for editing and sharing of captured screenshots. Whichever tool you ultimately decide to use, it won’t take you too long to learn how to screenshot a portion of the screen while ignoring the rest.