Windows 11, the most recent iteration of Microsoft’s operating system for personal computers, has several improvements over its predecessors in terms of functionality. Widgets improved support for virtual desktops, and accelerated multitasking are some of the new features that have been included.
You can want the ability to record audio on Windows 11 for various online activities, such as gaming, freelancing, YouTube uploading, podcast recording, or digital working. But how exactly does one record sound in Windows 11? Does this new operating system provide users with any alternatives by default to work with? This tutorial will walk you through how to record audio on Windows in a step-by-step manner. Keep the sounds you enjoy now.
Also read: How to Make Mic Sound Better? >
Table of Contents:
Record Audio on Windows 11 with Gemoo Recorder
Record Audio on Windows 11 with Game Bar
Record Audio on Windows 11 with Gemoo Recorder
You can use the built-in tool or a third-party Windows 11 audio recorder to record audio on Windows 11. Both of these options are frequently adopted among Windows 11 users. Although Game Bar has brought Windows 10 and Windows 11 users some convenience, technically it has some compatibility problems as some games cannot be detected by it. Therefore, it is not suggested to be your first option when you seek to record gameplay on PC.
Therefore, if you want to avoid these limitations when recording audio on Windows 11, you can give Gemoo Recorder a try. As a professional screen recording software, it is workable in Mac, Window 11, 10, 8 and other low end PC and it offers you different recording modes to satisfy your specific needs. You can choose to record screen with audio or record audio without microphone, you can take Gemoo Recorder a try. This open-source software can also help you record music from YouTube and record calls on Google Voice.
To learn how to record audio on Windows 11, free try Gemoo Recorder now and take the following instructions.
Step 1. Launch the program and take the on-screen instructions to log in to the app. Choose the Audio Only mode to get started.
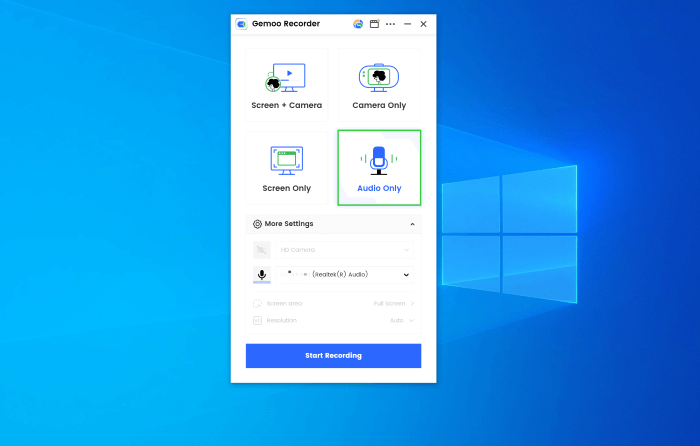
Select Audio Only Recording Mode
Step 2. Complete the settings and hit the Start Recording button to initiate the process. After 3 seconds, the recording will start.
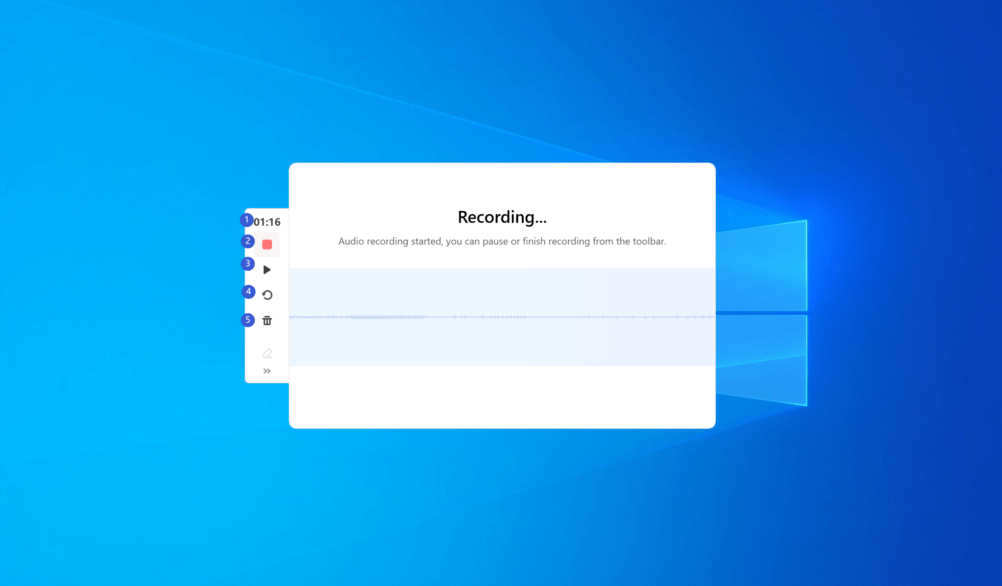
Record and Finish Recording Audio
Step 3. When you finish recording, hit the Red Stop button and the recording content will be uploaded automatically.
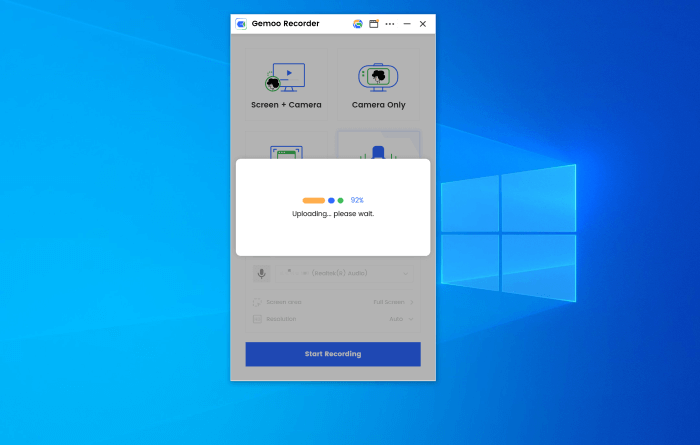
Finish Recording Audio
Record Audio on Windows 11 with Game Bar
On the other hand, you can capture audio using the Xbox Game Bar program as well. It is designed to record games on PCs, digital activities, and any voice certainly. Most importantly, Xbox Game Bar is the best free screen recorder for Windows. So you can launch it and record audio quickly and easily.
What’s more, this easy-to-use tool can customize the audio settings according to your tastes. After done, you can instantly access widgets for screen & audio recording, and share them with your teammates or Xbox friends in the community.
Here’s how to record Windows with Game Bar:
Step 1. Launch Game Bar Quickly
Press the Windows logo and the letter G to launch the Game Bar, or press the Xbox button directly.

Launch the Xbox Game Bar
Step 2. Enable Microphone Feature
Plug your microphone in and click the “Mic” button. Alternately, you can toggle the microphone’s status by pressing the Windows key plus Alt plus M.
Step 3. Start Recording
Click the circle icon to start recording, and click the square icon to stop recording. You can also start or stop the recording by pressing the Windows key plus Alt and R.
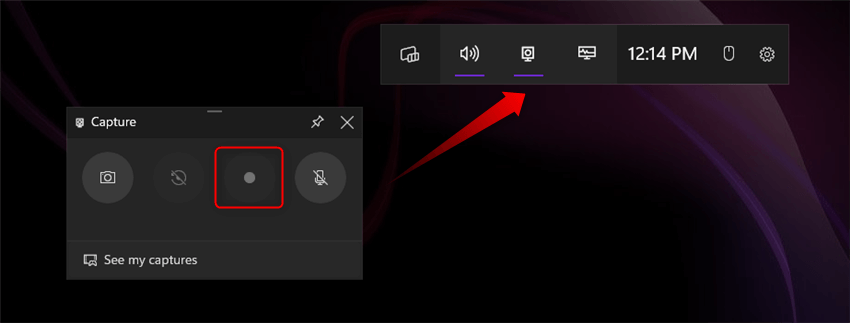
Start the Screen Recording
Step 4. See my Captures
Once you tap on stop recording, click See my captures to view voice and screen recording.
Note: You can change the settings to record audio, games, system, and other apps.
As you can see, Xbox Game Bar is a flexible recording tool that lets you record both the internal audio and your computer screen simultaneously, but can not record voice only. So, it applies to the users who wish to capture both audio and Windows screen.
Continue checking the below program for individuals who wish to record a ringtone or a song to utilize it as background music.
If no microphone is available for you now, you may want to know how to record audio on a PC without a microphone.
Why Is There No Voice Recorder in Windows 11?
Using a microphone attached to your computer, you can record your voice using the built-in Voice Recorder program in Windows 10. Microsoft will redesign Windows 11’s Sound Recorder program and give it a new name: Sound Recorder.
What the New Sound Recorder Has to Offer
Microsoft has now tested a redesigned version of Sound Recorder for Windows Insiders in the Dev channel. Windows 11’s improvements to the built-in Windows programs were summarized in a blog post by the company, which revealed the redesigned interface.
Playback and trimming settings are located on the right side of the Sound Recorder’s two-column layout, while a list of your recorded files is on the left.
In addition to the new functionality, it restores some of the older Sound Recorder functions removed from the program in Windows Vista and reduced to nearly nothing.
Once again, you can save or open files in various formats using the app’s waveform visualizer, which shows while recording and playback (including the default m4a, as well as mp3, WMA, FLAC, and WAV).
Audio playback speed can be adjusted from 0.25x to 4, and markers can be placed so you can skip between different sections of a huge audio recording.
If you are also using a Mac computer, you can read some tips to record internal audio on Mac.
Bonus Tip. How to Record a WAV File in Windows 10?
Windows Voice Recorder(previously called Sound Recorder) is created by Microsoft Corporation. It allows you to record a WAV file, including sounds, lectures, interviews, and other events. And, you can record, edit, or play them back.
It gives you the ability to record audio in various formats on your computer, including both the system audio and the microphone audio.
Here’s how to record with Voice Recorder:
Step 1. Once you get Voice Recorder from Microsoft Store, open it and click the Record button (a Mic icon). It will start recording as below.
Step 2. You can press the Square icon to stop recording, which will be saved in Documents > Sound recordings. And, you can trim, rename or share your recordings, etc.
Final Words
It is not too difficult to record an audio file on your computer if that is something you want to do. However, if you want the audio to be preserved in a certain format, you may need to use specialized tools.
We hope that by reading this post, you will better understand How to Record Audio on Windows. We are interested in hearing your thoughts on this topic to make it more helpful.

