Many of us use computers to capture audio for various reasons, including music creation, audiobooks, and YouTube videos. However, using an Apple Mac device to capture audio for some users can be a real pain when they don’t know how to do it. That is where our guide steps in with some of the best Mac audio recording methods that will come in handy.
These are the simplest and fastest methods for anybody to capture high-quality audio internet, record audio internally, and more in seconds. Take a look at these helpful techniques on How to Record Audio on Mac. Let’s get started!

How to Record Audio on Mac
Also read: How to Screen Record on a Mac without External Audio? >
Table of Contents: hide
Way 1. Record Internal Audio on Mac via Gemoo Recorder
Way 2. Record Internal Audio on Mac via Voice Memos
Way 3. Record Internal Audio on Mac via QuickTime
Way 4. Record Internal Audio on Mac via Easy Audio Recorder Lite
Way 5. Record Internal Audio on Mac via Headphones
Bonus Tip. How to Record Audio on Mac from Internet/Website?
If you’re having difficulty in record audio on Mac, take a look at the table provided below. It offers a variety of options, from recording top-notch audio to capturing basic snippets, so you’re bound to find something that suits your requirements.
| Methods | Best For | OS | Webcam recording |
| 1. Gemoo Recorder | 🥳Recording high-quality audio from PC, video calls, and gameplay |
Mac & Windows | ✔️ |
| 2. Voice Memos | 😜Recording sound from PC |
Mac & Windows | ❌ |
| 3. QuickTime | 🤡Needing to play and edit video and audio files on their Mac | MacOS & Windows | ✔️ |
| 4. Lite | 😻With limited computer resources and preferring simpler and more streamlined users | Mac & Windows | ✔️ |
| 5. Headphones | 🤩Enhaning audio experience and customizing headphone settings users | Windows, Mac, iOS, Android | ❌ |
Record Audio Using Gemoo Recorder
Recording internal audio on Mac can be easy as long as you use the right audio recording tool. Here, we highly recommend you give Gemoo Recorder a try. As a powerful audio recording software for Mac, it enables you to record internal audio only or record Mac screen with audio. More specifically, you can record internal audio coming from your Mac system video sound, and record the Microphone from your own voice. Compared with other built-in internal audio recording toolkits in Mac, Gemoo Recorder is expected to offer you better recording performance when it comes to audio recording quality and duration.
Besides, as Gemoo Recorder enjoys a website platform, it allows users to upload recorded audio and videos to the cloud. On one hand, not saving recorded content locally will cease the burden on local storage; on the other hand, it will save time and will be more convenient to share it with your friends and team members.
Advantages
- Supports recording from or inside of multiple sound sources.
- Without lag or chop, high-quality audio and video recording.
- Tools for rich video editing, including the ability to add GIFs, text and number effects, and more.
- Up to 4K resolution, watermark-free video.
- Multiple platforms, including Windows, Mac, Chrome, Firefox, etc., are supported.
Disadvantages
- Limited chrome extension.
- Can’t record audio and video together
Now, free try Gemoo Recorder on your Mac computer and take the following steps to record your favorite podcast and record a live stream on Mac with simple clicks.
Step 1. Open Gemoo Recorder and sign in to the app. Choose the Audio Only feature.
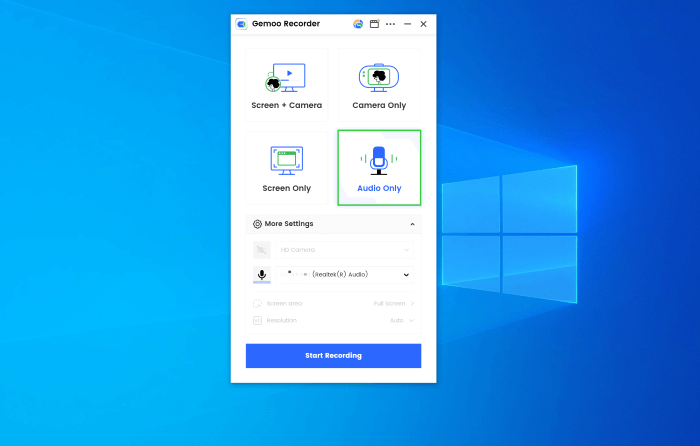
Select Audio Only Recording Mode
Step 2. Click on the Start Recording button to initiate the process after selecting the recording mode. There will be a 3-second countdown to get you prepared.
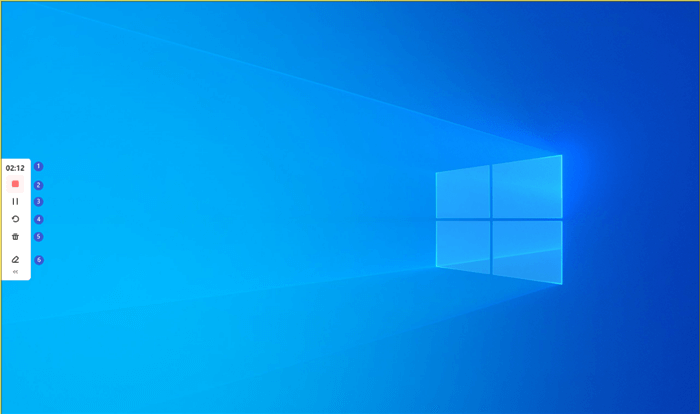
Start to Record the Screen
Step 3. Once the recording completes, you can hit the Red Stop button to finish your recording.
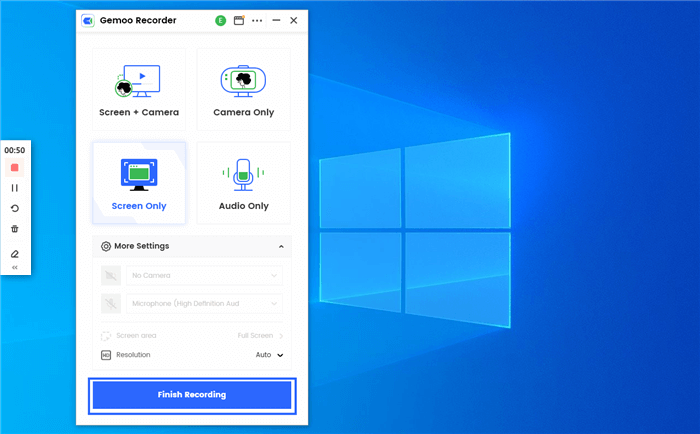
Finish Recording
Also Read: How to Fix Mac Microphone Not Working >
Record Audio via Voice Memos
You’re undoubtedly already acquainted with the voice memo app if you have an iPhone. Open the launch pad, which is the button with the rocket ship icon, on your Mac to access it.
Advantages
- Simple to use.
- Built into iOS as the default audio recorder, not necessary to download.
- Safe and definitely free of malware.
- There are no distracting ads on the interface while you’re recording.
Disadvantages
- The majority of users, occasionally run into bugs and glitches when playing recordings.
- The capability to convert audio to text is not supported.
- Not permit the recording of system sound using only the microphone.
Step 1: It’s possible to discover the “voice memos” app by searching for it in the top search box or browsing through the applications. The symbol will appear like the one seen. To launch the app, click on this icon.
Step 2: You’ll be presented with a basic, one-button interface when starting the voice memo app. Press this button to get started. The recording will begin right away, with no confirmation prompt.
You can press the pause button. To start again, just hit the “resume” button.
Record Phone Calls on iPhone
You can listen to what you’ve recorded so far while the recording is stopped by using the “play” button.
Step 3: Click “Done” to finish the recording. The recording file will be saved automatically. Please note that we now have two recordings on the left-hand side of the screen.
Record Audio with QuickTime?
You can record audio and video using this Mac software utility. Although QuickTime Player is more often associated with its video-playing and streaming capabilities, it has more to offer. In actuality, it’s an audio recorder for your Mac.
The only downside is that it doesn’t have a built-in audio recording. You’ll need a third-party app like Soundflower to do this. If you want better sound quality in your recordings, you can utilize an external microphone or the built-in microphone while recording audio.
Advantages
- Free to use.
- Built in with the Mac, no need to download.
- Beginner-friendly
Disadvantages
- Internal audio capture requires additional software.
- Das no editing capabilities
- Cannot simultaneously record audio and video
Learn how to use QuickTime Player to record internal audio on your Mac by following the instructions below.
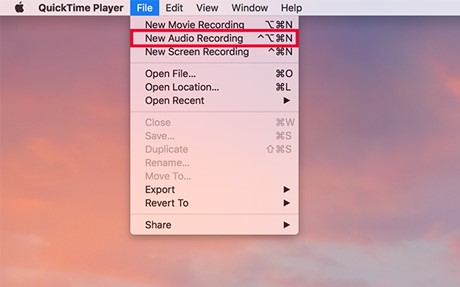
Step 1: Select File > New Audio Recording from the QuickTime Player app’s menu.
Step 2: Select the microphone and the amount of recording quality in the Options pop-up. The volume can be adjusted by dragging the volume slider.
Step 3: Record by pressing the Record button or using the Touch Bar’s functionality (if you have a recent MacBook Pro.)
Quicktime Player
Step 4: Option-click Record and then Option-click Record again to resume.
Step 5: To put everything to rest, click the Stop button.
Step 6: You can edit your audio clip by going to Edit > Trim.
Step 7: Choose a location to store your file once you’ve given it a name and saved it.
If you are working remotely, which is one of the types of Hybrid working, check this full guide to get to know what’s the future of work.
Record Audio with Easy Audio Recorder Lite
Easy Audio Recorder Lite is a system audio recording application for Mac devices that can be used to capture system sounds. It makes no difference what kind of audio you want to record on your Mac since this program offers all the tools you could need for any recording.
Advantages
- Noise removal.
- Comes with a built-in frequency analysis window.
- A built-in amplitude editor for Mac.
- Available in various languages.
Disadvantages
- Requires additional software that has to be downloaded.
- Cannot be used to record videos.
If you wish to learn how to record audio on your Mac using this program, the instructions in the next section should be helpful.
Step 1: You can access the settings menu by selecting the cog symbol at the top of the screen. From the newly opened menu, choose the “Input Device” drop-down menu and then select the device generated by the Soundflower app from the list that appears.
On the same page where you selected an audio source, you can decide the file format for your audio recording.
Step 2: Select a file format for your internal audio recordings by selecting the option next to “Format” and clicking “Save.” Once you’ve finished, click “Save” at the bottom to save your changes.
Step 3: To begin recording, press the red record button on your computer’s keyboard. You can tap the stop button to bring your recording to a close.
Step 4: You can see and listen to all of the recordings you have made with this app by going to the settings menu and selecting “Go to files location.”
Record Audio via Headphones
According to this thread, recording audio on Mac can be initiated by turning on the “System Audio.” However, if the recording doesn’t start, you prefer to try it with simple plug-and-play headphones.
Nonetheless, for wireless headphone users, there is a problem with Bluetooth audio, and this (sometimes) is one of the indicators of why you cannot record audio on your Mac computer. While there has been some progress in developing a cure for this, it will take much experimenting and testing to get it right.
Regrettably, this implies that there will not be a timely solution to this issue. The best option is to wear headphones that come with wire. Some offer a choice of adding a cable, allowing you to continue using the same headphones you are attempting to use with this device. However, you will be forced to use a new set of headphones if they do not function until the problem is rectified.
If you do not need microphone audio, you can check the steps to record audio without a microphone.
Bonus Tip. Record Audio on Mac from the Internet/Website
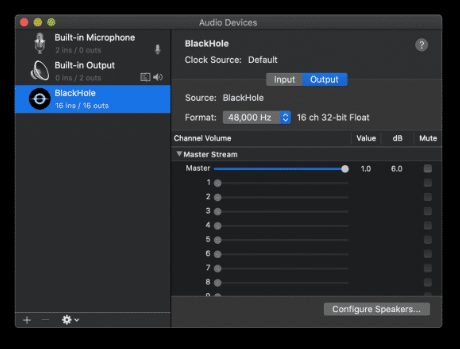
The ability to capture crisp and clear audio from internet pages on a Mac is made possible by various apps. However, before using any of these programs, users must first install a virtual audio driver like the BlackHole.
This allows you to capture audio from many browsers and other applications on your MacBook by forming a virtual connection. After setting up Blackhole you can simply use QuickTime to record audio from the browser.
Advantages
- Free to use.
- Intuitive and simple interface.
- Offers 16 channels of audio output and input.
- Can additionally be configured to accommodate 256 channels.
Disadvantages
- Records all the audio on a single file.
The procedure for installing and configuring this driver is as follows:
Step 1: Visit the BlackHole website to register your device and download and install the software.
Note: Complete the form to get the Download BlackHole Audio driver for Mac in your email inbox after submitting the information. And for your Apple Silicon Mac with Intel or M1 processor, download this file.
Step 2: Installing BlackHole is simple. Start the BlackHole Audio Driver setup program.
BlackHole Audio Driver
Step 3: After that, restart your MacBook.
Step 4: To access the Apple logo in the top left corner of the screen, go to the menu bar and choose it.
Step 5: Select the option System Preferences from the drop-down menu.
Step 6: Then, choose the sound choice from the drop-down menu.
Step 7: After that, choose BlackHole from the choices accessible on the Output tab. After that, click OK.
Step 8: After clicking on the input tab, pick BlackHole to finish the procedure.
It is possible to have peace of mind that the external noise will be collected when you set up Blackhole for your MacBook since it is a virtual driver that only captures the input from the desktop.
If you are using a Windows PC, you can check the steps to record audio on Windows, or the ways to record audio on a PC without a microphone.
FAQ about Record Audio on Mac
1. Does Mac have a built-in internal audio recorder?
Mac computers come with a built-in audio recorder called QuickTime Player. You can use this application to record audio from your computer’s internal microphone or an external microphone. To access QuickTime Player, simply search for it in your Applications folder or use Spotlight search. Once you open the application, select “New Audio Recording” from the “File” menu and start recording.
2. How do I record internal and external audio on Mac?
To record internal and external audio on a Mac, you can use the built-in QuickTime Player app. Here are the steps:
1. Open QuickTime Player from the Applications folder or Spotlight search.
2. Click on “File” in the menu bar and select “New Audio Recording.”
3. Click on the arrow next to the red record button and select your input source. If you want to record both internal and external audio, select “Built-in Microphone” and “Built-in Input” or “External Microphone” if you have one connected.
4. Adjust the input volume by dragging the slider to the right or left.
5. Click on the red record button to start recording.
6. When you’re done, click on the stop button and save the recording.
Note: If you want to record system audio (e.g., sound from a YouTube video), you need to install a third-party app like Gemoo Recorder or Loopback.
Final Words
Your Mac can be used as a convenient sound recording equipment for various tasks, like dictating a message to a coworker about a task, jotting down a shopping list, and capturing a meeting in the conference room, among others. We hope that the above audio recording methods have helped effectively find a solution. Now you surely know How to Record Audio on Mac.