Preview on the Mac is the ultimate destination for effortlessly viewing images and documents while conveniently addressing all our editing needs within a unified platform. Upon a double-click of a PDF, JPG, or PNG file, it promptly launches in Preview without any need for configuration adjustments. Gradually evolving from a mere file viewer, it now develops like an annotation tool and image editing tool.
Mac Preview Not Working
These fundamental functions often suffice for various file-related tasks. Consequently, encountering malfunctions in Preview can lead to a sense of disorientation. This article will explore the steps to fix the Mac preview not working issue!
Table of Contents: hide
What Is the Purpose of Preview on Mac?
What Is the Purpose of Preview on Mac?
The Preview application on Mac functions as a versatile utility for viewing, editing, and organizing a wide range of digital documents and media formats. Its main objective is to offer a user-friendly method to access and review files like PDFs, images, and certain video formats without requiring supplementary software.
Preview allows adding annotations to PDFs, performing image rotations or cropping, and basic document modifications. It also offers features like digital signatures, highlighting, and markup tools for collaboration and document review. Beyond its core viewing capabilities, Preview streamlines everyday tasks involving digital documents, making it a valuable utility for Mac users.
Why Is My Mac Preview Spacebar Not Working?
If the spacebar functionality isn’t working in Mac Preview, several potential causes could be at play. Here are some possible reasons:
- Outdated Software: Using an outdated version of macOS or Preview might lead to compatibility issues that affect the functionality of certain keys.
- Conflicting Keyboard Shortcuts: Conflicting keyboard shortcuts assigned within Preview or system-wide settings might interfere with the spacebar’s functionality.
- User Profile Issues: Corrupted user profiles or settings might cause certain keys, like the spacebar, not to work as expected within specific applications.
- Hardware Issues: In rare cases, hardware problems with the keyboard could lead to specific keys, like the spacebar, not working consistently.
- Third-party Applications: Certain third-party applications or utilities that modify system behavior might inadvertently affect keys’ functionality within other applications like Preview.
- System Updates: Changes introduced through macOS updates could affect the interaction between the spacebar and Preview.
- Accessibility Settings: Specific accessibility settings might alter keyboard behavior and affect how certain keys function.
How to Fix Mac Preview Not Working?
Let’s explore some ways to fix this issue:
Force Quit Preview
Whether Preview is unresponsive or declining to open an image file, the initial action to consider is closing the application and then relaunching it. This simple yet often effective step allows Preview to reset itself, potentially resolving any temporary glitches. By terminating the current session and initiating a fresh one, you allow Preview to reallocate system resources and clear any cached data that might be causing the issue.
After the relaunch, the application’s processes and memory allocation should be clean, providing a higher likelihood of successful image file opening and smoother performance on your Mac. Below are the steps to follow:
Step 1: With the Preview app running in the background, locate and click on the Apple logo in your screen’s upper-left corner.
Step 2: Choose the “Force Quit” option from the emerging menu.
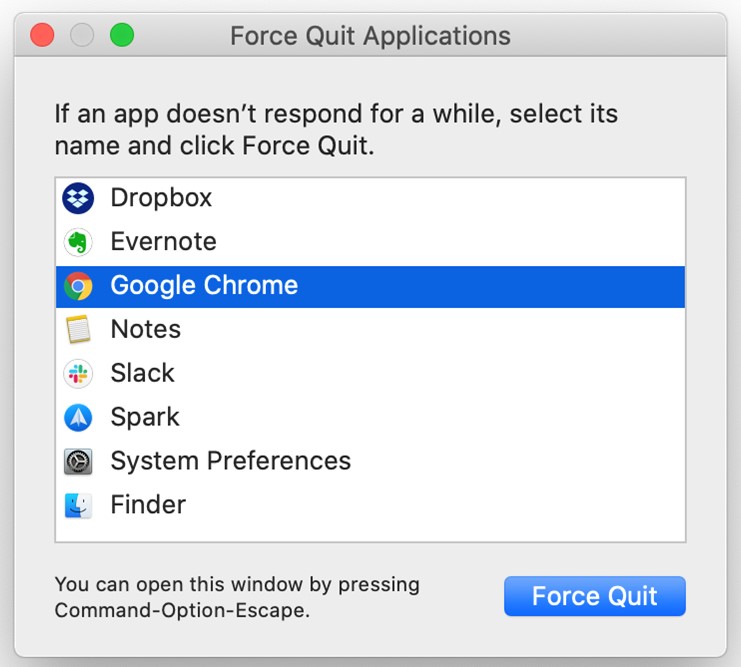
Choose Force Quit
Step 3: Identify and choose the Preview app from the list, then click “Force Quit.”
Step 4: This action will terminate the application. Proceed to reopen the Preview app and assess if it is functioning correctly.
Restart Mac
Performing a swift restart can effectively address various issues. This action resolves issues related to applications and also helps in refreshing the RAM and removing temporary files.
If a regular restart from the Apple menu doesn’t fix a recurring issue on your Mac, trying something more is a good idea. Please turn off your Mac, wait for a while, and then turn it on again. It can help make your computer work better and smoothly again. Check out the steps below:
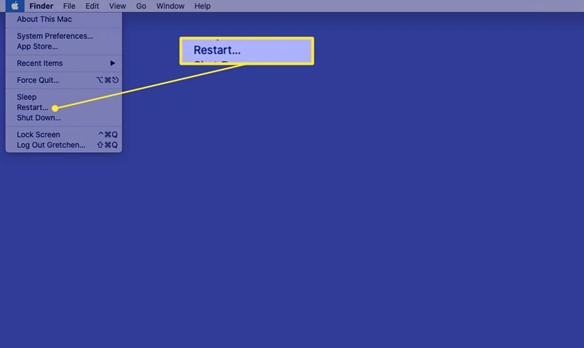
Restart Mac
Step 1: Click the Apple logo in the upper-left corner of your screen.
Step 2: Opt for the “Restart” option and patiently await your Mac to reboot.
Update Your macOS Version
Operating your Mac on an outdated macOS version might lead to unexpected app crashes, extended response times, and other unwanted issues. To ensure a smooth experience, keeping your macOS up to date is essential. Regular updates provide new features and enhance system stability and security.
Updating ensures you’re utilizing Apple’s latest optimizations and improvements, guaranteeing a more efficient and trouble-free computing experience while staying protected against potential vulnerabilities. To get started, follow these instructions:
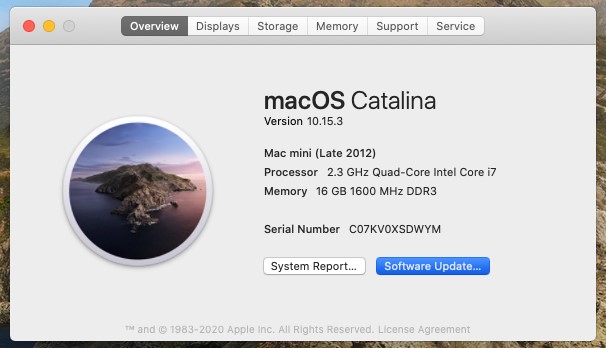
Step 1: Select the Apple logo at the upper-left corner of your screen.
Step 2: A menu will drop; opt for “About This Mac.”
Step 3: A small window will emerge, showcasing details about your Mac. Click “Software Update.”
Click Software Update
Step 4: Allow your Mac a brief moment to explore available updates. Should a new update be present, it will be showcased on your screen.
Step 5: Engage the “Update Now” button to kickstart the update process. Exercise patience while the update is underway. Once the update is complete and your Mac has restarted, you can assess whether the problem persists using the Preview application.
Delete Plist File
The Preview application on Mac utilizes a .plist file—a property list file—for storing configuration details. Occasionally, troubleshooting hiccups in the application’s functionality can involve removing the Preview .plist file. Such action becomes necessary when the file becomes corrupted or hosts erroneous information, resulting in operational glitches for Preview.
By erasing the existing .plist file, the application promptly generates a fresh counterpart endowed with default configurations. This renewal aids in rectifying prevailing configuration-related dilemmas, thus revitalizing Preview’s operational integrity. Explore the steps below to apply this fix:
Step 1: Access a fresh Finder window.
Step 2: Head to the upper section of your screen and click on the “Go” selection in the menu bar.
Step 3: Head over to the “Library” and then “Preferences” folder.
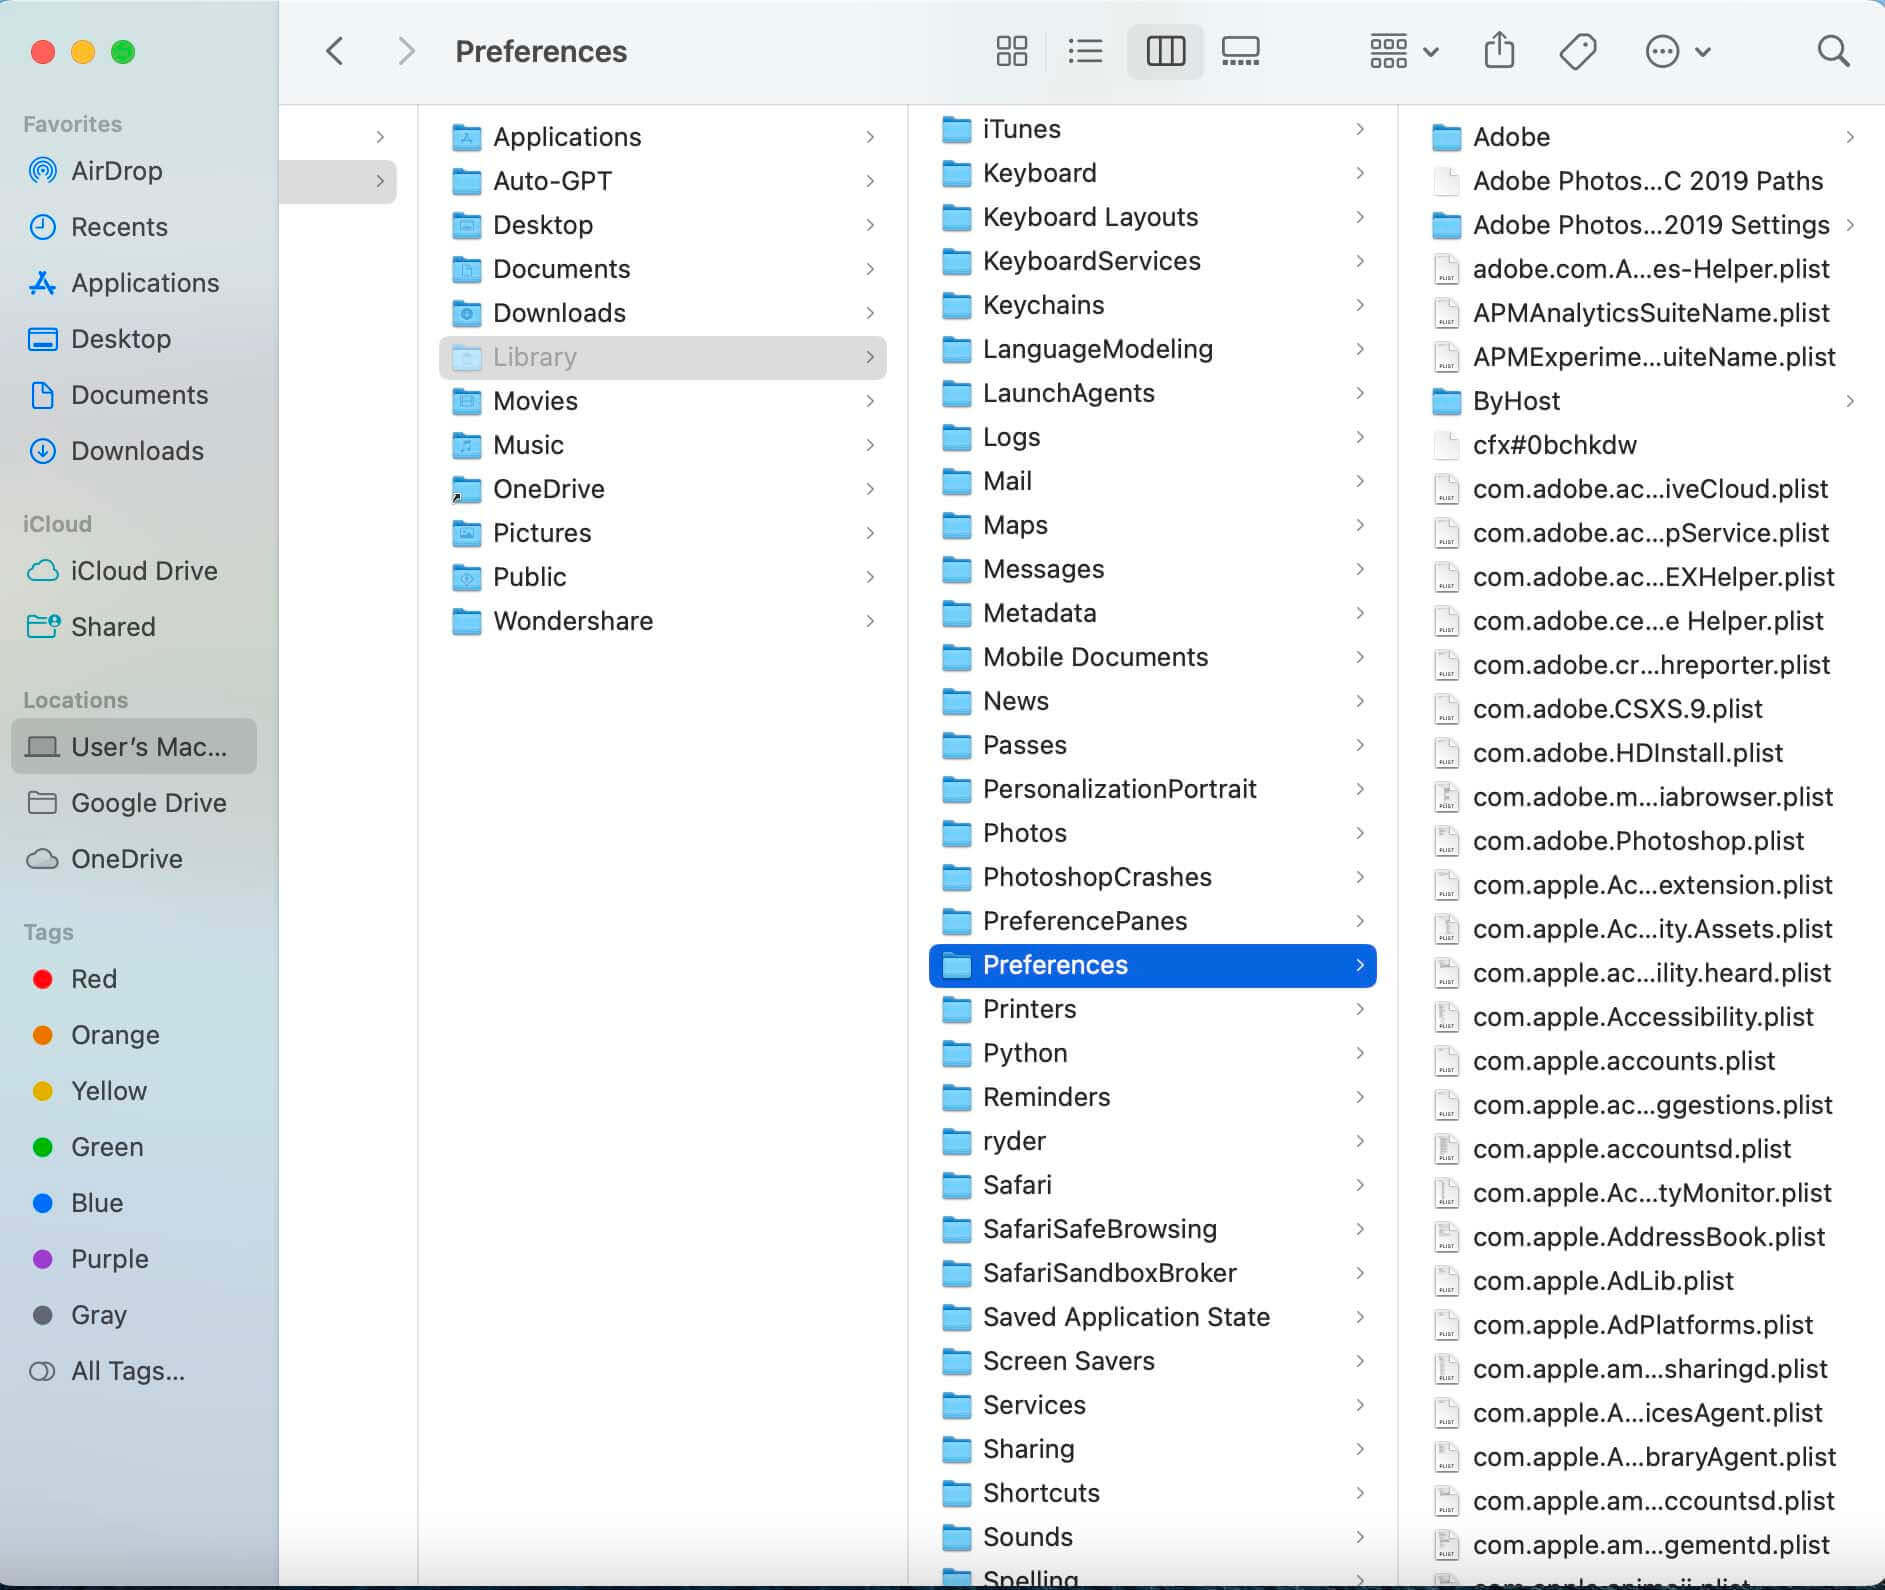
Open Preferences Library
Step 4: Locate and double-click the Preferences folder from the list.
Step 5: Identify the ‘com.apple.Preview.plist’ file within the list of files and delete it.
Step 6: Finally, open the Preview app, and your Mac will generate a fresh PLIST file for the app.
Check A Different User Account
If Preview continues to experience difficulties in opening, your macOS user account may be at fault. Experiment by logging into an alternative user account to assess Preview’s performance. If lacking additional user accounts, establish a fresh macOS user account. Once testing is complete, the user account can be removed from your Mac.
If Preview operates without issues in an alternate user account, it suggests a problem with your original user account. To enhance your Preview experience, consider transferring your data to the new account and making it your primary solution. This approach guarantees a smoother experience when using Preview.
Step 1: Open the Apple menu, choose “System Settings,” and select “Users & Groups.”
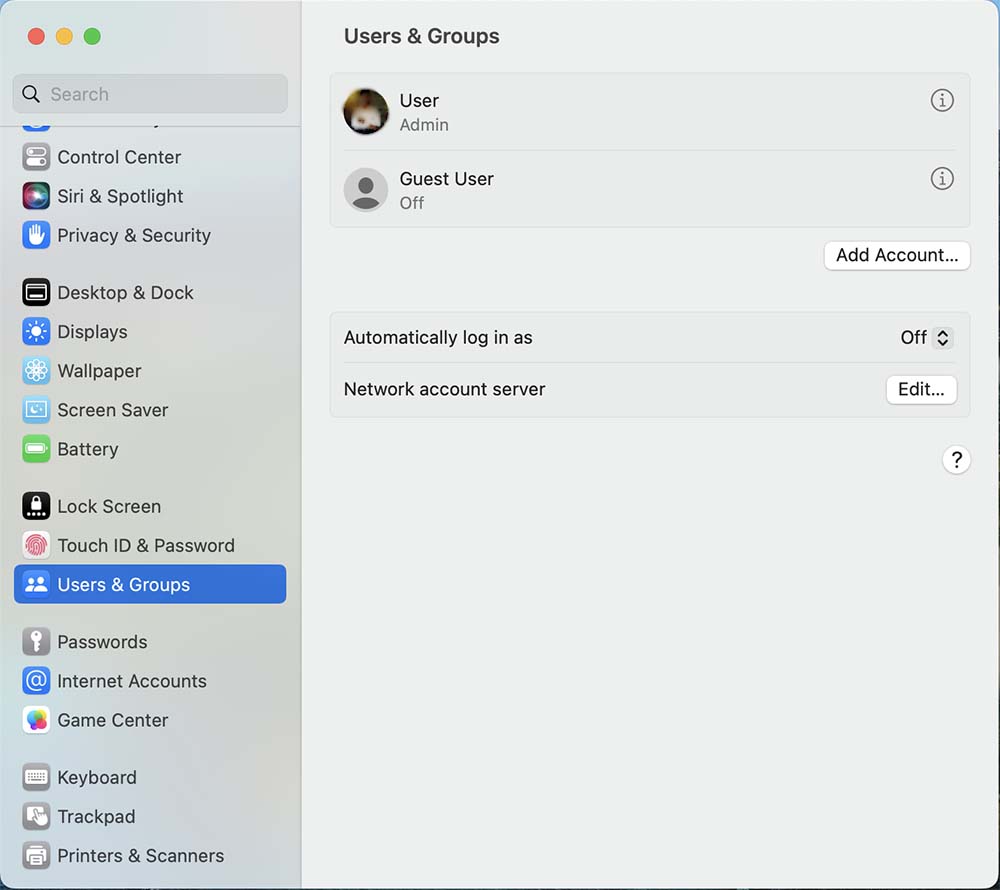
Select Users and Groups
Step 2: Click “Add Account,” and enter your password.
Step 3: Pick the user type from the menu.
Step 4: Enter full name and account name (optional).
Step 5: Set and confirm the password, and add a hint.
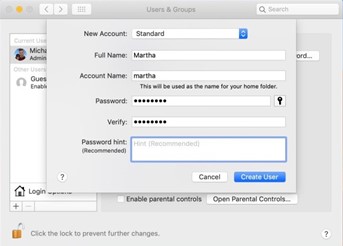
Click Create User
Step 6: Click “Create User.”
Reinstall macOS
If all previous attempts to resolve issues with Preview on your Mac have been unsuccessful, the final troubleshooting recourse is to erase your Mac and perform a fresh installation. This step is considered drastic and should only be pursued if all other options have been exhausted and Preview continues to malfunction.
Before taking any action, creating a backup of your Mac’s data onto an external drive is imperative. Reinstalling macOS necessitates a complete erasure of your system, making data preservation essential. Check the steps below:
Step 1: Power off your Mac.
Step 2: Turn on your Mac and simultaneously hold down the Command-R keys to initiate Recovery mode.
Step 3: Select the “Reinstall macOS” option once the macOS Utilities window appears.
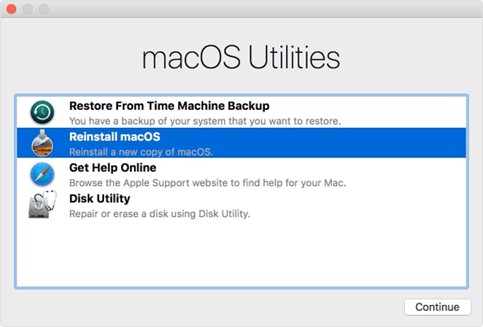
Select Reinstall macOS
Step 4: Adhere to the prompts displayed on your screen to continue with the reinstallation procedure.
Step 5: If you had employed Time Machine to back up your data, select the choice to recover your data from your Time Machine backup when the prompt arises.
Final Thought
In conclusion, if you’re facing issues with the Preview app on your Mac, consider trying out these simple solutions. These methods could potentially resolve the “Mac Preview not working” problem. Whether it’s addressing errors or accessibility problems, these fixes offer a path towards restoring seamless usage of the app. We encourage you to experiment with these solutions and share your outcomes in the comments section, enabling a collaborative space for troubleshooting and knowledge sharing.