How to Copy Screenshots to the Clipboard in macOS

In today’s interconnected world, smartphones and laptops have become essential gadgets for connecting people across the globe. Even teachers have adapted to the technological advancements by delivering lectures through video calls on their Macbooks and using screen sharing to showcase creative slides. It is common for individuals to feel the urge to capture a screenshot of their screen to save the displayed information to their clipboard for future use. However, there might be a lack of awareness regarding taking a screenshot on a Mac and copying it to the clipboard.

Copy Screenshots to the Clipboard in macOS
Not knowing how to capture and use important visual content can sometimes be frustrating. But do not worry! We have covered you with a thorough tutorial in this article on taking screenshots on your Mac and copying them to the clipboard. You will have many options to suit your preferences as we explore various techniques using both third-party tools and the built-in features, so without further ado, let us get started and learn the various methods and strategies for taking and copying screenshots on your Mac.
Recommended Tools:
Remove Black Background from Image
How do You Take a Screenshot on Mac and Copy it to Clipboard?
Wondering how to copy a screenshot on your Mac? Worry less! Take a moment to picture yourself participating in an online meeting where a colleague shares a crucial document on their screen. You can quickly save and refer to that information later by taking a screenshot and copying it to your clipboard without manually taking notes or downloading the file. We have listed the top three fixes, each with comprehensive instructions, to assist users in resolving any screenshot-related issues. So, let us start with these fixes and reclaim control over screenshot copying and capturing on your Mac.
Copy Screenshots to Clipboard Using Gemoo Snap
Want to use a handy tool for screenshotting on Mac? Gemoo snap is your answer! Its many features make it a flexible screenshot tool that will improve your screen capture workflow.
- It lets you personalize and enhance your screenshots by adding text, lines, shapes, window mockups, backgrounds, and shadows.
- Capture images of anything on the screen, including webpages, documents, and videos quickly and efficiently.
- Save screenshots to the clipboard for easy sharing via email or messaging apps.
- Extract text from screenshots and save it as a separate file using the OCR feature.
- Capture entire long webpages or documents by scrolling with the scrolling capture feature.
- Its desktop app and Chrome extension offer various features beyond simple screenshotting.
To do so, follow the simple steps mentioned below.
Step 1. Install Gemoo Snap on your Mac computer.
Step 2. Open the Gemoo Snap by clicking its icon > Sign in to your Gemoo account using your credentials.

Sign in Account
Step 3. Choose the Clipboard Screenshot mode from the available options and capture the screenshot.
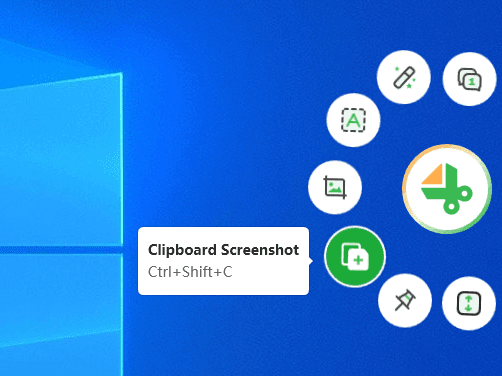
Select Clipboard Screenshot
Step 4. Once redirected to a new tab, click the “Copy icon” to copy the screenshot to your clipboard.
Annotate the Screenshot
Copy Screenshot to Clipboard Using Keyboard shortcuts
Looking for a shortcut method? Let us help you! Capture and store screenshots effortlessly on your Mac using a fantastic shortcut that automatically saves them to your clipboard. This ingenious technique provides a seamless way to record and access visual information swiftly. No more toggling between apps or navigating complex menus. Whether conducting research, sharing content, or optimizing your workflow, this invaluable tool will streamline your screen capture process. Say hello to effortless screenshot management on your Mac using the below-mentioned steps:
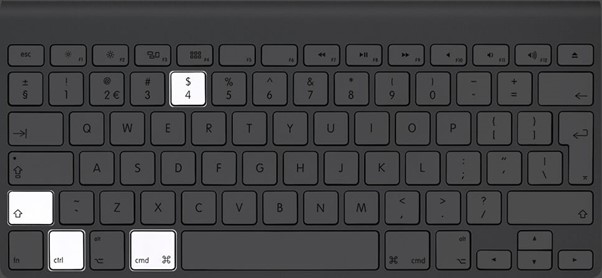
Step 1. Hold down the “Shift,” “Command,” and “4” keys parallelly. You can use this keyboard shortcut to capture a specific screen area.

Press and Hold Command+Shift+4
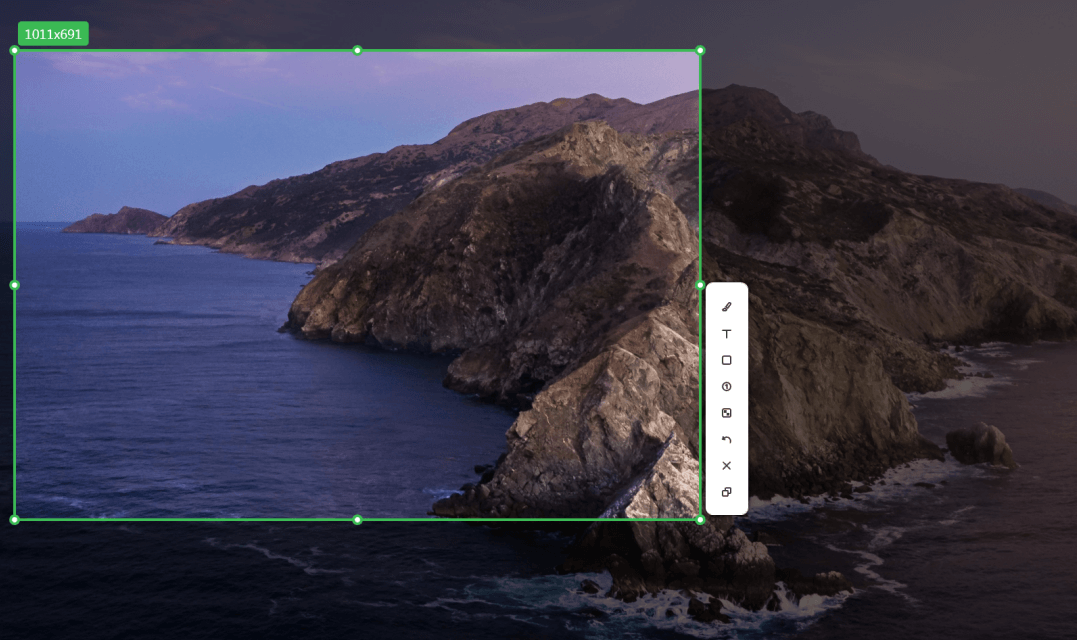
Step 2. Create a box around the portion you want to screenshot by clicking and dragging with the crosshair.
Create a Box Around The Area You Wish To Capture
Step 3. Release all the keys; while doing so, press the Control key.
Release All The Keys While Holding The Ctrl Key
Step 4. Paste it anywhere using “Command + V” or selecting “Paste” from the Edit menu.
Copy Screenshot to Clipboard Using The Preview App
Looking for a method that involves fewer keyboard strokes? The preview app is your answer! This built-in Preview app on Mac computers lets you view and manage different file types, including images and PDFs. It functions as a flexible tool and offers features beyond basic viewing. One of its useful features is the Preview app’s capability to take screenshots and conveniently copy them to your clipboard. You can take screenshots of particular areas, windows, or even the entire screen using the Preview app. Thanks to its user-friendly interface, you can choose the preferred capture option with just a few clicks.
Step 1. Open the Preview application from the Applications folder on your Mac.
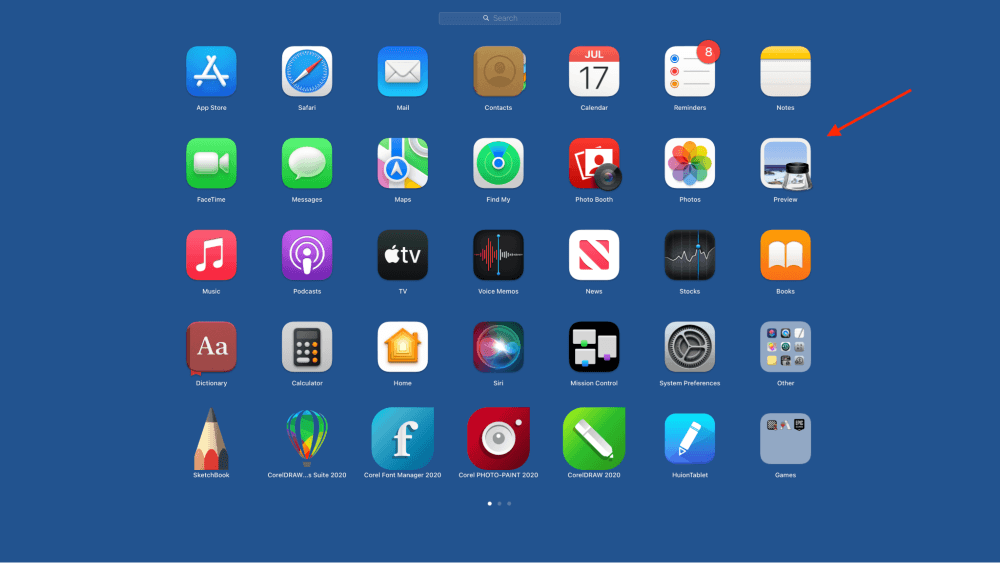
Open the Preview App On Your Mac
Step 2. Click “File” in the menu bar and select “Take Screen Shot.”
Step 3. Choose the best option for your needs from the available options (From Selection, From Window, or From Entire Screen).
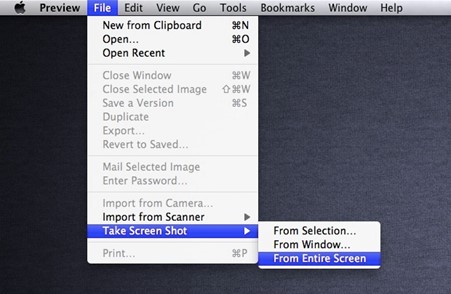
Select Your Desired Mode from the Given Option
Step 4. To copy the screenshot, press “Command + A” to select the entire screenshot, then click “Edit” in the menu bar and select “Copy” to copy the screenshot to your clipboard.
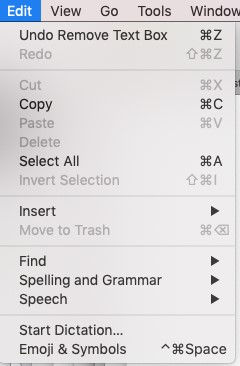
Click On Edit From Top Menu
FAQs About Mac Copy Screenshot to Clipboard
Are you still doubtful? Worry no more, as this section will answer some of the commonly asked questions to help you eradicate any ambiguity left and get a better grasp of the topic, so let us jump into the questions:
Where are Mac screenshots stored?
On a Mac, a screenshot is automatically saved to the desktop after being taken. By default, the screenshot’s file name begins with “Screen Shot” and includes the time and date it was taken. For instance, a screenshot taken on the 10th of June, 2023, at around 2:30 PM would have the file name “Screen Shot 2023-10-11 at 2.30.00 PM.png”. Finding your screenshots quickly is made simple by the default configuration. You can alter the default save location if you would rather keep your screenshots elsewhere. You can do this by navigating to the Screenshot app’s settings.
Can we edit a screenshot on Mac?
Yes! On a Mac, you can edit a screenshot. Mac provides its users with various ways to edit and annotate the screenshots once they are taken. You can embellish your screenshot with text, shapes, arrows, and other visual elements using the built-in “Markup” tool Mac offers. Additionally, you can rotate or change the image’s orientation, crop the image to focus on a particular area, and, if necessary, add your signature. Besides this, you can make more sophisticated edits to your screenshots using third-party image editing software like Preview and Photoshop, accessible on Mac.
Can we change the format of the screenshot on Mac?
Certainly! A screenshot on a Mac can be modified in type or format. By default, screenshots are usually saved as PNG (Portable Network Graphics) files. You can adjust this, though, if you favor a different format like JPEG (Joint Photographic Experts Group), TIFF (Tagged Image File Format), or PDF (Portable Document Format). You must use the Terminal app to modify the screenshot format. However, you can still manually select a different format for individual screenshots during the capture process or use image editing software to convert the format after the fact.
What happens when Mac’s storage is full, and you try to take a screenshot?
The operating system cannot save the screenshot as a file if your Mac’s storage is full and you try to take a screenshot. Instead, you might encounter an error or warning message informing you of insufficient storage space. You must free up storage space on your Mac to fix this problem and carry on taking screenshots. This can be accomplished by deleting pointless files, clearing the trash, uninstalling unused programs, or moving files to an external storage device.
Final Words
To sum up, capturing and inserting images on a Mac can be done swiftly by taking a screenshot, transferring it to the clipboard, and pasting it into various programs or documents. This article has extensively elucidated the top three techniques for capturing and copying screenshots to the clipboard on a Mac, encompassing the utilization of built-in tools and third-party extensions like Gemoo Snap. We have furnished detailed instructions to cater to your requirements. If you found this information valuable, share it with your friends, and leave your feedback in the comment section.