Shortcut Keys Settings
Shortcut keys are valuable for increasing productivity and efficiency while using FocuSee to record your screen. By learning and utilizing these keyboard shortcuts, you can effortlessly navigate through various recording functions – quickly start or stop screen recordings, clip or crop videos, add zoom-in effects, and perform other essential tasks without relying solely on mouse clicks or menu navigation.
Before learning how to record screens with FocuSee, let’s explore these FocuSee shortcut keys in both Windows and Mac computers.
Where Are Shortcut Keys Settings?
Download FoucSee on your Windows or Mac computer. Open it and find shortcut keys settings under the “Settings” option in the main interface.
For Windows Users
Launch FocuSee on your computer and click on the “Settings” icon on the right-upper corner of the interface.
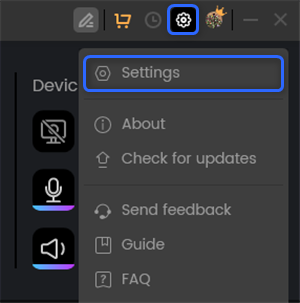
Click Settings on Windows
Find the shortcut keys settings below. These shortcut keys settings can be used during screen recording and video editing phrases. You can customize the shortcut keys with “x” icons when you need to avoid conflicts with the default shortcuts on your Windows computer.
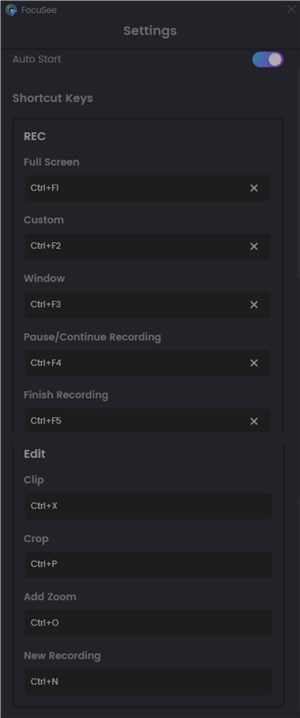
Default Shortcut Keys Settings for Windows
For Mac Users
Open FocuSee on your computer, click on the “FocuSee” icon on the interface, and navigate to the “Settings” option.
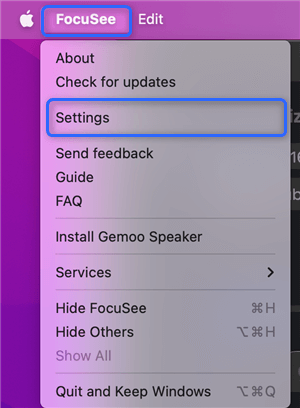
Click Settings on Mac
Under the “Settings” section, you’ll find a range of shortcut keys, covering both screen recording and video editing stages. To ensure that there are no conflicts with the default shortcuts on your Mac computer, you can personalize the shortcut keys using the “x” icons.
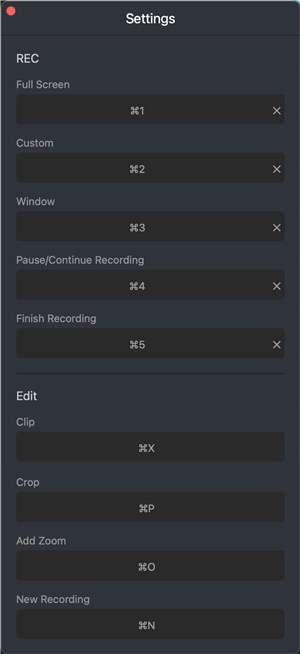
Default Shortcut Keys Settings for Mac
Regardless of whether you’re using a Windows or Mac computer, you can enjoy the full range of shortcut key features available. While the default shortcut key settings may differ between the two platforms, rest assured that you’ll still have access to all the convenient shortcut key features during screen recording and video editing phrases.
What Are Shortcut Keys Settings?
Here, let’s delve deeper into what each shortcut setting indicates:
Screen Recording Phrase
Video Editing Phrase
After checking and familiarizing yourself with the assigned shortcut keys settings, use these shortcut keys to initiate a screen recording and edit the recording at your fingertips.