Effective communication and collaborative teamwork have become paramount in the rapidly evolving digital era. One powerful tool that facilitates this process is the use of annotation tools. These visuals go beyond plain images, containing added explanatory elements emphasizing critical information and providing context. Annotated screenshots are vital in enhancing communication and understanding, enabling individuals to convey complex ideas with clarity and precision. Whether you need to demonstrate a software issue to a colleague, present a design concept to a client, or make step-by-step screenshot instructions for a project or task, annotated bulk screenshots are a great option.
How to Annotate Screenshot
By incorporating visual cues, callouts, arrows, and text annotations, you can effectively direct attention to specific areas and highlight crucial details. This practice reduces the possibility of misinterpretation and ensures your message is conveyed accurately. This comprehensive post will guide you through the process to annotate screenshots on various devices catering to operating systems and software. You will discover a range of tools and techniques to master the art of screenshot annotations. Elevate your communication game and foster seamless collaboration with the help of this step-by-step guide. So, let’s start!
Recommended Tools:
Can You Annotate a Screenshot?
Annotation of a screenshot involves adding explanatory notes, highlights, and other visual cues to convey information effectively. Several sectors, including software development, design, education, and communication, frequently adopt this method. You can highlight important details, guide users through a process, or offer comments by annotating screenshots.
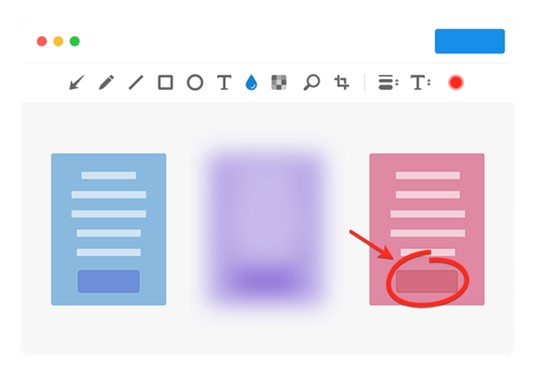
Annotate a Screenshot
When annotating, focus on clarity and conciseness. Use annotations sparingly to avoid overwhelming the viewer with too much information. Employ arrows or lines to indicate specific areas of interest, and add brief labels or text to describe those elements. Color coding can also be useful in distinguishing different aspects or highlighting crucial components.
Remember to consider your audience while annotating. Ensure that your annotations align with the context and purpose of the screenshot. Additionally, if you’re sharing the annotated screenshot with others, choose a suitable image format to maintain the quality and clarity of the annotations. Overall, effective annotation of a screenshot enhances communication, facilitates understanding, and aids in conveying complex information with ease.
How to Annotate Screenshot Online for Free?
Gemoo’s Image Annotation Tool is a good online choice for annotating screenshots and images with exceptional versatility and precision. Boasting an extensive collection of powerful tools, including arrows, brushes, texts, lines, and more, it empowers users to annotate their visuals in any desired manner, fostering clarity and effectively conveying ideas and insights. Whether highlighting specific elements, drawing attention to crucial details, or providing comprehensive explanations, Gemoo’s tool offers seamless functionality and ease of use.
With its comprehensive suite of features, users can easily craft annotations that enhance understanding and engagement. Whether you’re a marketer, designer, educator, or someone who seeks to enhance communication through annotated visuals, Gemoo’s Image Annotation Tool is the best-in-class solution, elevating your image annotations to a whole new level of excellence.
Key Features Of Gemoo’s Image Annotation Tool
- Swiftly annotate multiple images with ease, streamlining the process for efficient handling.
- Intuitive slide view for effortless previewing, saving, and organizing annotated images.
- Add notes effortlessly and export images in PNG, JPG, or PDF formats for versatile sharing.
- Consolidate study materials, create visual workflow notes, and boost productivity with accessible references.
Step 1. Upload or drag and drop a PNG or JPG format screenshot from your computer to the Gemoo Image Annotation Tool landing page. You can upload up to 10 screenshots to annotate at a time. These images will be shown in a slide view.
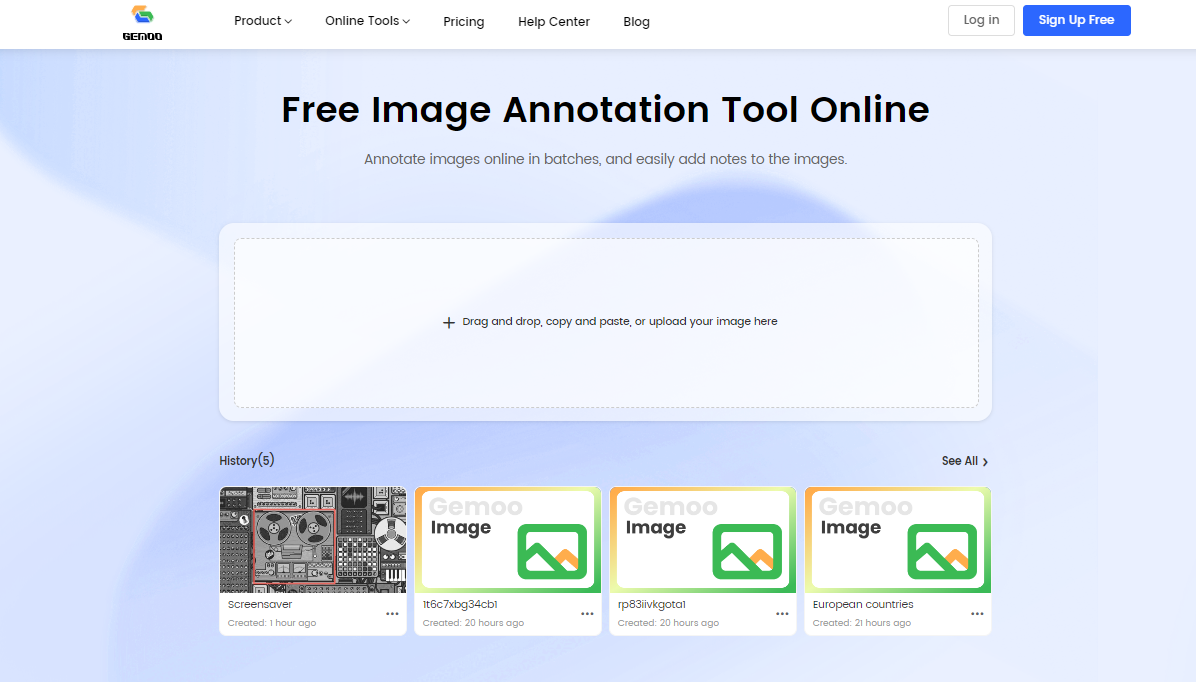
Gemoo Image Annotation Tool Landing Page
Step 2. Utilize the online editing tools to add annotations – text, arrows, brush, circles, notes, and other shapes to the screenshot. Save your edits before proceeding to the next step.
Upload Screenshots to Annotate
Step 3. Click the “Download” button to save the annotated screenshot in various file formats, copy and paste the annotated screenshot or click “Copy Link” to get its link to share with others easily.
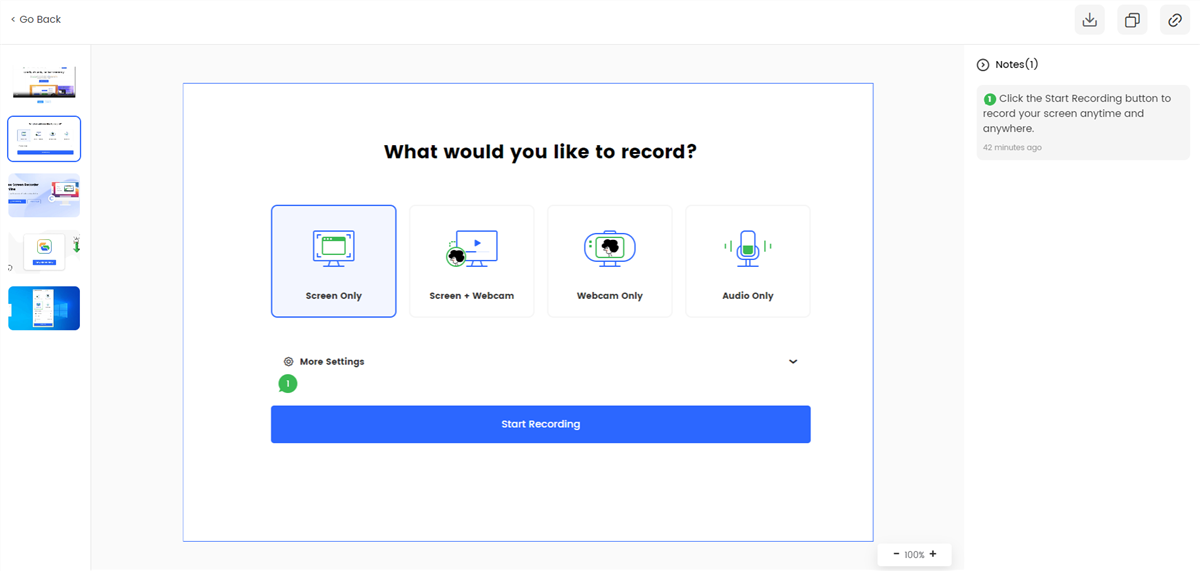
Image Annotation Sharing Page
How to Annotate Screenshot on Windows?
The Windows Snipping Tool, or Snip & Sketch, is a convenient and built-in screen-capturing utility designed to capture screenshots or snapshots on Windows systems. This tool offers a user-friendly interface with four options for taking screenshots, providing flexibility to capture the desired content.
Users can quickly save the screenshot to their PC for later use after annotating it. Snip & Sketch is a flexible tool for quickly taking and improving screen captures because it provides options for sending the annotated screenshot via email, messaging apps, or any other desired method. Whether for work, education, or personal use, Snip & Sketch is invaluable for annotating screenshots easily and efficiently.
Step 1: Press the Windows key, type “Snip & Sketch,” and then choose “Open” or press Enter to open Snip & Sketch.
Step 2: To open the Snipping Tool window, take a screenshot using one of the four options in the screenshot toolbar and click on the notification that displays.
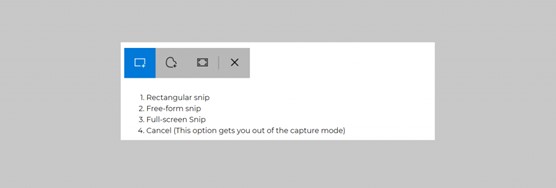
Choose Options to Take Screenshot
Step 3: Annotate the screenshot using the available tools (pen, pencil, and highlighter). Click the ballpoint pen icon to change the stroke color and adjust the slider for thickness.

Annotate Screenshot on Windows
Step 4: After annotating, save the screenshot to your PC. Using the Snipping Tool’s sharing options, you can also share it via email, messaging apps, or any preferred method.
How to Annotate Screenshot on Mac?
The Mac operating system comes equipped with a powerful and versatile native tool for annotating screenshots known as Preview. Serving as the default image viewer on Mac, Preview offers an array of annotation features that make it a handy and efficient tool for enhancing screenshots.
Once the annotations are applied, and the screenshot is enhanced to the desired level, users can conveniently save the edited image. Furthermore, Preview offers seamless integration with other applications, making it effortless to share the annotated screenshot through email, messaging apps, or any preferred means. Overall, the Preview tool’s ability to annotate screenshots provides Mac users with an intuitive and built-in solution for adding context, insights, and visual elements to their screen captures, enhancing their communication and productivity.
Step 1: Capture a screenshot on your Mac using keyboard shortcuts.
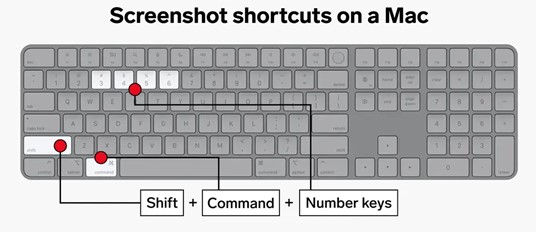
Capture Screenshot
Step 2: Open the screenshot in the Preview app, which serves as the default image viewer on Mac.
Step 3: Click on the “Show Markup Toolbar” button, represented by a toolbox icon, to access the annotation tools. These include text, shapes, lines, arrows, and highlighting options.
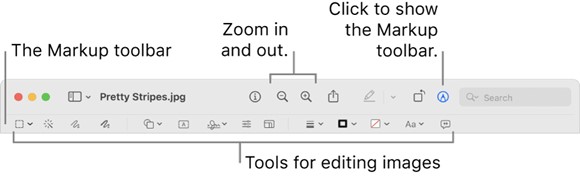
Access Annotation Tools on Mac
Step 4: Annotate the screenshot using the Markup Toolbar tools. Once done, save the annotated screenshot. You can easily share it from there through email, messaging apps, or any preferred method.
Final Thought
In conclusion, mastering the art of enhancing screenshots through annotations is a highly valuable skill that greatly enhances communication and collaboration. By incorporating visual cues and contextual information, annotate screenshot mac feature elevates the effectiveness of screenshots. Whether utilized for professional presentations, instructional materials, or team collaboration, annotated screenshots offer a clear and concise method to convey information. Learn how to use annotation tools efficiently and become adept with them if you want to boost your screenshot game. Must tell us your concerns regarding this in the comments section below!