How to Cancel Background Noise on Zoom Meetings?
Ambient noise can be a major distraction when doing a video conference from your home. Noise from the fans, the animals, the street, or the neighbors can interfere with concentration, particularly on the job. We’ve discovered four fantastic methods for canceling out the sound on your end during Zoom video conversations.

Cancel Background Noise on Zoom Meetings
Zoom’s ambient sound reduction parameters might help you reduce distracting ambient noise. To maintain professionalism during crucial Zoom meetings or presentations, you can choose the high suppression setting to eliminate any background noise. Fortunately, some solutions work to eliminate background noise in Zoom conference calls so that everyone can hear well. Just what are they? Keep reading for more explanation.
Also read: Remove Background Music from Video >
Table of Contents: hide
Is Zoom Noise Cancelling Good?
How Does Zoom Noise Cancellation Work?
Is Zoom Noise Cancelling Good?
Zoom claims to have noise canceling built in, but we all know that isn’t the case. Zoom attempts to isolate the voice component and removes the rest. Zoom is successful at this, and apart from subtleties, it’s impossible to tell any of them apart. Unfortunately, Zoom’s noise-canceling features are only accessible via their desktop and mobile applications, so it won’t help if you ring into a conference using a traditional phone.
The Zoom application would apply audio filters like active noise cancellation and echo cancellations to the sound taken by your microphones to enhance its quality. However, such filters might cause issues when the entire spectrum of audio obtained by the microphone is required. If customers experience poor sound quality during a conference, they can enhance it by turning off audio filters, and increasing their sample rates or turning to Zoom alternatives.
How Does Zoom Noise Cancellation Work?
The background noise scooped up by your microphones is instantly and significantly reduced as you zoom in. You can adjust the settings of the function to get a noise reduction that is even more pronounced. All required is an edition of the Zoom desktop app greater than 5.2.0.
Step 1. Install the Zoom app on your PC. Select Video Options on the app.
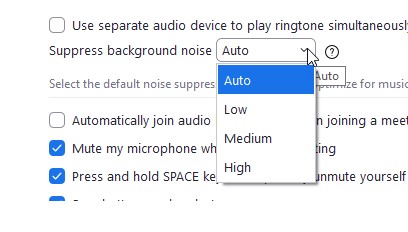
Step 2. Adjust the level of background noise suppression as necessary as follows:
- Auto – When it is necessary, Zoom will automatically use its background noise reduction setting. This setting is set by default. Music, on the other hand, is not considered to be background noise.
- Low– Reduces the amount of noise. Discourages the audible presence of background noise.
- Medium– Removes ambient noise caused by the air conditioner, the fan, pen tapping, and other sources.
- High– Aggressive noise reduction is eliminated, such as hammering, paper crushing, chewing, barking dogs, and other noises.

Select Auto
If you want the greatest possible sound quality while making music, you might think about selecting the Original Sound choice from the Music and Professional Audio menu.
The noise reduction already built in is only available in the desktop version. Despite this, we anticipate it will eventually be included in the smartphone app.
How to Cancel Zoom Noise via Microphone Settings?
Windows 10, much like its predecessor Windows 7, comes with several built-in microphone settings that can limit the amount of background noise that is snagged by the device. The specific customization options that are available to you will be determined by the sound system installed in your computer as well as the audio drivers that were supplied by the manufacturer.
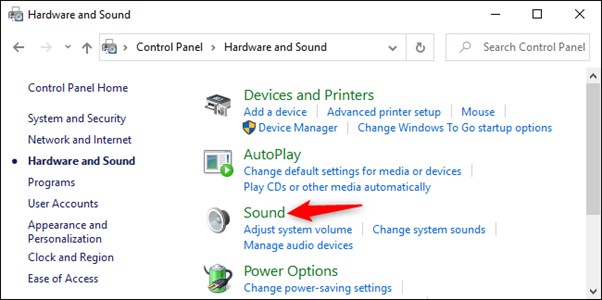
Step 1. Head to the Control Panel, where you’ll find these various settings. To access them, launch the Control Panel from the Start screen and navigate to the Hardware and Sound submenu before selecting the Sound option.
Step 2. In the Sound window, pick the audio equipment you want to use, then click the “Properties” button after selecting.

Cancel Zoom Noise in Windows’ Microphone Settings
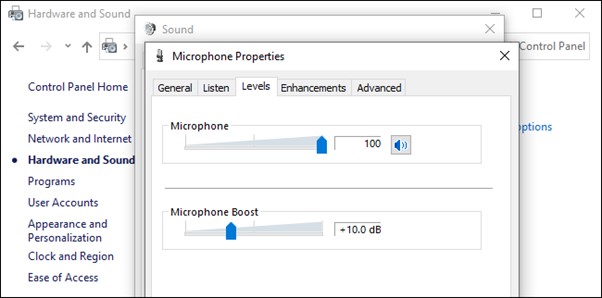
Step 3. To access the levels, select that tab. If you are experiencing issues with background noise, one solution is to turn the Microphone Boost option down. For example, try setting it to +10.0 dB rather than +20.dB.
Step 4. This renders the microphone extra sensitive, so it would have a better time understanding what you have to say; however, it would also take up more of the ambient noise around you.
Note: After lowering the microphone enhance option, you should experiment with increasing the microphone’s volume to 100.
Tip: If you turn down the boost settings on the mixer so that the microphone picks up less volume, raising the volume on this slider will make it simpler for others to hear what you have to say.
Step 5. After making some adjustments, click “Apply” and then retest your microphone to see if the new settings made a difference.

Pick An Enhancement
Step 6. To finish, go to the “Enhancements” menu by clicking on it. It is possible that this tab will not be accessible; this is determined by the audio hardware and drivers installed on your computer.
Step 7. If an option is labeled “Noise Suppression” or “Noise Cancellation,” make sure it is selected. Other possibilities could help reduce the background noise here.
How to Improve the Sound Quality in Zoom Meetings?
Look at the procedures below to diagnose and enhance your sound quality in a Zoom conference if you’ve been advised that your audio is not understandable.
Use the Microphone Correctly
Most individuals don’t know where their device’s microphone is located, so they either avoid using it or are too far away from it when needed. Your voice will be silenced and distorted if you cover the microphone. Mics on mobile devices are often located on the bottom, whereas laptops are more commonly found on the top bezel. That’s why it’s important to avoid blocking their view and not be too far away. You can also use an external mic if you have one handy or use a regular set of headphones instead.
Use Noise Cancellation Software
Except for using a better-quality microphone, you should also consider using noise cancellation software to eliminate unwanted background noise. Among the most widely-used noise cancellation apps in 2023, Gemoo Recorder is worth your trying. As it can distinguish human voice and environment sound, it can effectively improve the sound quality in Zoom meetings when recording. Free try Gemoo Recorder and learn how to use Gemoo Recorder to enhance the sound quality during recording Zoom Meetings.

The Interface of Gemoo Recorder
Use Room with Absorbing Sound-Absorbing Materials and Furniture Carpets
Do you know that your voice echoes in a room where no one is around? While we can not always be able to detect it, there is always some degree of echo produced in every given space. Hanging a thick curtain or placing large pieces of furniture within it will help dampen the echo. If you can, have meetings in your home with the softest furnishings, such as couches, carpets, and rugs, to minimize noise. Nowadays, a device’s microphone can pick up even a distant sound.
Change Advanced Audio Settings for Professional Audio Uses
The menu labeled “Advanced Audio” is where you’ll find the option for “High-Fidelity Audio.” The “Original Audio” option is upgraded to 48 kHz, 96 Kbps mono/192 Kbps dual, and echo reduction and post-processing are turned off. These changes are made to increase the high quality of audio communication in situations including arts education and performance. There is a need for a sound interface, microphones, and earbuds of a professional grade.
Final Thought
Using your smartphone or laptop to participate in meetings or seminars is extremely common. Attending a meeting online comes with the drawback of being exposed to ambient noise. Still, the advent of online meetings has made it possible to participate in any meeting, even while one is moving about. These simple methods can be used to lessen the amount of background noise in audio during Zoom video chats.
We hope this information assists you in holding video chats on the service that sound polished and professional. A few of the strategies can also be used in other systems for video calls. Despite this, we have a comprehensive post that explains how to silence background noise in Zoom video conversations.


