How to Reduce Background Noise on Mic
There are ways to reduce static and background noise if your microphone picks up unwelcome sounds. Although it may be impossible to eliminate background noise, interference may be minimized. Once you know what kind of microphone you need, you can start thinking about ways to reduce ambient noise.

Reduce Background Noise on Mic
You can do several things to improve the clarity of your voice, whether you’re working from home and having trouble being understood regularly, recording audio snippets or music, or simply attempting to have clear communication. Some are mechanical, others are electronic, and others are programs or instruments. Here’s how to record audio on a Windows computer such that it comes out clean and clear, with as little ambient noise as possible.
Also Read: 3 Ways to Record Discord Audio & Video >
Table of Contents: hide
Why Is My Mic Making Background Noise/ Peripheral Audio?
How to Reduce Background Noise on Mic
Way 1. Reduce Background Noise on Mic via Checking the Environment
Way 2. Reduce Background Noise on Mic via Changing the Microphone
Way 3. Reduce Background Noise on Mic via Noise Cancelling Software
Way 4. Reduce Background Noise on Mic via Noise Suppression
Why Is My Mic Making Background Noise/ Peripheral Audio?
Every single sound recording has some level of background noise. To create the finest possible audio recordings, these distracting noises must be eliminated to the greatest extent feasible. Now that we have that out of the way, let’s look at eliminating background noise from the mic.
How to Reduce Background Noise on Mic?
In this post, we will demonstrate 6 ways to reduce background noise on mic. You can try it based on your needs.
Way 1. Reduce Background Noise on the Mic via Checking the Environment
The first way of reducing the background noise of the mic is by checking the environment for extra noise. A substantial quantity of noise may be produced by appliances such as televisions, radios, air conditioners, fans, and other similar items, which might disrupt your recording.
To eliminate the noise from the electrical equipment in your immediate surroundings, turn off the power to those gadgets. In addition to that, double-check that the wires are in working order. If you position other cables directly over the audio input, there might be some kind of distortion occurring.
Way 2. Reduce Background Noise on the Mic via Changing the Microphone
Make sure you get the correct microphone; if you’re in the market for a new mic, you should make sure to pick the one that works best for you. Look for a mic with a low self-noise rating since this will help cancel out the noise from the mic.
In addition to this, bear in mind that the sensitivity levels of various microphones might vary greatly. For instance, the sensitivity of dynamic microphones is often rather low, but the sensitivity of condenser microphones is somewhat greater.
Way 3. Reduce Background Noise on Mic via Noise Cancelling Software
If none of the above works, we recommend using noise cancellation software like Gemoo Recorder to reduce background noise on the mic. Professional podcasters and video creators will choose Gemoo Recorder to remove noise during their recordings. Decreasing background noise from the microphone is only one of its several functions. Under ‘More Settings’, you can also set resolutions or your recordings, up to HD 1080.
As a professional screen recording software, it supports you to record your screen without background noise in 4 forms – Screen + Camera, Camera Only, Screen Only, and Audio Only. Thus, you can choose a mode to use based on your specific demands – recording live stream, online meeting, gameplay, podcast, favorite songs and etc.
Now, you can free try Gemoo Recorder. Follow the steps below to reduce background noise on the mic using Gemoo Recorder.
Step 1: Download Gemoo Recorder and sign in to it according to the instructions on the screen.

Sign in for Gemoo
Step 2: On the welcome page, choose the Screen Only mode and tap on the Start Recording button to initiate the recording procedure.
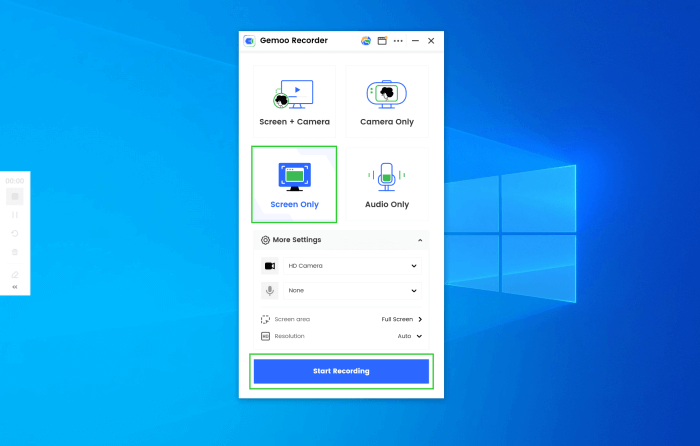
Launch Gemoo Recorder and Choose the Screen Only Mode
Step 3: After 3 seconds, you will be enabled to use your microphone with high-definition audio. During the recording, you can also use the left tools to add annotations to highlight your views.
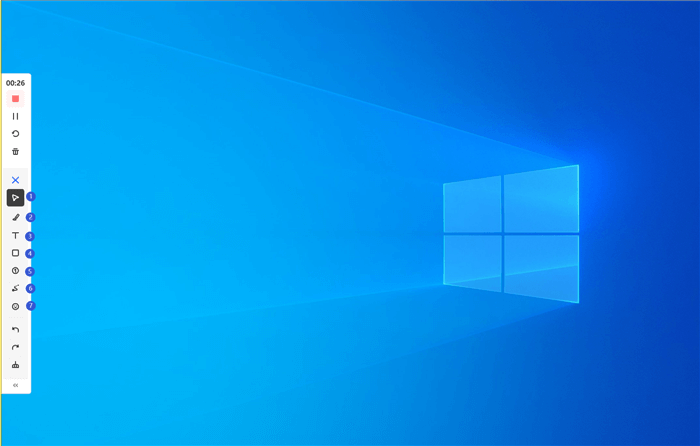
Annotate Screen during Recording
Way 4. Reduce Background Noise on Mic via Noise Suppression
In Windows 10 and Windows 7, there is a built-in feature known as Sound Suppressions that may assist you in lowering the amount of background noise produced by your microphone. You may activate the option to lessen the noise by following the procedures listed below.
Step 1: Open the search bar, type “control,”. Look for “Control Panel” and click to open it.
Step 2: Go to Hardware and Sound and then click on Sound.
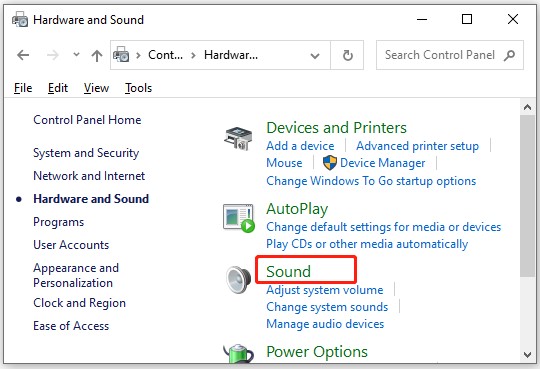
Select Sound in Control Panel
Step 3: Navigate to a tab named Recording and then open the Properties of the microphone.
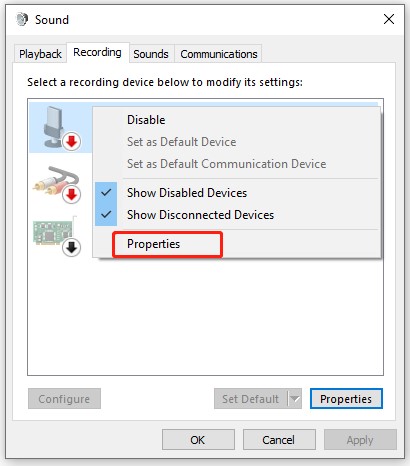
Select Properties in Sound
Step 4: Click on Levels from the top bar and adjust the settings for Microphone Volume (100) and Microphone Boost (10dB)
Step 5: Navigate to the tab labelled “Enhancements.” Find the “Noise Suppression” option, tap to check box and click OK.
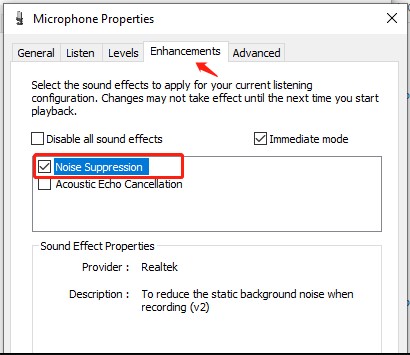
Select Noise Suppression
Note: You can use the Acoustic Echo Cancellation feature, which will assist lessen the echo that is created by the speakers even if you are not wearing headphones. You may now record again and check whether the background noise has been removed from the audio.
Way 5. Reduce Background Noise on Mic via Equalization
Equalization allows you to adjust the frequency levels so that you may get rid of the noise from the video that you don’t want. You can raise the volume of the missing noises while simultaneously lowering the frequency of the prevalent sounds. Follow the steps below:
Step 1: Install APO Equalizer (EQ APO). When installing EQ APO, pick the microphone from the pop-up menu.
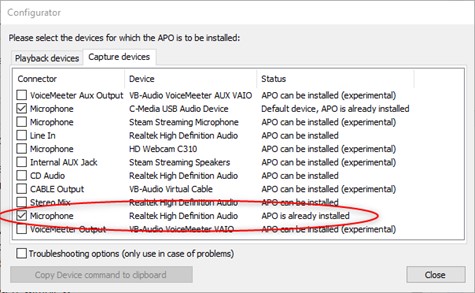
Pick Microphone from Configurator
Step 2: Install Reaper ReaPlugs. After the installation is complete, a reboot may be required.
Step 3: Install EQ APO. Start Configuration Editor in the EQ APO directory with a blank slate.
Step 4: Now add two more things. First, click the Plus symbol in the upper left to add Control -> Device, then click “Change” and choose the mic.
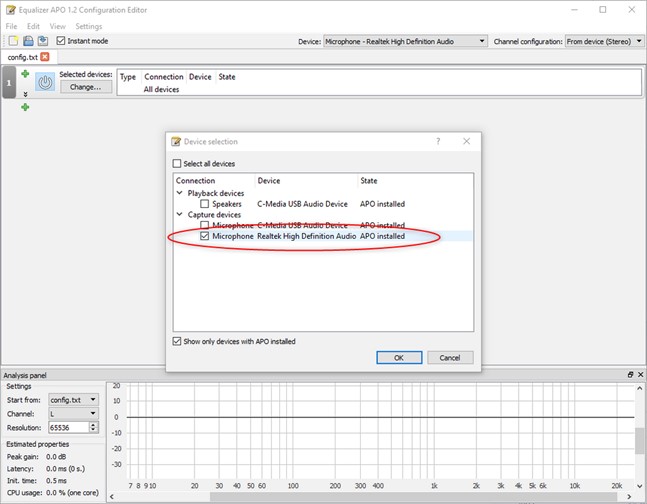
Select Microphone
Step 5: Under “Mode,” pick “Subtract” in ReaFir. Then drag the two dots to the bottom to create a flat line. Click “OK” or “Apply” to test your recording.
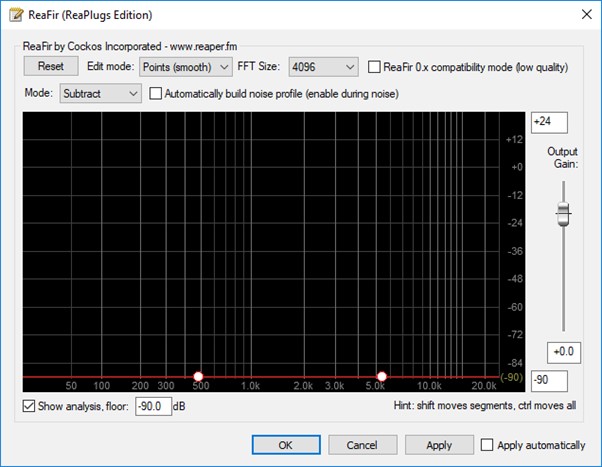
Create a Flat Line
Way 6. Reduce Background Noise on Mic via a Shock Filter
Microphones have a high degree of sensitivity; we recommend using shock filters to reduce background noise on the mic. Shock mounts protect them from accidental drops and vibrations so you can enjoy optimal performance and audio. Handling noise is effectively muffled by using shock mounts. Reduce vibration-induced noise by attaching a shock mount to the microphone stand.
Final Thought
You should now be able to limit the amount of background noise that a microphone picks up. Unwanted noises have the potential to be disruptive, irritating, and detrimental to the quality of the sound. Although it’s possible that you won’t be able to get rid of them entirely, there are several strategies to cut them down to a manageable level while still producing high-quality material. Have you ever struggled with troubles caused by the noise in the background? If yes, then we hope that this article helps you.


