As one of the computer manufacturers, Dell computers have become equally popular with people of all ages in recent years. It is versatile, chatting, working, and learning are just a few of its features. In fact, I believe that people will be more impressed with this feature after 2019, because starting in 2019, people are starting to work and attend classes from home. So we need to record the screen on the computer at any time to share our lives, communicate our work, do our studies, etc. But for newbie Dell users, how to start to record screens.

How to Record Screen on Dell
Dell computers, like most Windows computers, do not come with many screen recording features or software, most of which require the help of screen recording apps for PC. So in this article, we will not only introduce how to screen record through Dell’s own settings but also introduce some simple third-party software.
Also read:
How to Screen Record on Surface Pro >
How to Screen Record on Thinkpad >
Way 1. Screen Record on Dell via FocuSee
Way 2. Screen Record on Dell via Gemoo Recorder
Way 3. Screen Record on Dell via Game Bar
Way 4. Screen Record on Dell via OBS Studio
FocuSee is a powerful and intuitive screen recording software that enables users to easily create engaging and professional-quality video content on their Dell computers. Whether you’re looking to create tutorials, presentations, or demonstrations, FocuSee offers a comprehensive set of tools to help you capture and refine your recordings.
One of the standout features of FocuSee is its ability to record your screen, webcam, or both simultaneously, giving you the flexibility to create content that suits your specific needs. The software also offers automatic caption generation, which not only makes your videos more accessible but also helps reinforce your message and boost audience engagement.
FocuSee’s Outstanding Features
Follow the Steps to Screen Recording on Dell
Step 1. Install FocuSee for free on your Windows or Mac computer and launch it > Run the application, then click on the “Custom” option on the welcome page.
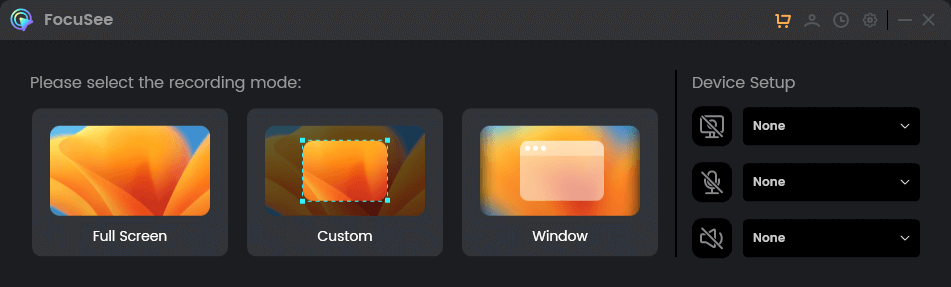
Choose a Recording Mode
Step 2. When you’re ready, click the “Record” button to start the recording process. During the recording, FocuSee will automatically apply zoom effects based on your mouse cursor clicks and movements.

Frame an Area to Record
Step 3. When you need to stop recording, click on the red “Stop” icon on the left toolbar. You will then enter the video editing interface.
One of the easiest way to screen record on Dell computer is to use Gemoo Recorder. As an open-source screen recorder, Gemoo Recorder enables you to screen record on Dell as well as on the website in HD quality. Despite Dell laptops, it is also applicable for other common models, ranging from Mac, Lenovo, and Surface, to ThinkPad, and ASUS. To customize your recording content and highlight ideas, you can also attach annotations during the recording process, such as adding texts, numbers, lines, stylus, stickers, and other patterns. Free try Gemoo Recorder now and check its outstanding features below.
Step 1. Launch Gemoo Recorder on your Dell computer and choose the Screen Only button after successfully signing in to the app according to the on-screen instructions.
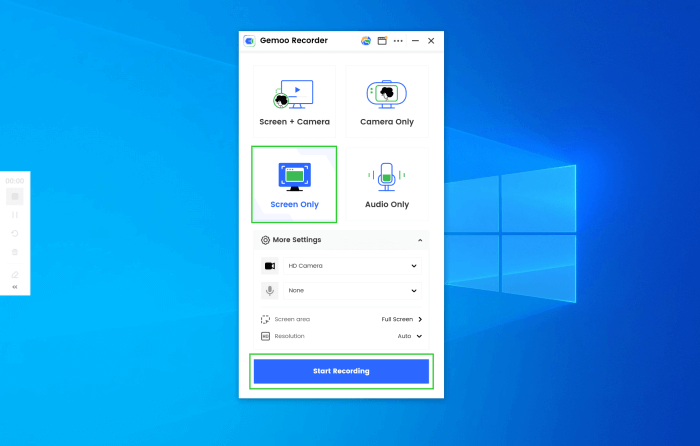
Launch Gemoo Recorder and Choose the Screen Only Mode
Step 2. Click on the Start Recording button when you are ready to record. After 3 seconds, the recording will start.
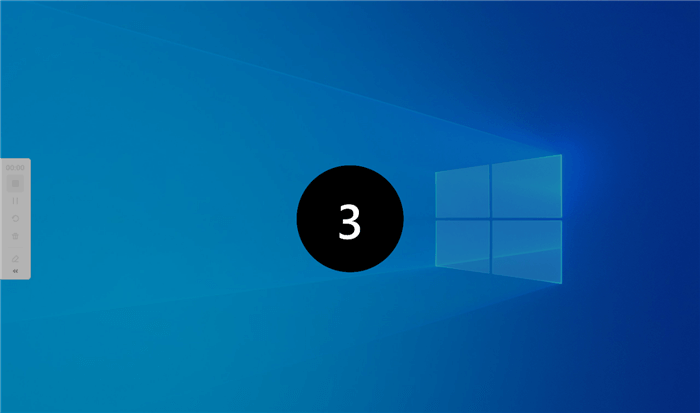
Wait for the Recording Countdown
Step 3. You can add annotations from the left toolbar. Also, you can choose to pause or restart your screen recording. When the recording completes, hit the Red Stop icon and wait for it to be uploaded to the Gemoo website platform.
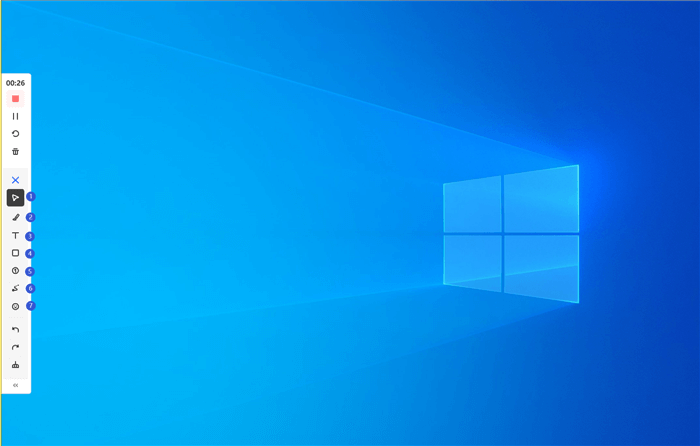
Annotate Screen during Recording
If your Dell computer is Windows 10 and above, then you can simply use the Game Bar of your computer to complete the screen recording. This feature is a built-in feature for Windows 10 computers. It is called game bar, and it helps you to record videos. Moreover, the steps to activate it are very simple.
The steps you need to take in order to record the screen include the following:
Step 1. Run the game or application from which you would like to capture content.
Step 2. Once the program is running, press the combination of Windows key and letter G to start the Game Bar.
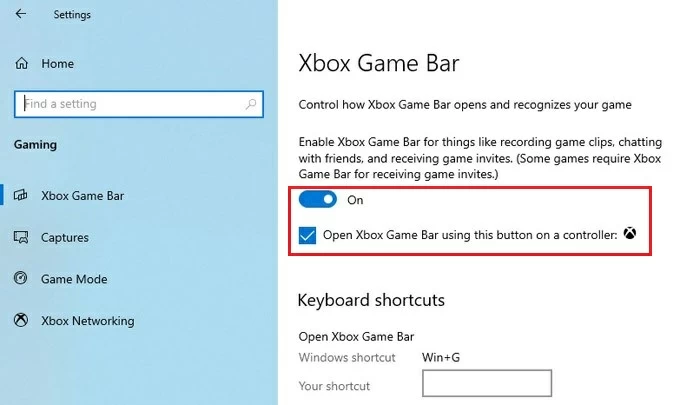
Open Xbox Game Bar
Step 3. Check the box next to “Yes, this is a game.” message when prompted.
Step 4. Press Win + Alt + R or click on the Record icon in the menu bar to start capturing the action.
OBS Studio, also called Open Broadcaster Software, is a free open source software for screen recording and live-streaming for Windows, Mac and Linux. With it, a set of sources can be supported such as images, window captures, webcams, text, browser windows, capture cards, audio, live and recorded video, and more. In addition, this powerful Dell laptop screen recorder offers a multi-view feature that allows you to monitor 8 different scenes with ease. You can even mix audio, add transitions, adjust resolution/FPS, and more the way you like.
To create a new recording, follow those steps:
Step 1. Open OBS Studio on your Mac desktop or laptop and click “+” button.
Step 2. Click on Start recording when you are ready.
Step 3. When it’s finished, you can find the recordings by clicking “File”.
ShareX, like OBS studio, is also an open source, and it’s a free screen recording tool, which is loved by many computer screen recording users. You can use it to go full screen recording, select screens to record, etc.
It also supports hotkeys to get the job done quickly. Once you are done recording, you can record video in MP4 format or GIF and again.
The steps to use it for screen recording are also very simple.
Step 1. Download and launch ShareX.
Step 2. Choose “After Capture Tasks” and then click “Upload Image to Host”.
Step 4. After that, please simultaneously press Shift and PrtSc to start or stop screen recording.
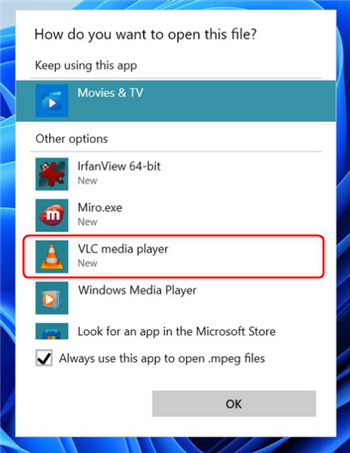
VLC is a free and open source multipurpose application for audio and video playback and conversion. VLC can play various video formats, including DVD media, on many operating systems, including Windows, Mac and Linux.
It is not only able to play videos, it can also help you to go for screen recording, screenshots, etc. But compared to the previous steps, VLC has more operations, therefore, we provide you with a detailed step-by-step description.
Step 1. Download VLC Media Player and launch it.
Open VLC Media Player
Step 2. Go to Media and choose Convert/Save option.
Step 3. Go to Capture Device option and choose “Desktop” as the device you want to record the screen.
Step 4. Then set your desired frame rate for the capture and press on Convert/Save at the bottom.
Step 5. Next, go for “Browse” to select output destination folder and name the file – Save the settings.
Step 6. After that, click on “Start” button and your Dell laptop screen will be captured.
Step 7. If you’d like to stop recording, just tap on the “Stop Playback” button on the bottom left-hand corner.
As you can see from the above method, as a Dell user, if your Windows version is 10 and above, you can easily use the Game Bar to record videos. But if your computer is not one of these versions, don’t worry, Gemoo Recorder can also help you record Windows 8 and lower-end PC.

FocuSee
Way 1. Screen Record on Dell via FocuSee
Way 2. Screen Record on Dell via Gemoo Recorder
Way 3. Screen Record on Dell via Game Bar
Way 4. Screen Record on Dell via OBS Studio
Way 5. Screen Record on Dell via ShareX
Way 6. Screen Record on Dell via VLC
The Bottom Line