In search of a detailed guide that explains how to screen record on Chromebook? If yes, then this is the right spot to visit.

Screen Record on Chromebook
Screen recording is one of the latest features integrated by Google into its Chromebook OS. It’s an advanced technology designed to help end-users take screenshots or make a screencast of the events they find on their screen. The feature is an amazing one and without a doubt really handy as students, tutors make use of it. Also, it can be used in recording business meetings or PowerPoint presentations.
If you belong to any of the groups of individuals stated above but have no idea how to make use of the screen recording feature on your Chromebook, look no further! Just keep reading.
Also read: How to Snip on Chromebook >
Table of Contents: hide
Does Chromebook Record Screen Recording?
How to Screen Record on Chromebook?
Method 1. Screen Record on Chromebook via Keyboard Shortcut
Method 2. Screen Record on Chromebook via Screen Capture
Does Chromebook Record Screen Recording?
YES! Chromebook does record screen recording. The technique involved is similar to the general screen recording process. However, the background sound might not be included if you do not enable the microphone feature.
How to Screen Record on Chromebook?
Find below the top 2 techniques to screen record on your Chromebook device.
Method 1. Screen Record on Chromebook via Keyboard Shortcut
Screen recording via keyboard shortcut is one of the simplest, quickest and cheapest ways to create a screencast on Chromebook.
To employ this technique, follow the stepwise guide below:
Step 1. Launch the Screen Recorder
Tap the hotkeys, Ctrl + Shift + Show Windows (the button with a rectangle and two lines to the right) to open the built in screen recorder program on your Chromebook.

Launch the Screen Recorder via Keyboard Shortcut
Step 2. Enable Screen Recording
On the screen record tab, click on the video icon to enable screen recording on your Chromebook.

Enable Screen Recording
Step 3. Enable Microphone
Before screen recording starts, click on the gear icon, also known as settings. Another tab will pop up with the ‘Record Microphone’ option. Slide the button right to enable the microphone.

Enable Microphone
Step 4. Start to Record
Select whether you want to record your entire Chrome screen, a portion of it, or a single window. To do this, you have to select from the set of square-like icons that appear on the screen recorder. On selecting one of these square-like icons, tap on anywhere on your screen to commence screen recording. Wait a while for the screen recording to complete, then tap on the red stop button to end the process.

Record Entire or Partial Chrome Screen
Step 5. Preview and Save Screen Recording Files
A notification saying ‘Screen Recording Taken’ will pop up on your screen. Tap on it and you will be directed to your local file where your downloaded videos are stored. Preview the file for errors. Should you find any, delete the file and then start all over.

Preview and Save Screen Recording Files
Screen recorded files are stored in the WEBM format on Chromebook. If you would like to share the file with someone else, you need to convert it to MP4. To convert from WEBM to MP4, you can use an online video converter.
Method 2. Screen Record on Chromebook via Screen Capture
Besides the use of keyboard shortcuts, Screen Capturing is another amazing technique you can use to screen record on Chrome. However, you must note that the results of the technique are image files and not video clips. Thus, your file doesn’t have a sound.
To use the screen capture technique, check out the guide below:
Step 1. Launch Screen Record Tab
Use the three hotkeys Ctrl + Shift + Show Windows. Or better yet, click on the status bar located at the bottom right corner of your screen. Then select ‘Screen Capture’.

Launch Screen Capture on Chromebook
Step 2. Enable Screen Shooting
The screen recording bar will immediately pop up on your screen with a couple of options floating. Select the camera icon to enable screen shooting.
Step 3. Select a Part of Screen to Capture
Next, select the part of your screen you want to capture. Use one of the square-like icons that appear on the screen record tab to do this. Here is a visual representation of this statement.
Unlike the screen recorded files, screenshots are automatically saved on your clipboard for you to preview. To save the screenshots properly, copy and paste them into another folder.
Now you have an idea of how to screen record and take a screenshot on Chromebook, let’s move a step further- how to stop screen recording on Chromebook.
How to Stop Screen Recording on Chromebook?
On confirming the completion of your screen recording, stopping the process is the next thing to do. To do that, locate and click on the red circular button that appears on the screen recording tab. Here is an image for visual understanding.

Stop Screen Recording on Chromebook
Bonus Tip. How to Screen Recording on Windows/Mac Computer?
If you are a Mac or Windows owner, you can also record your screen on your Mac or Windows machine as long as you choose the right toolkit. If you are looking for an effective screen recording app, you come to the right place. You are highly recommended to give FocuSee a try. With this amazing screen recording software, you can easily choose to record full or part of your computer screen. As a professional screen recording tool, FocuSee is applicable in different situations – recording a demo video, PPT presentation, video tutorial, etc. More importantly, it also offers an automatic zoom-in feature during the screen recording process. Free try FocuSee now and enjoy its recording features via the following steps.
Step 1. Free install FocuSee and launch it on your Windows or Mac computer > Run the app and click on the Custom option from the welcome page.
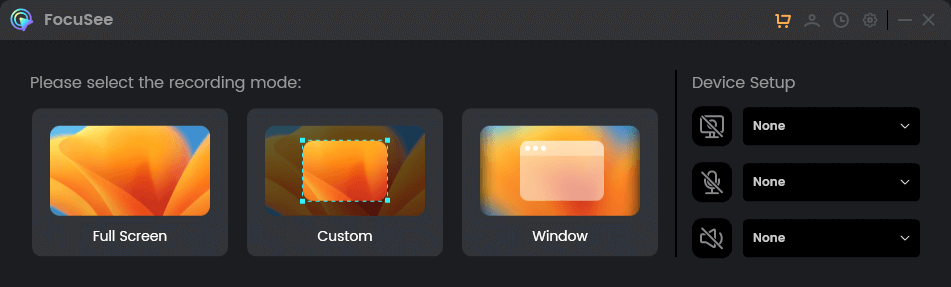
Choose a Recording Mode
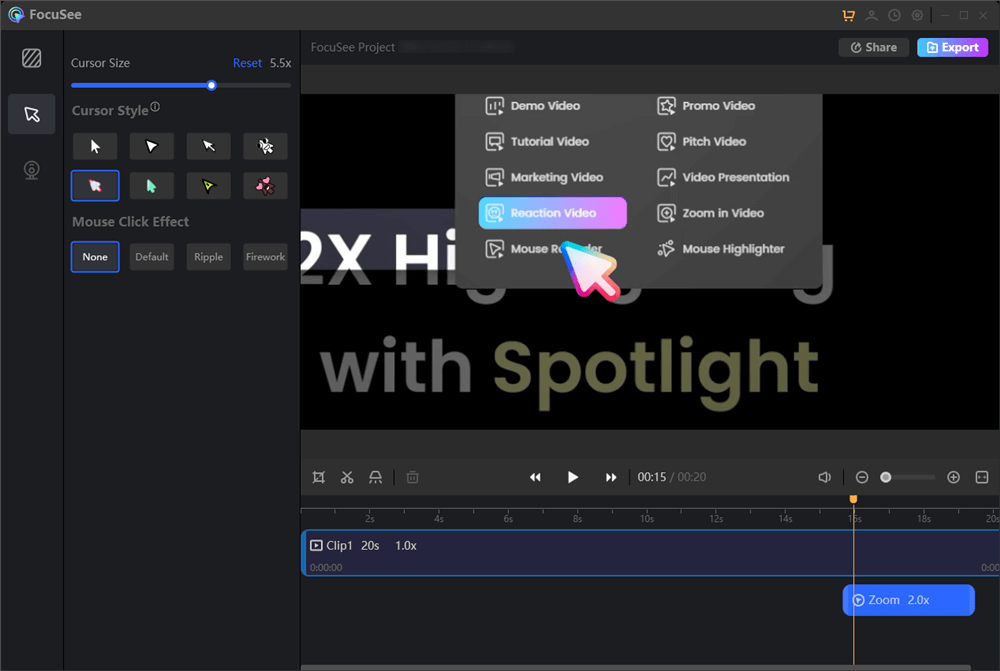
Step 2. When you are well prepared, tap on the REC button to initiate the recording process. During the recording, FocuSee will automatically apply the zoom-in effect based on the mouse cursor clicks and movement.
Frame an Area to Record
Step 3. When you need to stop recording, you can click on the red Stop icon on the left toolbar. Then, you will go to the video editing interface.
Edit Your Recording
The Bottom Line
Now you have the top 2 techniques to screen record on Chrome at your fingertips, employ it in your next project. Screen recording on Chrome has never been this easy. All thanks to the simple guide provided here in this article.