Do you own a Mac OS, but have no clue on how to make a screen record with it? Welcome, to the tech website where all the solutions you need regarding your gadgets are provided. Continue reading!

How to Screen Record on Mac/Laptop Mac
Screen recording is an incredible feature peculiar to Apple devices including Mac OS that allows you and me to create a screencast of whatever is appearing on our screen for future reference. The feature is handy and highly beneficial as it saves you time, stress, and data.
Utilizing the screen recording feature on your Mac OS can be challenging, especially when you don’t have the background knowledge. For this reason, we decide to create this tutorial guide on how to screen record on Mac/Laptop Mac. You can also record screen and audio on Mac or record computer screen with audio, though, the technique requires some additional steps after the usual screen recording process. So without wasting your time, let’s dive in.
Also read:
How to Screen Record on Surface Pro >
How to Screen Record on Thinkpad >
Table of Contents: hide
Method 1. Screen Record on Mac via Simple Clicks
Method 2. Screen Record on Mac via Keyboard Shortcut
Method 1. Screen Record on Mac via Simple Clicks
No matter whether you attempt to record Teams meetings or record gameplay on your computer, you may need to learn how to screen record on your Mac or Windows computer. It is easy to screen record on Mac computer as long as you choose the best Mac video recording software. Among the most popular screen recording software for 2024, FocuSee is worth your attention. It enables you to record what is happening on your screen so that you can playback it when you need to see it again. You can check below to see more screen recording features of FocuSee after free installing FocuSee.
FocuSee’s Main Features
- Auto-generate and edit captions as needed
- Choose from side-by-side, overlay, or screen-only layouts
- Trim, cut, crop, speed up, or slow down sections for concise videos
- Select preset sizes for YouTube, Twitter, TikTok, and other platforms
- Enhance video appeal with various mouse styles and click effects
- Customize auto-zoom effects, including zoom level, duration, and position
Steps for Screen Recording on Mac via Simple Clicks
Step 1. Launch FocuSee on your computer > Enter your account and password to create an account or log in to FocuSee (you can use your Google account to log in).
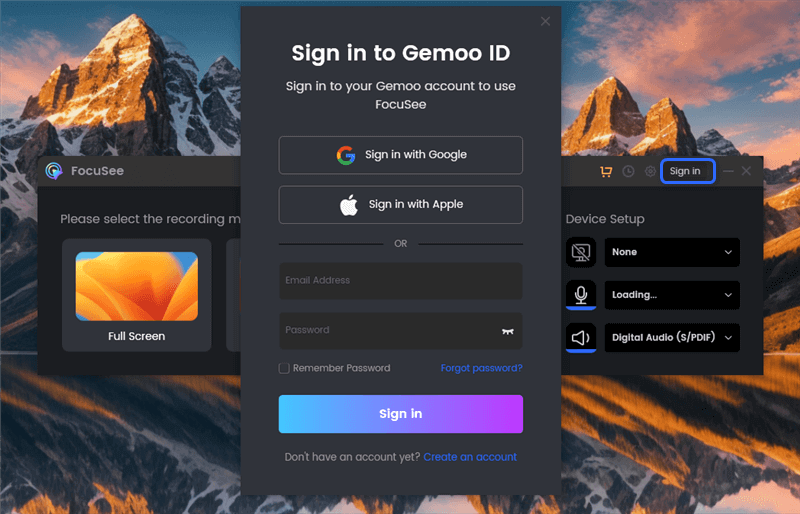
Create an Account and Activate FocuSee
Step 2. Locate the Device Setup and adjust the microphone and camera settings. FocuSee offers three recording options. Select the desired option and start recording your video.
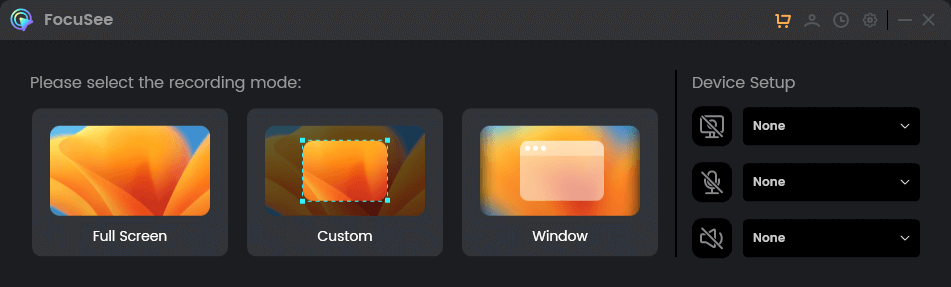
Choose a Recording Mode
Step 3. FocuSee focuses on capturing screen recordings and can automatically handle post-production. After recording, you can further customize the output by changing the background, adjusting the cursor style, adding captions, editing zoom effects, and applying other enhancements to create a polished, professional video.
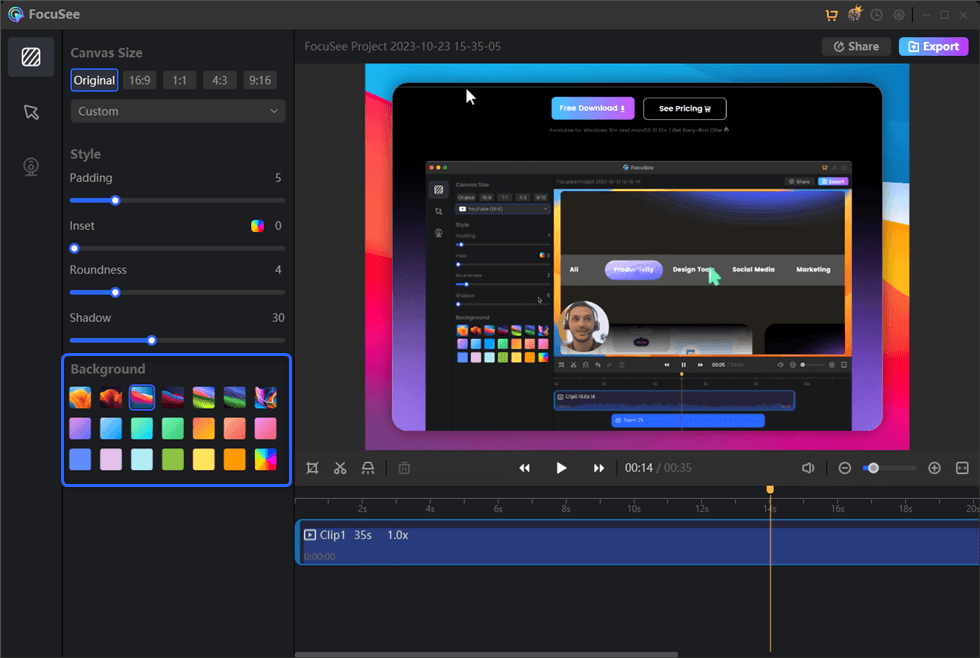
Change out a Virtual Background
Step 4. Export the recorded video as an MP4 or GIF file, or easily share it via a link.
Method 2. Screen Record on Mac via Keyboard Shortcut
This method involves the use of your Mac OS keypads. It’s obviously one of the easiest and quickest screen recording techniques available to end users. Also, it’s cost-free.
To make a screen recording on your Mac OS using keyboards, follow the steps below:
Step 1. Open the Screenshot Toolbar. On your Mac OS, locate the hotkeys Command + Shift + 5 and then click on them in the same order. This will immediately open the screenshot toolbar at the bottom of your screen.

Open the Screenshot Toolbar via Keyboard Shortcut
Step 2. Record Your Entire or Partial Mac Screen. Locate the round rectangular shape icon which is four buttons away from the ‘x’ icon, and then click on it to record your entire screen. To record a selected portion of your Mac screen, use the dotted rectangle shape next to the round rectangular shape icon.
Record Your Entire or Partial Mac Screen
Step 3. Enable Screen Recording. Click on the ‘Record’ tab to commence screen recording on your Mac OS. Wait a while for the ‘screen recording’ to complete then proceed to the next step.
Step 4. Stop Screen Recording. To stop recording, locate and click on the ‘Square in Circle’ icon. Better yet, you can use the hotkeys: Command + Control + Esc.

Stop Screen Recording
Method 3. Screen Record on Mac via Screenshot
For this method, you will be taking a screenshot which is an alternative to screen recording. Rather than having a video clip, your file will be saved in the form of an image. The technique is simple and economical as it lets you manage your device’s memory space. However, it does have its challenges as you can not use it for a video clip.
To record your screen on Mac via screenshot, check the stepwise guide below.
Screen Record on Mac via Screenshot
Step 1. Launch the Screenshot Toolbar. On your keyboard, tap on Shift + Command + 5 to open the screenshot tab. Here is a visual representation of what will pop up on your screen.
Step 2. Take a Screenshot. Click on the rectangular icon next to ‘x’ to capture your entire screen. Alternatively, you can use the hotkeys: Shift + Command + 3.
Step 3. Catch a Portion of the Mac Screen. If you would like to capture a portion of your screen, tap on the dotted rectangle icon which is two buttons away from ‘x’. Better yet, you can use the hotkeys: Shift + Command + 4.
Method 4. Screen Record on Mac via QuickTime Player
QuickTime Player is an inbuilt app on all Mac OS- that is it’s a preinstalled program. This program could be used for several purposes, including screen recording. Let’s check out how to screen record or stop screen record on QuickTime Player.
To use QuickTime Player, follow the guide below:
Step 1. Launch QuickTime Player. Locate and tap on the QuickTime Player icon on your screen. If you do not have an idea of what the icon looks like, here is an image of it.

Launch QuickTime Player
Step 2. Open Screen Recording Window. Click on the ‘File’ tab located at the top of your screen, then click on the ‘New Screen Recording’ icon from the list that appears to open the screen recording window.

Set up a New Screen Recording
Step 3. Start to Record Your Mac Screen. Hit the red circular icon to start the screen recording process. If you would like to record your entire screen, click anywhere on your screen. However, if it’s a portion of your screen you want to record, click and drag your cursor over the section, then tap on ‘Start Recording’ at the center.

Start to Record Your Mac Screen
In addition, if you would like to record sound, tap on the drop-down menu next to the red circle, and then select ‘Internal Microphone’ as shown below. Then click on the circular icon with a square embedded in it if you seek to stop recording your screen.

Enable the Internal Microphone
Step 4. Preview Your Recording then Save. Now the recorded file will pop up on your screen, click on it to preview. If you are satisfied with the result, proceed to save the file. To do that, click on File > Save.

Preview and Save Your Recording
Final Words
With the tutorial guide given above, taking a screen record on Mac OS shouldn’t be a problem anymore. Just employ one of the techniques/methods given in the guide, and you are good to go.