Microsoft Word is a popular word processor, but although it does a good job editing text, it has several issues when dealing with photos in a document. Manually selecting images and storing them may be tedious and time-consuming, particularly when working with huge files, including several pages. As luck would have it, though, there are a few ways that make extracting images from Word as easy as eating a pie.

How to Extract Images from Word
Extracting photos from Word is as easy as screenshot in Word. You may need screenshot software for this, but in fact there is no need to spend a lot of money on installing software. Save your photographs after uploading your Docx file or Google Docs; it’s as simple as that. To extract photos quickly and easily from a Microsoft Word document, read the article below to get a step-by-step map.
Table of Contents:
Can you Export an Image from Word?
How to Extract Images from a Word Document?
Can you Export an Image from Word?
Yes, you can export images from a Word file. Images and other images included in a Microsoft Office document are preserved in the document itself. On the other hand, you could wish to save a photo to its file to utilize it in another context. There are 2 ways o do this:
- You can save a photo, diagram, chart, or shape in Office for macOS as its own individual image file.
- You can save a photo, shape, or SmartArt image on a PC as its distinct picture file, whether in PowerPoint, Word, or Excel. When using Outlook on a PC, you can only save a photo to its own independent image file.
Further Reading:
How to Fix Save Image As Not Working on Mac >
How to Extract Images from a Word Document?
The following are the two methods considered the most effective for extracting all photos from a Microsoft Word document: Therefore, without further ado, let us get started.
Extract Images from a Word Document by Saving as Picture
The following method applies to images, shapes, charts, digital ink, SmartArt graphics, and text boxes in PowerPoint, Word, and Excel. The steps outlined here are the only ones that will work for images in Word:
Step 1: Click the illustration you wish to save as its own picture file by right-clicking it and selecting “Save as Picture” from the context menu.
Step 2: Choose the desired file format from the selection that appears when you click the Save as type button.
Step 3: You can give the image a new name by typing it into the “File name” box or accept the recommended name.
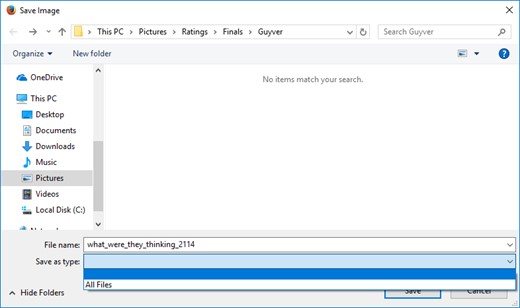
Select File Type
Step 4: Choose the folder on your computer where you wish to save the Picture. Select the Save option.
Extract Images from a Word Document via a Screenshot
Taking a screenshot can be another easy way to extract images from a Word document. You can simply save the image from a Word file to your computer, though, you fail to make it when you working on online Google Docs. And in this situation, taking a quick screenshot via a professional screenshot tool – Gemoo Snap will make extracting images more convenient.
Besides, Gemoo Snap also allows you to edit your screenshot and recognize the texts in images extracted from the Word document. Thus, you can add some notes or symbols if you want to give some highlights to it.
Free download Gemoo Snap and continue reading, learning how to use Gemoo Snap to extract images from a local or online Word document.
Step 1. Open Gemoo Snap and sign in to the software by following the steps on the screen.

Gemoo Snap Interface
Step 2. Open the Word document or online Google Docs and navigate to the images you seek to extract. Tap on the Clipboard screenshot mode and capture the image with 1 simple click.
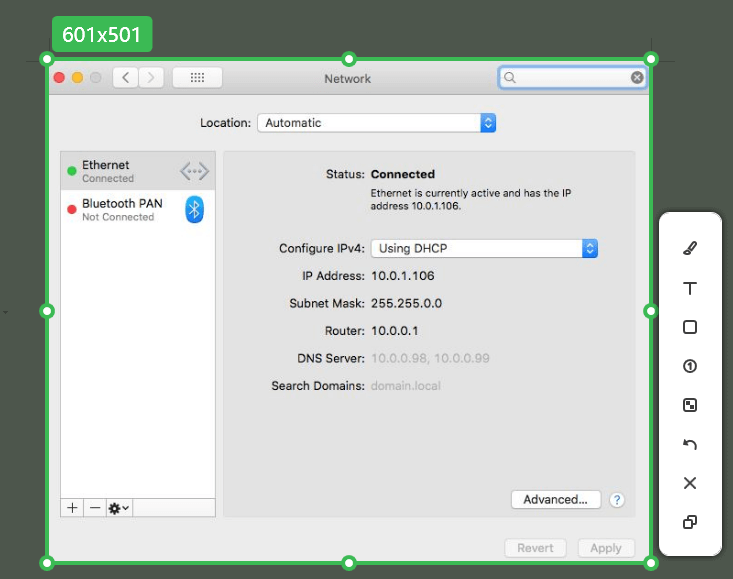
Extract Images from a Word Document via a Screenshot
After capturing the screenshot, you can add annotations to it via the right toolbar. When you’ve finished editing the screenshot, it will be uploaded to the cloud, where you can manage it or copy and paste the screenshot to share it with others.
Extract Images from a Word Document via Copy and Paste
This method is not as effective as the one that came before it, but it would be useful when extracting one or two photographs.
Step 1: Select “Copy” from the context menu when right-clicking on the Picture. There will be no change to the duplicated image’s dimensions or quality in any way.
Step 2: Now, use an image editing application like Paint, Photoshop, or GIMP; however, in this situation, I would use the default tool known simply as “Paint.” Launch Paint, paste the Picture into the program, then either hit the “CTRL+S” key combination or click the Save button to save the image.
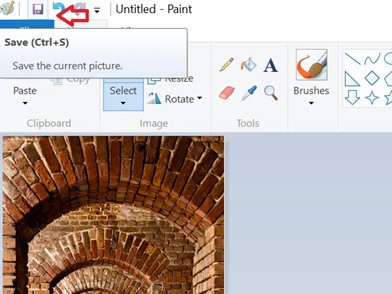
Save The Picture
How to Extract Multiple Images from a Word Document?
In this part, you should demonstrate how to extract multiple images from a Word document simultaneously. It would help if you introduced the ways with detailed steps and high-quality pics.
Extract Multiple Images by Saving as a Web Page
This is one of the simplest approaches when it comes to extracting all of the photos from a Word document. We will save the Word document as a Web Page, and then it will pull all of the photos out at once. Follow the steps below:
Step 1: Launch Microsoft Word and go to the file from which you want to extract all photos. Now, pick “Save As” from the drop-down menu that appears when you click the “File” button, which is located in the upper left corner of the document.
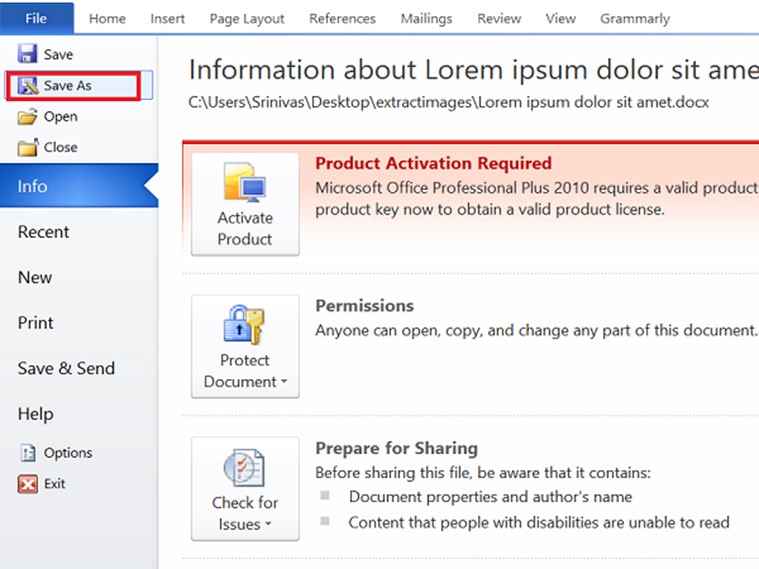
Select Save As Picture
Step 2: Choose the place on your computer where you wish to store the file, and give it a descriptive name. Now, under “Save As,” choose “Web Page” from the drop-down menu.
Step 3: You will also notice an option labeled “Web Page, Filtered,” but you should not click it since doing so might lower the resolution of the photographs. To save the Word document as a Web Page, you must click the “Save” button.
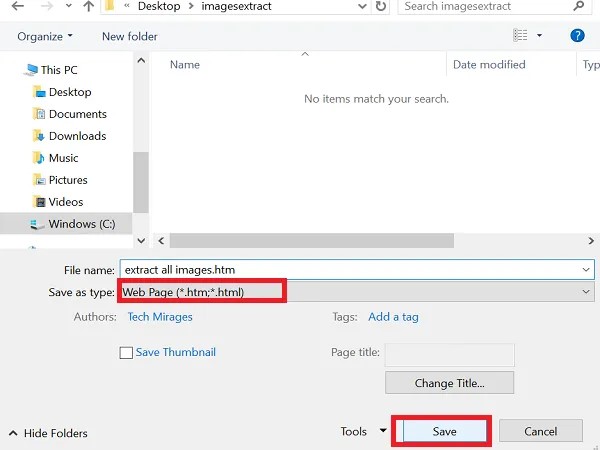
Click The Save Button
Step 4: If you go to the place where you saved the document, you will notice a file with the extension “.htm,” and a folder with the supplied name will be created for you automatically. When you open the folder, you can see a list of all the photographs. Make copies of all these photos and paste them into a folder of your choosing.
Extract Multiple Images by Saving them as Zip Folder
Simply renaming the file extension from “.docx” to “.zip” is required to use this straightforward procedure, enabling you to extract all the photos from the document in a single batch. Let’s have a look below:
Step 1: Choose the necessary file, right-click on it and pick “Rename” from the context menu.
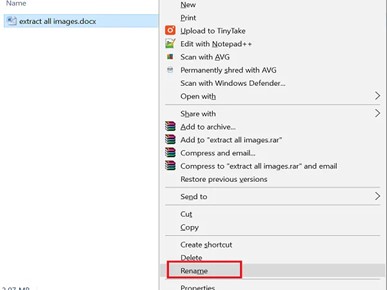
Click Rename File
Step 2: Now, change the extension from “.docx” to “.zip” and click Enter after you’ve made the change. This dialog box will appear, but there is no need for an alarm; choose “Yes” from the menu.
Step 3: To extract the contents of this zip file, you may use any of the standard zip extraction programs, such as 7-Zip or WinRAR. Please provide the path to where you want to extract the ZIP folder.
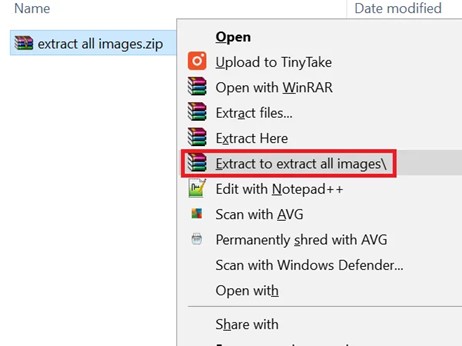
Extract To Extract All Images
Step 4: Now, open the folder you extracted, and go to Word > Media in the menu. You may locate all of the photographs right now in the folder labeled “media,” and you can copy any of them to another location if you want. To extract the photos from the Word file, you may right-click the file and then use 7-Zip.
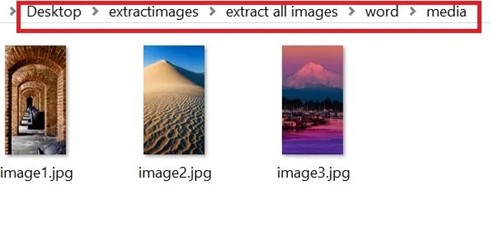
Open Word Media
FAQs About Extracting Images from Word
In this part, we collect a list of frequently-asked questions about extracting images from Word.
1. Can You Find the Source of an Image from Word?
Yes, you can. To access the size selection window, right-click the image and choose Size. To access the Alt Text tab of the dialog box, click here. You can paste or type in the name of the file that serves as the source.
2. How Do I Cut and Save a Picture from Word?
First, choose the image by clicking on it, then go to the toolbar’s ribbon and select the Picture Format option. Click the Picture Format tab, then pick the Crop option. There are crop handles drawn in black all over the Picture’s borders and corners. Slide any of the crops handles inward to crop the Picture.
Final Thought
Blog posts cannot exist without accompanying images. In fact, including photos in your content will result in 94% more people seeing them. However, it is not always simple to track down the ideal Picture. And even if you discover it, you may not understand how to copy it and save it on your computer so that you can use it in the future.
The good news is that extracting photos with these f4 simple solutions is straightforward. They are all you need to maintain readiness whenever you want to capture the picture-perfect moment. In addition, if your authors provide you files in.zip format, your work will be quicker and more structured.

