Have you ever seen a stunning picture on your Mac while browsing the web and wanted to save it? This is where “Save Image As” helps. This handy application allows users to save Internet images to their Mac’s local storage effortlessly. The “Save Image As” option lets you directly save photographs, infographics, and memes to your computer.
The ‘Save Image As’ feature may sometimes malfunction despite its simplicity, leaving users confused and upset. If “Save Image As” doesn’t function on your Mac, this article will explain how to fix it. We will discuss browser-specific defects and system setups that create this problem and provide easy remedies to restore image-saving capabilities. Get going!
What Is the Mac Command for Save As?
The “Save As” command on a Mac lets users make a duplicate of a file and change its name or location. When users wish to edit a file without changing the original or save it in a new format, they use this command.

Save Image As Not Working On Mac
The default keyboard shortcut for “Save As…” on modern macOS systems can be a bit complex. To access the “Save As” command, users must press a combination of keys: Command + Option + Shift + S. This finger-twisting shortcut may initially seem daunting, but it provides a quick and efficient way to invoke the “Save As” functionality.
Why Won’t My Mac Let Me Save As?
The “Save As” feature not working on your Mac might be annoying, but there are a few frequent causes and remedies. Explore some possible causes below and see which one is occurring on your device:
✏️ File Permissions and Locations
Saving a file necessitates appropriate permissions and a legitimate location on your Mac’s storage. The “Save As” option may not work whether you try to save a file in an unapproved location or without a destination. Make sure you save the file in your user or Documents folder and have permission to change it.
✏️ Application-Specific Restrictions
Certain applications may restrict the “Save As” function to file types or contexts. This restriction may be intentional, such as when working with a read-only document or a file format that does not support the “Save As” command. Verify that your application has no restrictions on storing files and consider utilizing alternative methods such as exporting or duplicating the file.
✏️ Keyboard Shortcut Conflicts
Keyboard shortcuts may sometimes have unexpected results when used together. The “Save As” shortcut can conflict with another command if you have modified your keyboard shortcuts or installed third-party apps that alter them. Make sure there is no duplication of shortcuts by reviewing your keyboard settings. The default settings of shortcuts may be restored if necessary.
✏️ Application Glitches
Because software isn’t always flawless, programs might have glitches that impede functioning. If your program is experiencing a brief problem, the “Save As” command may not function properly. Close and reopen the program, restart your Mac, or update it to the newest version to see if the problem goes away.
✏️ System Updates and Compatibility
Updating the operating system may cause compatibility issues with certain applications, impacting the “Save As” function. Ensure that your operating system and application are current. If the problem with “Save As” began after a recent update, consider contacting the application’s support team or perusing online forums for solutions related to that update.
Further Reading: How to Find Screenshots on Mac >
How to Fix My Save As Not Working on Mac?
Now that you’re fully aware of the reasons behind the Save Image As option not working on your Mac, it’s time to delve into the fixes to the problem. Each method mentioned below is our tried and tested and works alternatively when you need to save an image to your Mac. Let’s look at each one of them in detail below.
Save an Image on Mac Through Drag and Drop
Mac users can quickly drag and drop photos across programs or devices. Allowing you to save images from email, search engines, or documents of any type. However, Instagram photographs cannot be saved as the platform doesn’t allow it. To save a picture by drag-and-drop, follow these steps:
Drag and Drop to Save an Image
Step 1: Drag-and-drop to save a photo on a MacBook. Open the email, document, or website with the photo you want to save to your MacBook.
Step 2: Open the picture if needed. Click the photo to see a Google search result in full-screen mode.
Step 3: Click and drag the picture to the Mac. Drag the photo of the browser window till it floats over your desktop by clicking and holding it.
When you move the picture away, it should seem translucent.
Save Images from Google on Mac
Google can help you find and save the same picture if you can’t use “Save Picture As” on your Mac. Simply go to Google, open the picture from your smartphone, or search for it, and save it. Perform the following steps to do so:
Step 1: Find a picture to copy or save online.
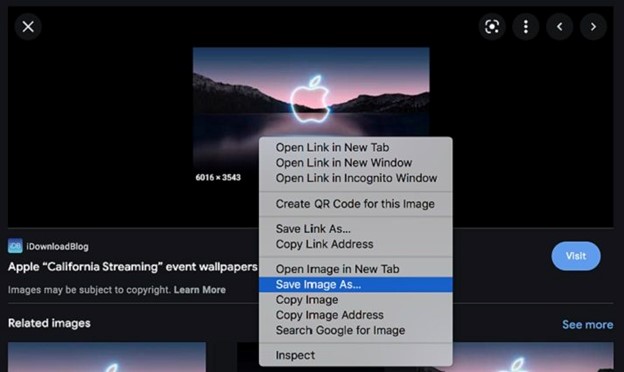
Step 2: Right-clicking (or Control-clicking) the picture will open a contextual menu with all the choices.
Step 3: Create an image folder using the “Save Image As” pull-down option.
Save Images from Google on Mac
Step 4: Choose a folder to save the picture. “Save Image As” copies the picture to your Mac, like “Save Image to Desktop.”
Use Copy/Paste When Saving Image
Macs cut and paste photographs like Windows PCs. The “Command” button, “X,” “C,” and “V” keys are used to cut, copy, and paste on Macs. Website images can be copied but not cut on Mac. Instead, Word and Finder images can be cut or copied. Here’s how the photo storage on a MacBook via copy-paste works:
Step 1: Hold the “Command” down.
Step 2: Click “X” to cut the picture. Press “C.” to copy it. This is done by removing and transferring the image to the Mac RAM.

Copy Paste an Image
Step 3: Put your cursor where you want the picture to go and click. To paste it, hold down the “Command” key while hitting the “V” key.
Further Reading: How to Copy and Paste a Screenshot on Mac >
Grab a Screenshot of Your Mac Display
When the “Save As” feature on your Mac isn’t cooperating, one unexpected but effective solution can be to grab a screenshot of your Mac’s display. While this might seem unrelated, taking screenshots can sometimes refresh the system and its functionalities, including the saving feature. It’s a quick and non-intrusive way to give your Mac a little nudge back in the right direction. Mac users can use a keyboard shortcut to screenshot this way:

Screenshot Image
Step 1: Press Shift+Command+4.
Step 2: Once done, a crosshairs-shaped icon will replace your cursor. Select the capture area by clicking and dragging.
Step 3: When you release the mouse button, your Mac will take a picture of the area and save it to your desktop.
How to Save Image on Mac without Mouse?
Saving photos on a Mac without a mouse is optimal. While the mouse lets you click settings to store the picture in a directory, keyboard shortcuts let you save photographs anywhere on your Mac. This procedure is simple and time-saving. Just press Shift + 4 simultaneously. Then, left-click and hold. Once done, you can drag the box around the image and capture the desired area.
Final Thought
The reasons behind a malfunctioning “Save As” feature on your Mac can vary from file permissions to application quirks. However, armed with the insights and solutions presented here, you’re well-equipped to navigate these challenges confidently. Remember, troubleshooting technology issues is all about systematic exploration. Whether it’s a keyboard shortcut hiccup, an application-specific limitation, or even the surprising efficacy of taking a screenshot, each solution sheds light on the intricacies of your Mac’s operating system.