Fixed! Screenshot not Working on Mac and Windows

Taking screenshots and distributing them to other users is an essential element of the process for many users. On each machine, there is a different screen capture method available. Taking a screenshot is straightforward and uncomplicated on Mac and Windows, just as it is on any other operating system. Users of Windows and Mac can quickly and easily snap screenshots using these tools.
How to Fix Screenshot not Working on Mac and Windows
Sometimes these tools run into some unknown problems, which can make you wonder why your Snipping Tool Not Working. However, if you’re facing such a situation, don’t worry because you’re in the right spot. In this article, you’ll discover the reasons and the finest ways the fix the problem on Mac and Windows. Let’s get going!
Table of Contents:
How to Fix Print Screen Not Working on Windows
How to Fix Snipping Tool Not Working on Windows
How to Fix Print Screen Not Working on Windows
Windows comes with a built-in keyboard key, PrtScr, which allows you to take a screenshot of your screen without opening a whole application. Since it has made taking a screenshot easier for Windows users, this key not working can be annoying.
Why Is My Print Screen Function Not Working?
There can be many reasons for the Print Screen function not working on Windows. Some of the most common ones are:
- Print Screen function is disabled
- Your Keyboard drivers are outdated
- Hardware issues
These issues can result in your Print Screen feature malfunctioning. And if you wish to fix it, follow the section below:
How do I get my Print Screen button to work?
To know how to fix the Print Screen button not working on Windows, follow these methods:
Method 1. Make Sure Your Print Screen Key is Enabled
The first thing to fix your print screen button not working issue you should do is to make sure that it is enabled in your keyboard settings. Because the option is not enabled, the PrtScr key won’t work.
To enable the PrtScr key from your Windows settings, follow these steps:
Step 1. To get Ease of Access, press the Windows key + U. Scroll down until you see the Keyboard. Click on it.
Step 2. Right-click on the Print Screen Shortcuts area and enable it.
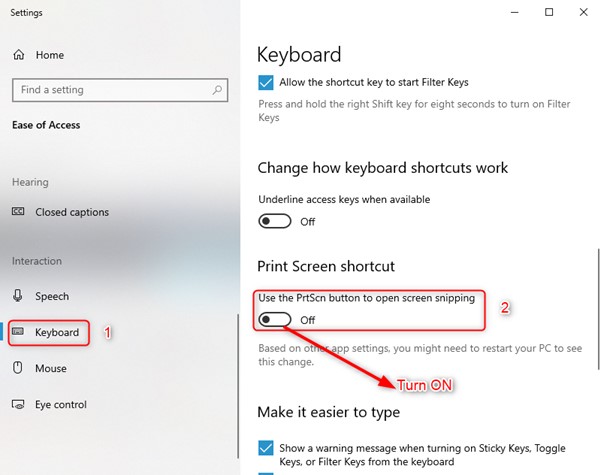
Toggle the Print Screen Shortcuts Option
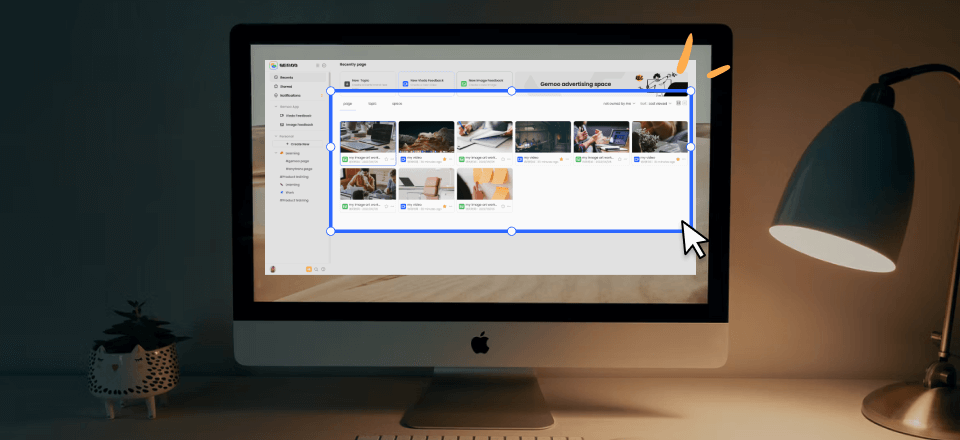
Method 2. Using Gemoo Snap to Take Screenshots
As a free and professional app for taking quick screenshots, Gemoo Snap can provide you with a variety of screenshot needs even without the Print Screen button. Quick screenshot, screenshot and feedback, screenshot immediately annotate the image, and screenshot upload to the cloud, etc.
Whether you need to report a bug, give feedback on a design or assignment, Minecraft gameplay, or anything else, it can help you quickly and easily. It works well both on Windows and macOS computers.
Now, please follow the detailed steps to take screenshots with Gemoo Snap:
Step 1. Free download and install Gemoo Snap on your computer first. Or, you can install an extension in Chrome (Add to Chrome). Please choose a function and tap on it.

Gemoo Snap Interface
Step 2. Now, please click and drag your mouse to customize the desirable region, then release it.
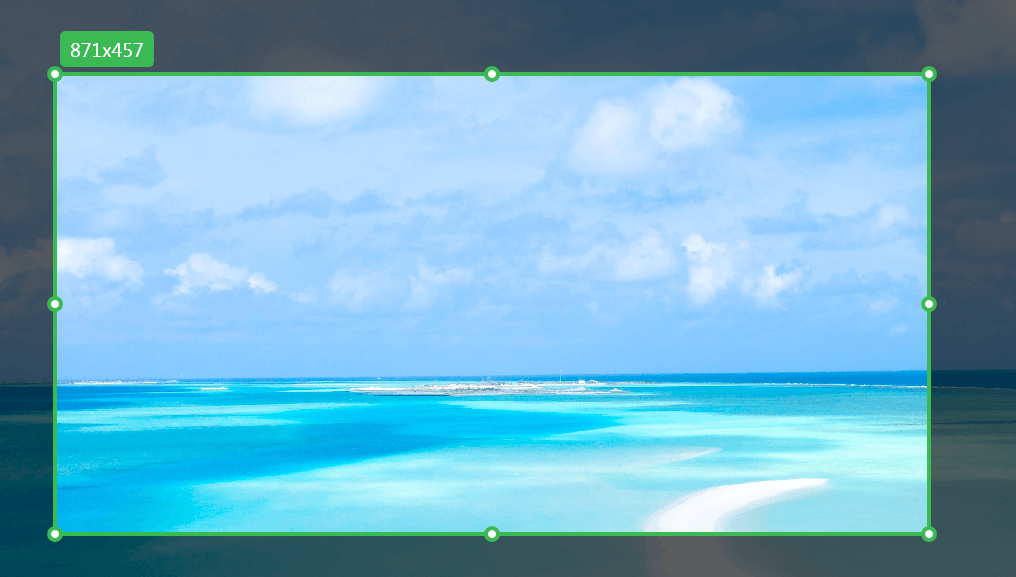
Frame The Screen
Step 3. Then, you can see the toolbar with brush components and add the annotation in this screenshot.
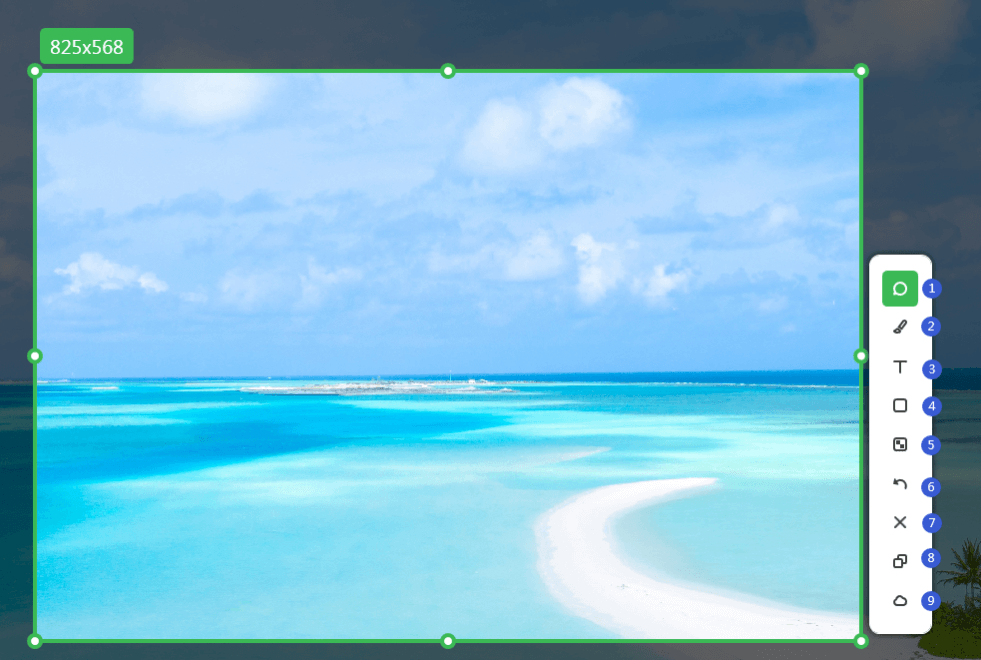
Add Feedback for Screenshot
Method 3. Update Your Keyboard’s Drivers
If your PrtScr is already enabled, there must be an issue with your keyboard drivers. Old drivers can cause problems with the key. To get rid of it, you need to update your keyboard drivers.
To update your keyboard drivers, follow the steps below:
Step 1. Click on the Search menu and search Device Manager; click on the first option to launch it.
Step 2. Click on the arrow next to the Keyboards menu to expand it.
Step 3. Update the driver by selecting Update Driver from the popup menu when you right-click on the expanded keyboard option.

Click on Update Driver
Step 4. Choosing Search Automatically for Updated Driver Software allows Windows to search for the most recent driver on your computer or online and then follow any on-screen instructions.
How to Fix Snipping Tool Not Working on Windows
For many Windows users, Snipping Tool is useful for capturing and manipulating screenshots. As a native Windows tool, it’s lightweight and excellent for creating screenshots, although it sometimes fails to function correctly. Follow these ways to fix the Snipping tool problems.
Method 1. Stop Snipping Tool from Task Manager and Relaunch it
It is possible that leaving the Snipping Tool and starting it back up again would fix the issue of it not functioning. You may stop the Snipping Tool entirely by using the built-in tool Task Manager, which enables you to quit any application that is not responding or hanging. After doing so, you can try relaunching the application to see if this resolves the issue.
To solve the Snipping tool issue with this method, follow these steps:
Step 1. Click on the Search menu and search Task Manager; click on the first option to launch it.
Step 2. Right-click the Snipping Tool icon on the left side of the Processes tab, and then pick End task from the option that appears.
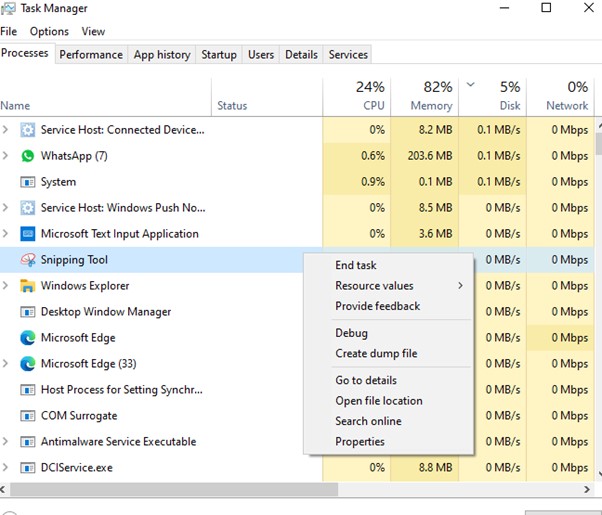
Click on the End Task Option
Step 3. Try restarting your Snipping Tool to see if it works or not.
Method 2. Repair Snipping Tool
You can give the built-in procedure Apps & features a try to repair the app if it isn’t functioning properly or if some functions of the app aren’t working properly. This will allow you to perform the workflow again.
To repair the snipping tool, follow these steps:
Step 1. Go to the Windows Settings, and click on the Apps & Features option.
Step 2. You can enlarge the Snipping Tool by scrolling down to the list and clicking on it. After that, choose Advanced Options.
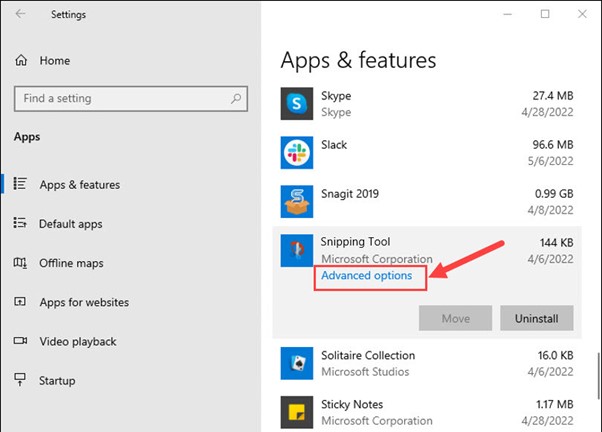
Click on Advanced Options
Step3. If the option to Repair is available, choose it. Choose to Reset the app if the option is not accessible or if it does not resolve the issue.
How to Fix Screenshot on Mac not Working
Wondering how to get the screenshot not working on Mac fixed? Like Windows, macOS also has the built-in screenshot feature and there are also many snipping tools for MacBook. And it’s not difficult to remove screenshots on a Mac desktop to free up storage space and maintain desktop organization. However, it can run into issues. If such a thing happened to you, follow the methods below:
Method 1. Make Sure that Mac Screenshots Are Enabled
Even if the macOS automatically allows the capacity to take screenshots when it boots up, you may verify this behavior in the System Preferences menu. To make sure Mac screenshots are enabled, follow the steps below:
Step 1. Choose the Apple icon from the above menu and select System Preferences.
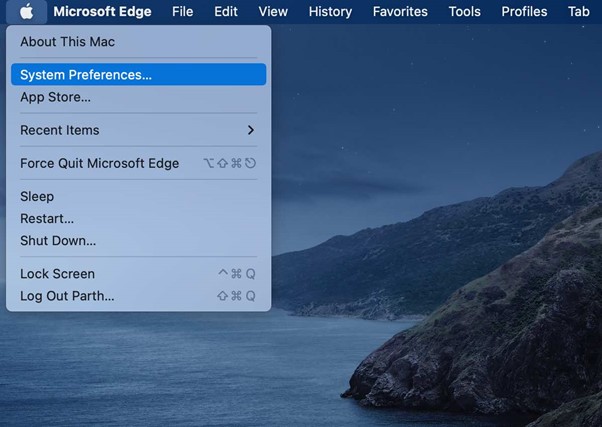
Click on System Preferences
Step 2. Navigate to the Keyboard menu, and then choose Shortcuts from the menu that appears above it.
Step 3. Choose Screenshots from the menu on the side, and then ensure the appropriate checkboxes are checked.
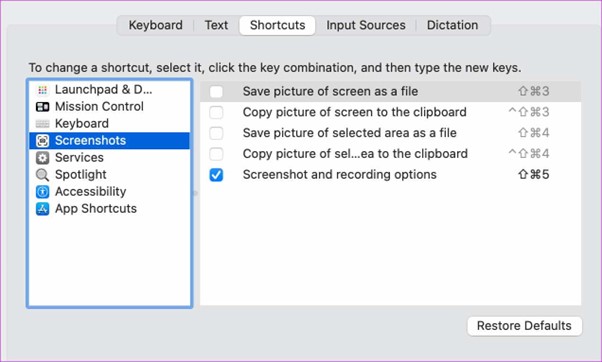
Click on Screenshots
Method 2. Do NVRAM Reboot
The NVRAM is where your Mac saves its fundamental settings, such as the display information, the time zone, and the sound level, among other things. You can address fundamental problems with your Mac by resetting the NVRAM.
To do an NVRAM reboot on your Mac, follow these steps:
Step 1. Pick Shut Down by clicking on the Apple symbol located in the top menu bar.
Step 2. Hold the power button until you hear the start-up beep.
Step 3. After that, for the next fifteen to twenty seconds, press the keys Command, Option, P, and R.
Frequently Asked Questions
How do I get my Print Screen button to work on my Dell?
To get your Print Screen button to start working on Dell, follow these steps:
Step 1. Press the Windows + U key, and select Keyboard from the left menu.
Step 2. Now toggle the option under the Print Screen Shortcut section to ON.
Why is my screenshot not saving on Mac?
Restarting your Mac may help fix a benign system fault that causes Mac screenshots to stop functioning. Restarting your laptop is as simple as selecting Restart from the apple symbol in the upper left corner of your screen. Restart your computer and see whether the shortcuts for taking screenshots function.
Final Words
Screenshot, no doubt, is the need of the hour since you require it for conveying your idea properly. And during this era, it can be quite annoying if your laptop stops taking screenshots. However, if you’re facing such a scenario, we hope you know how to solve the Snipping Tool Not Working issue after reading this article.