Welcome to Midjourney, a multifaceted platform designed to cater to your diverse digital needs. If you’ve recently joined Midjourney and are wondering ‘How to Upload Images to Midjourney?’, you’ve come to the right place. This guide can help beginners like you through the process, making it simple.
Uploading images is a basic yet essential feature of Midjourney, and mastering this process will significantly enhance your user experience. This guide, however, continues beyond just uploading. We walk you through other exciting features of Midjourney, such as its unique image editing capabilities and the easy steps to combine two images. As a new user, you may also have various questions. Don’t worry; we’ve covered you with a comprehensive FAQ section addressing common queries from Midjourney users.
Also Read: How to Fix Midjourney not Working? >
Can Midjourney Edit Existing Images?
When it comes to working with images, Midjourney is a versatile platform. Yes, you can indeed use Midjourney prompt generators to generate images or edit existing images on Midjourney. The platform provides tools to simplify the editing process, even for beginners.
First and foremost, after uploading your images to Midjourney, you will find basic editing features like other image annotation tools. These include the ability to resize, crop, and rotate your images. This can be particularly handy if you have photos that don’t fit your desired dimensions or need adjustment in their orientation.
Midjourney Upload Image
Midjourney provides an array of filters and effects to enhance your images. Adjust brightness, contrast, saturation, and more with just a few clicks for quick personalization or artistic flair – ideal for beginners without advanced photo editing knowledge!
Midjourney stands out in particular due to its ease of use. All its features are presented in an intuitive, user-friendly interface without the need for specialist knowledge, making Midjourney an excellent option for beginner photo editors who wish to edit images quickly and effectively.
Midjourney provides all the tools necessary for image management: upload, store, refine, and polish them all within one comprehensive platform. It’s an all-in-one solution.
Further Reading: How to Use Midjourney without Discord >
3 Ways to Upload Images to Midjourney
Now that you understand the editing capabilities of Midjourney, it’s time to take a closer look at how to upload images to this platform. This step is essential as it allows you to use your photos or any inspiring image and combine them with Midjourney’s AI to create unique pieces. Uploading images to Midjourney can be achieved in three main ways: using Discord, utilizing Imgur, or applying the /blend command on Midjourney. Each method has its steps; understanding these will ensure a seamless experience using Midjourney. Let’s delve into each of these methods one by one.
Upload Images to Midjourney via Discord
Uploading images through Discord is widely used due to its convenience and the community around Midjourney on Discord. Here’s how to do it
Step 1: Access the Midjourney server on Discord via the desktop app or web version.
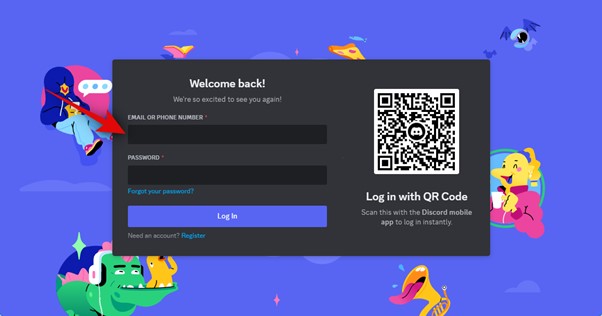
Access Midjourney Server on Discord
Step 2: Click the direct message icon in the bottom left corner.
Click Direct Message Icon
Step 3: Create a new group DM by selecting offline friends.
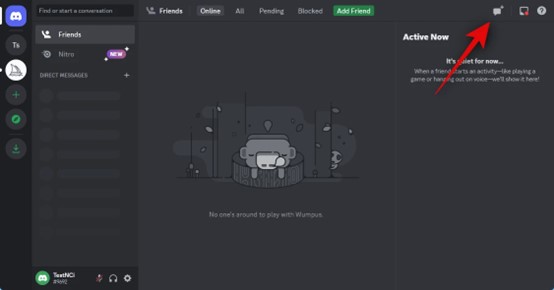
Create New Group DM
Step 4: Once the group is made, remove all added friends to create a solo group.
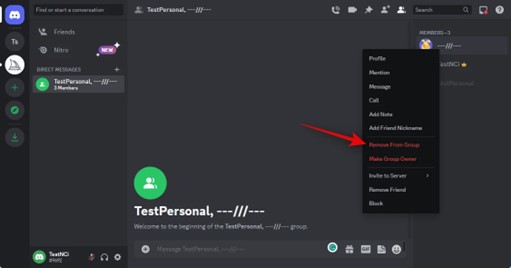
Remove All Added Friends
Step 5: Use the “+” icon at the textbox’s bottom to upload your image. Press Enter to upload the image to the message.
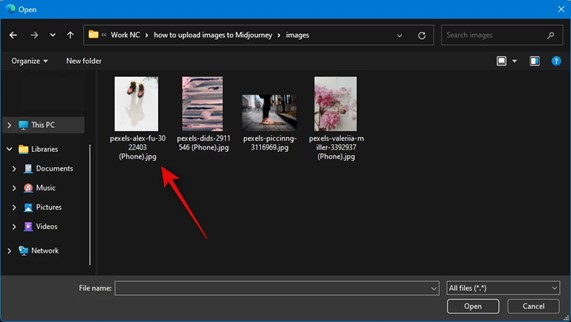
Upload the Image
Step 6: Click the uploaded image and open it in the browser to copy its URL. Go back to the Midjourney server and select a channel.
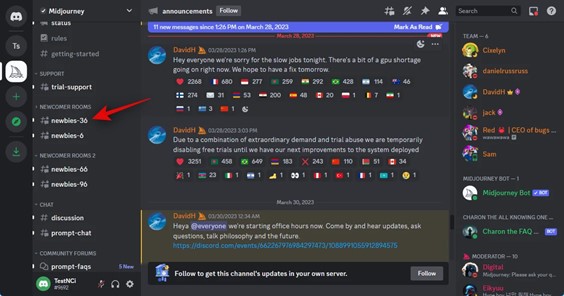
Select A Channel
Step 7: Use the /imagine command, paste your image URL, add a text prompt, and adjust the image weight using the -iw (Value) command. Add your text prompt after a single space.
Step 8: Press Enter to submit your command, and voilà, Midjourney will generate a new image using your uploaded image and text prompt.
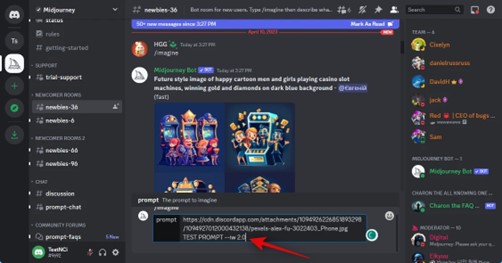
Press Enter to Submit Command
Further Reading: How to Add ChatGPT to Discord >
Upload Images to Midjourney via Imgur
Imgur provides an alternative method of uploading images for use in Midjourney. The steps to follow are:
Step 1: Log into Your Imgur Account on your PC.
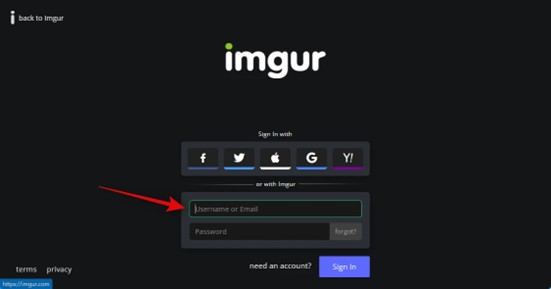
Log into Your Imgur Account
Step 2: Click “+ New Post” and upload an Image for Midjourney.
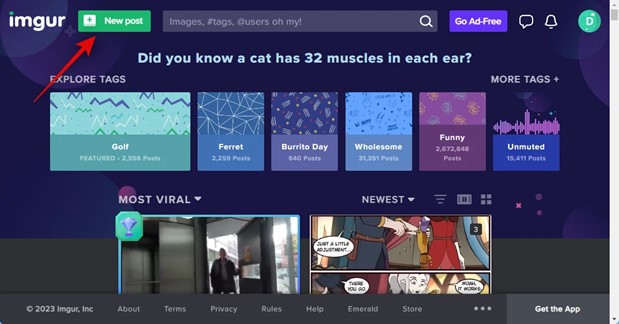
Click New Post
Step 3: Choose the Video/Image that you want to use. Open the image in a new Tab and copy the image’s URL.
Step 4: Open Discord Server and then follow the steps as mentioned in Method 1 to complete the process.
Upload Images to Midjourney via the /blend command
Midjourney offers users a command called /blend that enables them to combine several images into a unique composite image. Here’s how it works::
Step 1: Access the Midjourney server on Discord on your PC. Choose the Midjourney server.
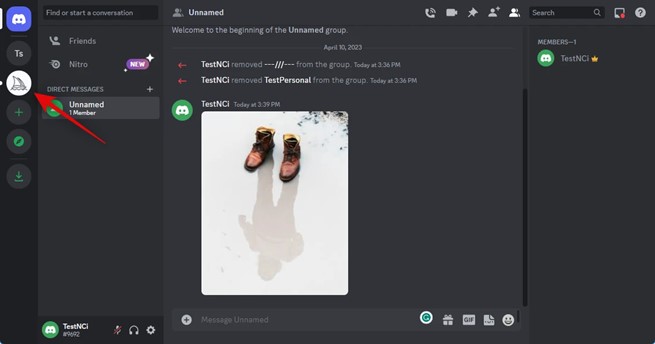
Choose the Midjourney Server
Step 2: Select a newbie channel to blend and create your new image. Type the /blend command in the textbox at the bottom.
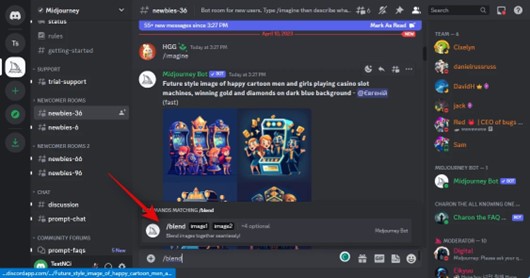
Type The Blend Command
Step 3: Click the placeholders to upload the images you wish to blend. To add more than two images, add more placeholders and upload your images accordingly.
Step 4: Choose your preferred aspect ratios from the available options 1:1, 2:3 (Portrait), and
3:2 (Landscape) for the output.
Step 5: Press enter, and Midjourney will generate a blended image based on your selected images.
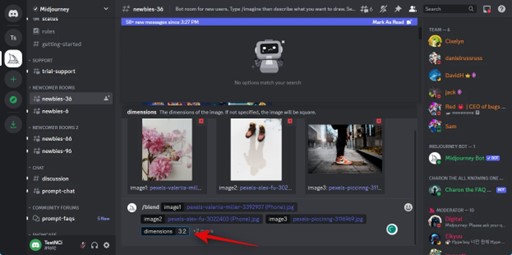
Midjourney Generates Blended Image
By following these methods, you can comfortably and effectively upload and use images on Midjourney, enhancing your experience with the platform’s AI capabilities.
How to Combine Two Images in Midjourney?
Combining two images in Midjourney is straightforward if you know the correct steps. This method is excellent for creating hybrid images incorporating elements from your chosen images. Here’s a step-by-step guide on how to do just that:
Step 1: Launch either a Midjourney server or the Midjourney Bot on Discord, and click on the text box located at the bottom.
Step 2: Enter “/blend” into the search field, and choose it from the drop-down menu that appears.

Enter Command
Step 3: Two “image” boxes appear above the text box. Clicking either box allows you to select or drag and drop images that should fit seamlessly with it.
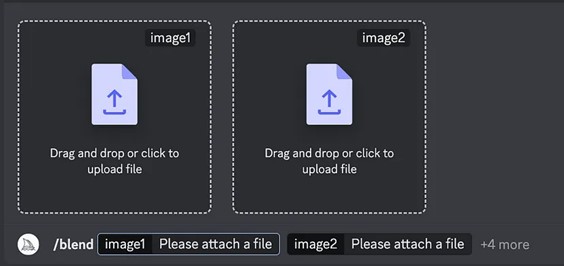
Two Image Boxes
Step 4: Repeat the steps to upload the second image you want to combine. You can add more than two images by repeating the steps above.
Step 5: Once both images have been uploaded, you can choose their aspect ratio for the final image. If you prefer an exact 1:1 aspect ratio, feel free to skip this step – otherwise, click on each prompt box at the bottom for this step to occur.
Step 6: From the menu that pops up, select “dimensions,” enabling an “image/dimensions” box to appear next to your existing “dimension” boxes.
Step 7: Select your output dimension of choice by choosing an aspect ratio from the “Options” menu – Portrait, Square, or Landscape are available as choices.
Step 8: After configuring the /blend command, press Enter. Midjourney will then start analyzing the contents of your images, blending them into one cohesive image.
Step 9: Midjourney will generate a set of new blended images using the photos you uploaded. When processing is complete, you’ll see these new images.
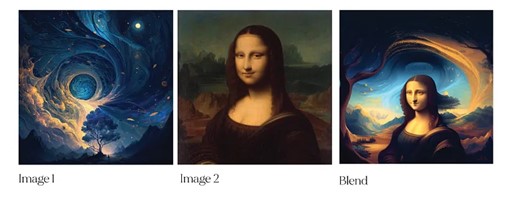
Set of New Blended Images
Step 10: If you like any generated images, you can upscale them by selecting the corresponding options between U1 and U4. If you want to create new results, choose from V1-V4.
FAQs from Midjourney Users
Here, we’ll answer several questions frequently-asked by Midjourney users.
How do I Find my images on Midjourney?
Finding your images on Midjourney largely depends on where you have uploaded them. If you upload images through Discord’s server, they’ll appear in the channel where they were uploaded and will be marked with your username so they’re easy to locate using the search bar at the top right of Discord. Suppose you have uploaded images through a private server. In that case, you can find them similarly within the channel where they were uploaded. Remember, each image generated through Midjourney has a unique ID you can use for searching.
Do Midjourney-generated images have a copyright?
Yes, images generated by Midjourney do have copyright. As a general rule, the creator of the original image holds the copyright. However, Midjourney uses AI to generate images, which creates a new category of authorship. As per the current understanding, AI-generated works aren’t eligible for copyright protection as they don’t involve human authorship. Yet, the input data used by AI may be subject to copyright, depending on its source. As AI-generated content is still emerging, laws and regulations around copyright are subject to change. Therefore, it’s always best to consult a legal professional to use these images commercially.
Can I use Midjourney images commercially?
Before using any Midjourney images commercially, it’s crucial to understand the platform’s terms of service and copyright laws surrounding AI-generated content. Generally, unless specified otherwise by the platform, users should assume they don’t have the right to use the generated images for commercial purposes. Midjourney’s policy may allow non-commercial use of the images. Still, you may need explicit permission from the platform for commercial use. It’s essential to check the platform’s latest policies or consult a legal advisor before commercial use to ensure compliance with all applicable laws and guidelines.
Final Thought
The ability to upload, edit, and even blend images on Midjourney has broadened the platform’s usability and enhanced user creativity. Whether through Discord, Imgur, or the platform’s blend command, you have numerous options to explore and generate unique visuals. Furthermore, it’s important to respect copyright laws and Midjourney’s terms of service when using generated images. We hope this article has clarified your queries about “How to Upload Images to Midjourney?” We invite you to share your thoughts, experiences, and even your Midjourney creations in the comments below. Happy image crafting on Midjourney!

