Taking screenshots is one of the easiest tasks to engage in on your Surface Pro smart device. However, it is quite challenging for folks who don’t have the knowledge. If this is the same for you too, this article is definitely for you.
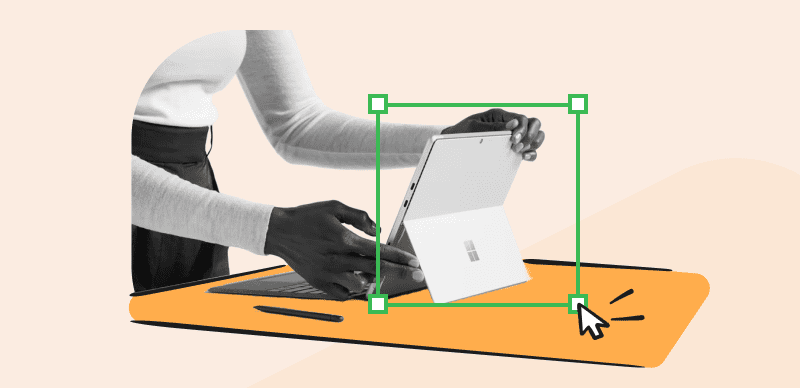
Take Screenshot on Surface Pro
In this post, we will walk you through the various techniques to capture high-quality screenshots on your Surface Pro smart device using different effective methods. All you just need to do is to stick with us till the end of this article.
Table of Contents: hide
Screenshot on a Surface Pro with a Keyboard.
Screenshot on Surface Pro without a Keyboard
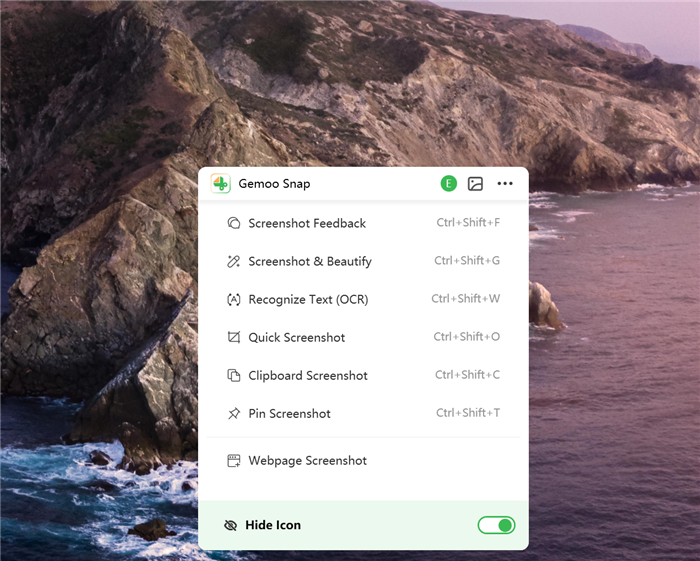
Try Gemoo Snap on Surface Pro
Gemoo Snap, a free and lightweight app for quick screenshots, can meet a range of your needs: quick screenshots, screenshots with feedback, screenshots that immediately improve the image, screenshots that can be pinned, screenshots that can be uploaded to the cloud, etc. Using annotated images to communicate more effectively is made possible by Gemoo Snap. To quickly create a screenshot and annotate your thoughts, whether you need to provide feedback on a design or assignment or report a bug, just click here.
Key Feature
- Gemoo Snap can instantly record the highlights of a game or TV show on your Surface Pro and automatically upload to the cloud with shareable links.
- You only need to take a screenshot, add your feedback and ideas contextually using texts, lines, or shapes, and cover up private information with mosaics when using Gemoo Snap.
- You can easily improve your captures by adding backgrounds, rounded corners, and shapes.
- Assist you in removing text that can be copied from images, videos, PDFs, websites, etc. copy and take notes. Just that simple.
- Take screenshots of the entire screen or a specific area while scrolling, stopping whenever you need to.
Check the steps to take a screenshot on your Surface Pro.
Step 1: Install Gemoo Snap for free on your computer first. Alternatively, you could add an extension to Chrome (Add to Chrome). Please tap on the function of your choice.

Gemoo Snap Interface
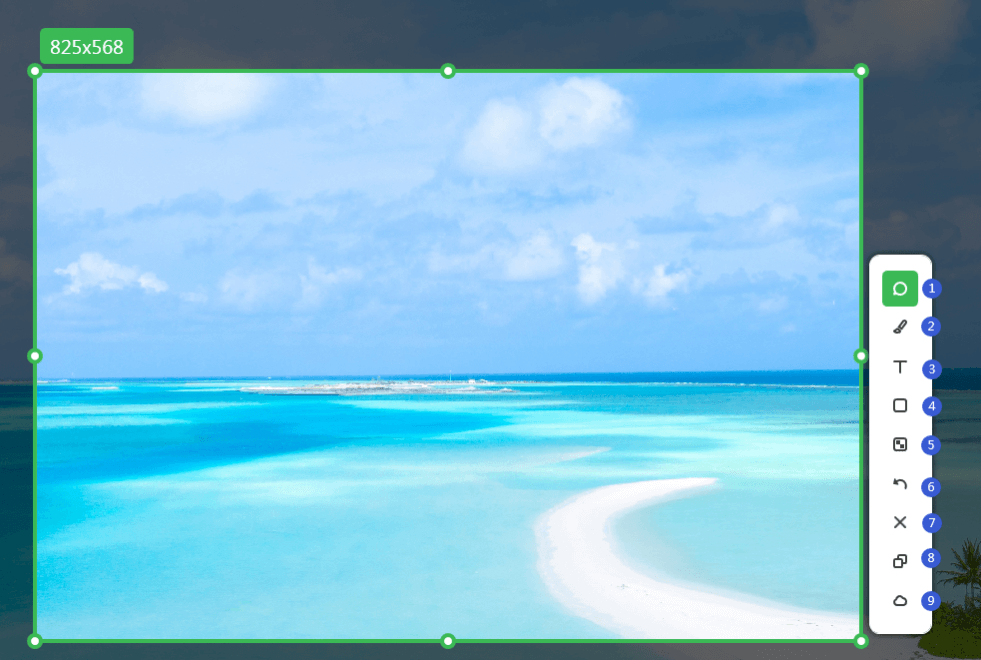
Step 2: Choose the screenshot type. Then, custom captures screen size. Click, drag the desired area with your mouse, and let it go.
The Features for Gemoo Snap
Step 3: You can see the toolbar with brush components, then add an annotation.
Add Feedback for Screenshot
Screenshot on a Surface Pro with a Keyboard
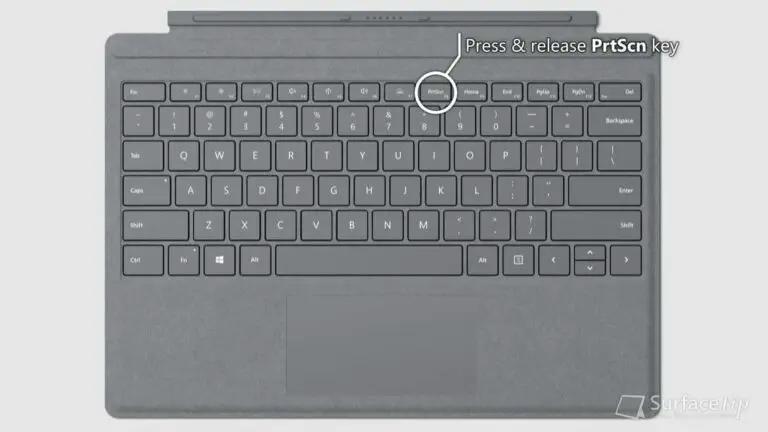
Our first recommended method is by using the keyboard. This is a very simple way to capture your Surface Pro screen, and it just involves holding the right hotkeys. However, it only works with Surface Pro devices with a Type cover.
Check the instructions below to tape screenshots on your Surface Pro with the keyboard:
- Locate the Print Screen button (labeled PrtScn) at the top row of your keyboard.
- Your screen will automatically dim, and brighten which shows that a screenshot has been taken.
Screenshot Surface Pro with PrtScn key
Screenshot Surface Pro with PrtScn key
The resulting image is a snapshot of your entire computer screen. If you wish to screenshot specific windows;
- Launch the window you want to capture.
- Hold the hotkeys; Alt+ PrtScn. Your screen will dim and brighten as usual to show that you’ve taken a snapshot.
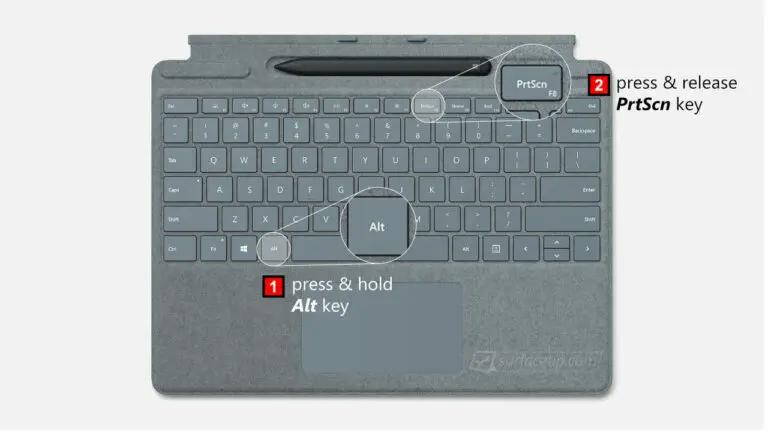
Screenshot Surface Pro with Alt PrtScn
If you own a Surface Pro 3 or older version without the Print key, use the three (3) hotkeys; Fn + Windows + Space to capture your current screen.
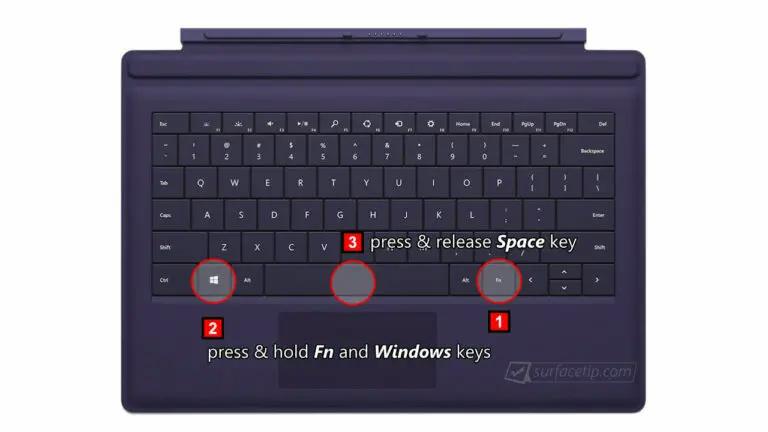
Screenshot Surface Pro 3 with FN Windows Space
Screenshot on Surface Pro without a Keyboard
Should the method above fail to work with your Surface Pro model, we recommend that you use this technique which doesn’t require touching your Keyboard.
Surface 3
- Locate the Windows button on your Surface Pro tablet screen, and tap on it.
- Keep holding the Windows button, then press the Volume Down button (labeled minus). Here is a visual representation of this step:
- Next, your device’s screen will dim, then brighten again. This shows that a snapshot has been taken. Kindly check your local drive for the corresponding screenshot.
Surface Pro 4 and Newer Models
This Surface Pro model doesn’t support the Windows button, so the approach to taking a screenshot will be quite different. Here’s how to do that using this device:
- Press down the Power button and Volume Up key simultaneously.
- Next, your screen will automatically flicker (dim, and brighten again), signaling that you’ve successfully taken a snapshot of what you have on your screen.
The method above lets you capture your entire screen. To adjust your resulting image, you have to edit it to the required dimension.
Using the Windows Snipping Tool
With the Snipping Tool on your Surface Pro device, you can take a snapshot of your screen in multiple dimensions, both full-screen, and selected portions. The tool is lightweight, and simple to operate.
You can apply the guide down here to take a screenshot on Surface Pro with the Windows Snipping Tool:
Step 1: Click on the taskbar at the bottom left corner of your screen, and then enter Snipping Tool in the search bar. Left-click on the icon to open it, and the response page down here will appear:
Step 2: Look through the different screenshot options by clicking the drop-down menu, and selecting one of them. Find below what each option does:
Free-form Snip: This button allows you to use your mouse, or finger to capture a specific area of the screen.
Rectangular Snip: Manually select a part of your screen by drawing a rectangle around the region.
Window Snip: It lets you capture specific windows.
With this option, you are allowed to take a snapshot of your whole screen.
Step 3: After selecting the screenshot mode, use the corresponding button to capture your screen accordingly. Select your preferred location, and image format to store the resulting file.
With the Snip And Sketch Tool
Microsoft introduced a new screen-capturing feature into its Windows 10 updates called the Snip and Sketch Tool. With the feature, you can successfully take screen snapshots, annotate, and share the resulting image conveniently.
If you run Windows 10 on your Surface Pro device, you can capture your screen with the Snip and Sketch Tool. The approach required is simple. Just apply the stepwise guide below:
Step 1: Head to the taskbar at the lower left corner of your Home Screen, and enter Snip & Sketch. Click on the corresponding icon to launch it.
Step 2: When the Snip & Sketch Tool opens, tap on the New button, and then select Snip now.
Step 3: Select the portion of your screen that you wish to take a snapshot of. Once done, the screenshot will appear automatically open in a Snip & Sketch window.
Step 4: Tap on the Save button to save the snapshot on your local drive.

Tap on the Save Button
Via the Keyboard Shortcuts
Lastly, we have
useful keyboard shortcuts to take snapshots on Surface Pro computer systems. It involves the use of hotkeys to activate the Snip & Sketch Tool mentioned above.
To take a snapshot on Surface Pro using keyboard shortcuts, check out the guidelines below:
- Hold down the hotkeys; Windows + Shift While holding both keys, press and release the S button on your keyboard.
- Without delay, the Snip & Sketch Tool will automatically open with the screen clipping mode feature that lets you capture your screen in specified dimensions.
- Now click on Save to add the resulting snapshot to your local storage.
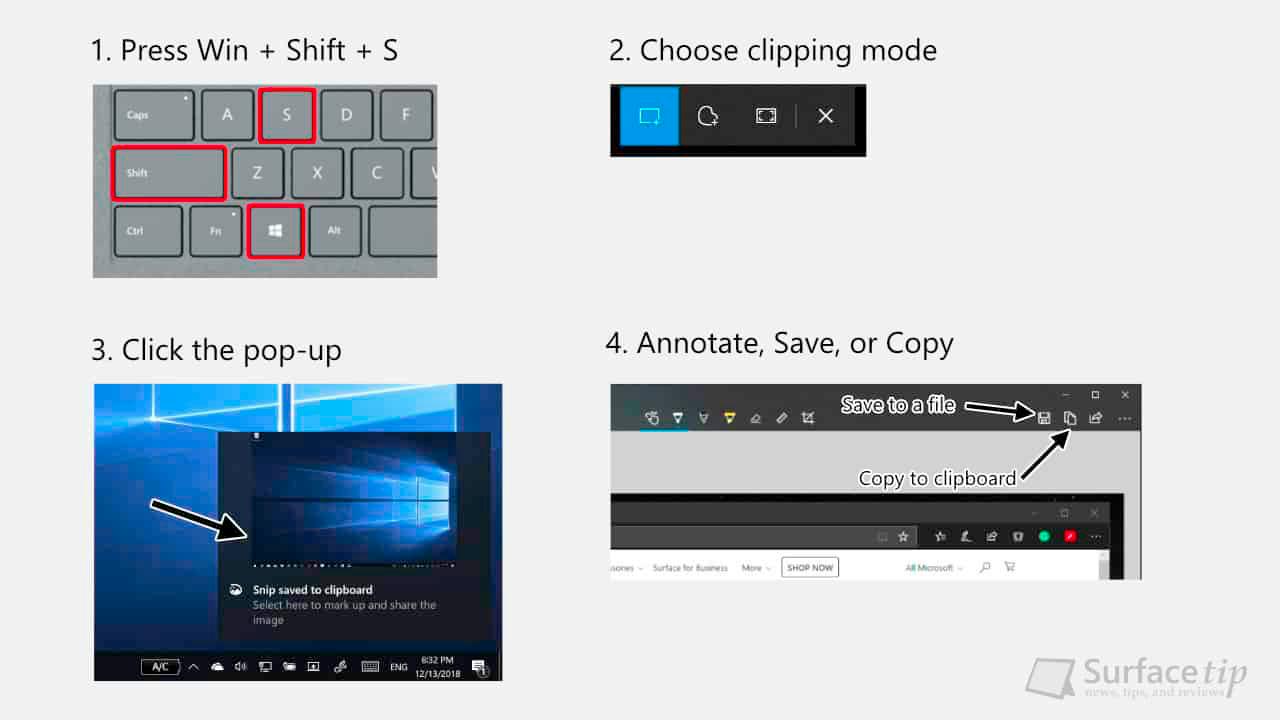
Screenshot via Keyboard Shortcuts
Final Thought
Now you know the five (5) official ways to take snapshots on the Microsoft Surface Pro, whether old or new model. Apply whichever one you know is best suited for your Surface Pro model. All techniques are simple and free to implement on your device. Just make sure you follow the procedure as outlined in the article above to get the job done perfectly.