Facebook stories have become popular for individuals to share daily activities with friends and family. However, sometimes we may come across a story we want to save for future reference or share with others who may not have seen it. In such cases, screen recording a video, like Facebook story is a useful and convenient method to capture and save them for later use.
How to Screen Record Facebook Story?
In this article, we will explore some of the most popular methods for screen recording Facebook stories, ranging from using the built-in screen recorder in iPhone to using third-party screen recordings tools like Gemoo Recorder and OBS, and provide step-by-step instructions to use each method. So, whether you are an iPhone user, an Android user, or a desktop user, stick with us as we guide you through screen recording Facebook stories.
Also read:
How to Make 3D Photos in Facebook >
Table of Contents: hide
Why Do you want to Record a Facebook Story?e
Why Do you want to Record a Facebook Story?
Wondering what the fuss is about? Let us help you! Facebook is a social media platform created in 2004 by Mark Zuckerberg to connect people and build communities online. It allows users to share photos, videos, status updates, and other content with friends, family, and followers, engage in discussions, join groups, and discover new interests. Its Stories have become popular for individuals to share their daily activities and creative expressions.
There are various reasons why someone may want to record a Facebook story.
- Highlights: They may want to create a highlight or a reel of their favorite stories, use the content in a blog, vlog, or collage creation, or share it with others who have not seen it.
- Marketing: Additionally, it can be useful for businesses or marketers to analyze user behavior and engagement with their content.
- Preserve Moments: Screen recording Facebook stories can be a valuable way to capture and preserve moments that are meaningful or interesting to us.
Further Reading: How to Record Messenger Video Calls on Facebook >
The Legality of Record Someone’s Facebook Story
Do you need clarification about the ethicality of this act? Do not worry! The legality of recording someone’s Facebook story is a complex and controversial issue that depends on various factors, including the user’s privacy settings, the intended use of the recording, and the applicable laws in the jurisdiction where the recording occurs. Recording someone’s Facebook story without their consent may infringe on their privacy rights and could violate their personal and data protection rights.
However, there may be situations where recording a Facebook story is legal and ethical, such as when the user has given their consent or when the recording is made for a legitimate purpose, such as journalism or public interest. If the purpose of the screen recording is not to exploit anyone by any means, it is ethical.
Further Reading: Can You See Who Views Your Videos on Facebook >
Record Facebook Story Video in Three Ways.
Are you looking to learn the three best ways to record Facebook stories? You have come to the right section, as it will briefly introduce each method along with the quick and easy-to-follow steps to help you record stories on Facebook. So let us not wait anymore and dive into them:
Record Facebook Story via Gemoo Recorder
Gemoo Recorder is a screen recording software that allows users to capture videos from their computer screen. It has various recording options, including Screen+Camera, Camera only, Screen only, and Audio-only recording. It also supports different audio sources, such as system sound, microphone, and both, and lets the users record video and audio simultaneously. Gemoo Recorder comes with editing features, such as trimming, cutting, merging, and adding annotations, allowing the users to customize their recordings and make them more engaging.
Step 1: Click “Free Download” and install Gemoo Recorder from the Gemoo website on your computer.
Step 2: Open Gemoo Recorder, select “Screen only” from the main menu, and customize the recording area by selecting the area you want to record, such as the full screen or a custom area.
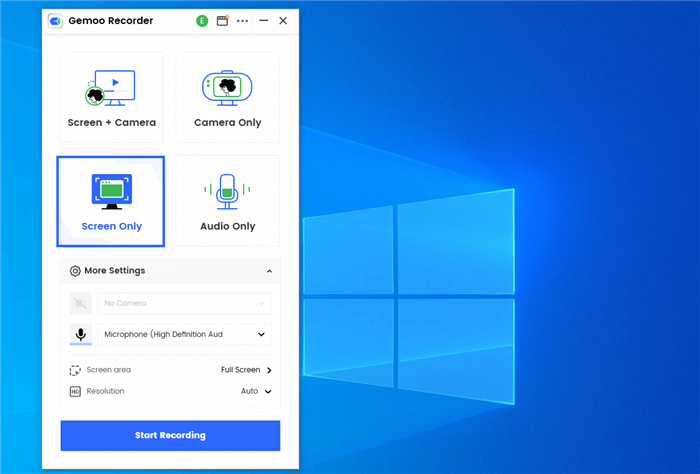
Screen Recorders for Teachers – Gemoo Recorder
Step 3: Open Facebook and play the story you want to record. Then, switch back to Gemoo Recorder and click the “Start” button to start recording the screen. Once you finish recording, click the “Stop” button to save the video in your preferred format.
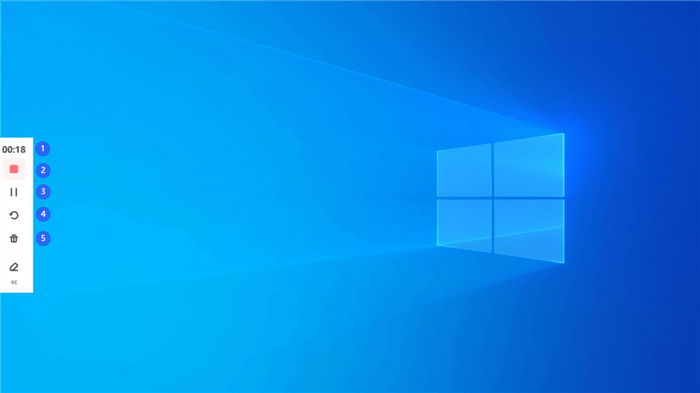
Record Video
Step 4: During recording with Gemoo Recorder, you can also edit the screen by clicking the “Add Annotation” button to access the editing options.
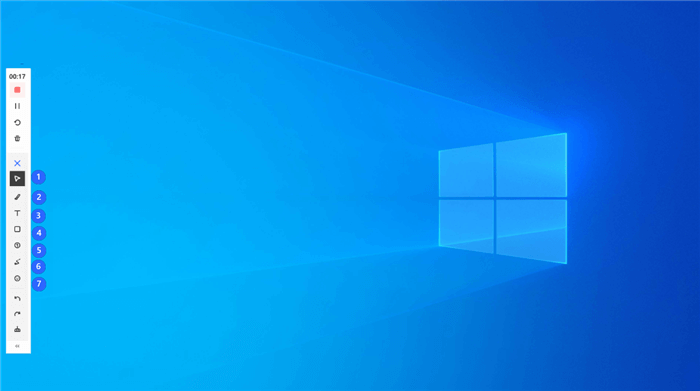
Annotate Screen during Recording
Step 5: When the recording is end, your video will upload to the Gemoo cloud autimatically.
Record Facebook Stories using OBS Studio
OBS Studio is a free and open-source video recording and live streaming software widely used by gamers, podcasters, YouTubers, and other content creators to capture, mix, and stream video and audio content on Twitch, YouTube, and Facebook Live platforms. It provides a range of features for recording and streaming, including screen and window capture, webcam and microphone input, video and audio mixing, scene transitions, and customizable overlays. It also supports a variety of codecs and file formats, including MP4, FLV, and MOV.
Step 1: Click “Download Installer” from the official website of the OBS Studio. Once installed, open the software.
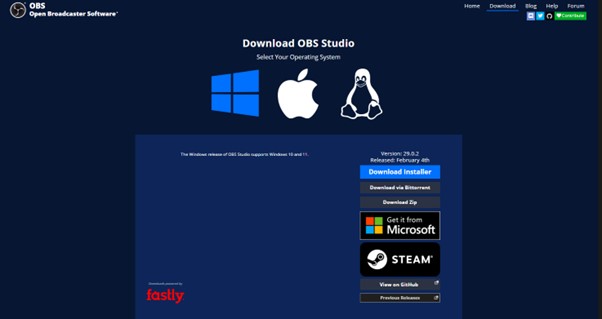
Click On The Download Installer
Step 2: In OBS, click on the “+” button in the “Sources” box and select the “Display Capture” option. Then, choose the display you want to capture (usually your main monitor) and click “OK.”
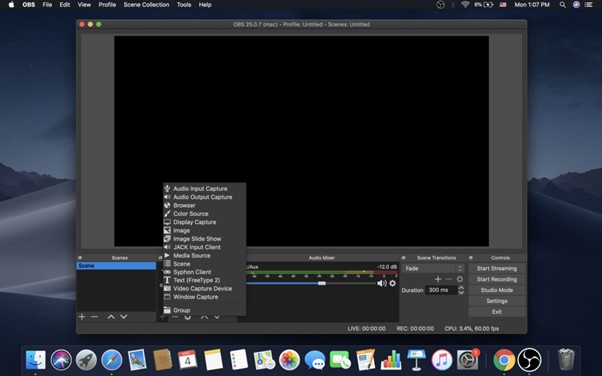
Click On Display Capture
Step 3: Open your web browser and start playing the Facebook story you want to record. Then, switch back to the OBS studio and click the “Start Recording” button to begin recording the screen, and click the “Stop Recording” button when the story has finished.
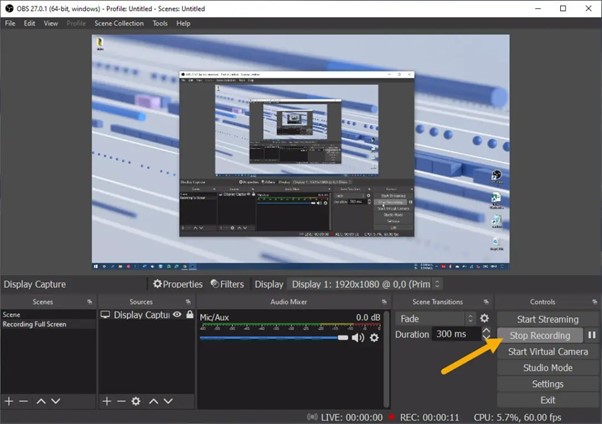
Start Or Stop The Recording
The OBS Studio default saves recorded videos to your computer’s “Videos” folder. However, you can choose a different location to save your recordings by adjusting the “Recording Path” setting in OBS.
Record Facebook Story with iPhone’s Built-in Recorder
iPhones come with many handy features that make them popular among users. One of the most useful features is the built-in screen recording function. With this feature, users can easily capture anything on their iPhone screen, from video calls to gaming sessions, and save it as a video file. The screen recording feature can be accessed through the Control Center, customized to include the screen recording icon. Once activated, users can start and stop recordings with just a tap and even add audio commentary using the built-in microphone.
Step 1: Swipe up from the bottom of your iPhone screen to access Control Center. If you have an iPhone with Face ID, swipe down from the top-right corner of the screen to access Control Center.
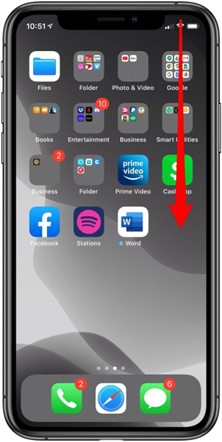
Swipe Down To Open Control Center
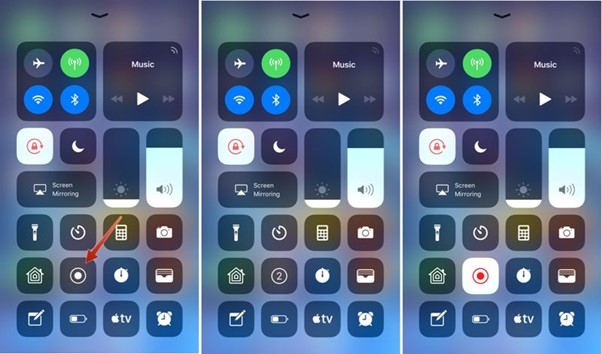
Step 2: Tap the screen recording icon in Control Center, then wait for the countdown to finish. After the countdown, open the Facebook app and play the story you want to record.
Click On Screen Recording And Wait
Step 3: After recording the Facebook story, tap the red recording indicator at the top of your screen and click “Stop.” You can also swipe up from the bottom of the screen and tap the screen recording icon in Control Center to stop the recording.
When you use an iPhone’s built-in screen recording feature, the videos are saved in the Photos app. You can access them by going to the Photos app, selecting the “Albums” tab, and then selecting the “Videos” folder. From there, you should be able to see all of your recorded screen videos, and you can edit, share, or delete them as needed.
Final Thought
In conclusion, recording Facebook stories for an ethical purpose can be useful for sharing experiences with others. Whether you are using a desktop or a mobile device user, there are multiple ways to screen record and capture Facebook stories using built-in tools or third-party tools like OBS Studio and RecExperts by EaseUS. Each method has advantages and limitations, but all are effective for capturing screen activity and producing high-quality video recordings. If this article has helped you, remember to share it with your family and friends. We also welcome your feedback, so please comment below if you have any questions or suggestions.


