Taking screenshots on your Toshiba laptop is useful for archiving and disseminating data. Capturing an error message, saving a website, or sharing a fragment of the material requires taking screenshots. A Toshiba laptop’s in-built Snipping Tool and a few keystrokes make it easy to capture screenshots on Windows. There are keyboard shortcuts available for quickly and easily take screenshots of the full screen, separate windows, or defined locations. After reading this tutorial, you can snap screenshots on your Toshiba laptop with ease and speed.
You can use your Toshiba laptop to create high-quality screenshots for various applications if you take the time to learn and practice these methods. On the other hand, the Snipping Tool lets you capture and annotate specified screen portions and offers greater functionality and customization possibilities. To be ready for everything, this article will teach you how to use the Snipping Tool and keyboard shortcuts to capture screenshots.
Table of Contents: hide
Screenshot on a Toshiba Laptop via Keyboard Combos
Screenshot on a Toshiba Laptop using Snipping Tool
Screenshot on a Toshiba Laptop via Keyboard Combos
On a Toshiba laptop, you may use quick shortcut keys to capture screenshots easily. You may easily and quickly take screenshots of your desktop, a selected screen region, or the currently active window with the help of these keyboard shortcuts. Look at the different methods below:
Full-screen screenshot
The “PrtScn” or “Print Screen” key allows you to screenshot the whole page on your Toshiba laptop. You’ll find this key in most keyboard layouts at the top right corner. Just follow the steps below:
Step 1: The “PrtScn” key must be pressed, often known as the “Print Screen” key.
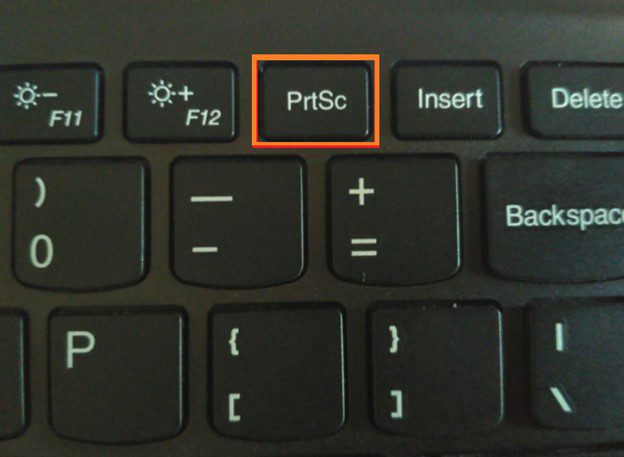
Press PrtSc
Step 2: You may copy the full screen to the clipboard.
Step 3: To use the screenshot, open a text or image editor and click “Ctrl” + “V” to paste the picture.
Step 4: The screenshot may be edited and saved as usual.
Partial screenshot
To take a screenshot of a selected region of your screen, press the “Alt” and “PrtScn” keys simultaneously. Only the currently selected window will be captured. Follow the steps below:
Step 1: Locate the window or portion of the screen that you want to capture on your Toshiba laptop.
Step 2: Input “Alt” and “PrtScn” into your keyboard simultaneously.
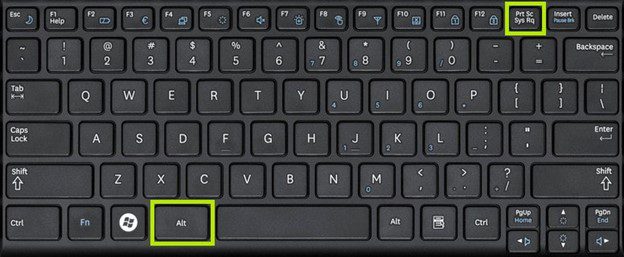
Press PrtSc And Alt
Step 3: You may copy a screenshot of the current window to the clipboard.
Step 4: To use the screenshot, open a text or image editor and click “Ctrl” + “V” to paste the picture.
Step 5: The screenshot may be edited and saved as usual.
Active Window Screenshot
On your Toshiba laptop, press the “Alt” + “Fn” + “PrtScn” keys simultaneously to screen capture the active window. This is the way to utilize when you need to take a screenshot of only one of many open windows. Follow the steps below:
Step 1: On your Toshiba laptop, bring the window you wish to grab to the forefront.
Step 2: To do this, concurrently hit Alt+Fn+PrtScn.
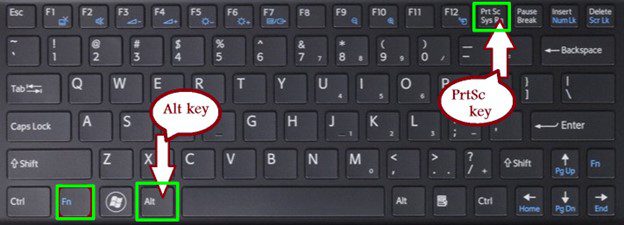
Press PrtSc + Alt + Fn
Step 3: The screenshot will be automatically copied to the clipboard.
Step 4: Go to a text or image editor and click “Ctrl” + “V” to paste the picture to edit it further.
If you have a Toshiba laptop, you may quickly take screenshots of the full screen, a selected region of the screen, or the currently active window by following these instructions and pressing the appropriate key combinations.
Screenshot on a Toshiba Laptop using Snipping Tool
You may snap exact screenshots of any section of the screen using the Windows Snipping Tool, which is featured in all Windows-based devices, including Toshiba laptops. Toshiba laptops offer a built-in Snipping Tool that may be used instead of shortcut keys to snap screenshots.
Step 1: Open the Snipping Tool
To launch Snipping Tool, press the “Start” button, type “Snipping Tool,” and choose it from the results list.
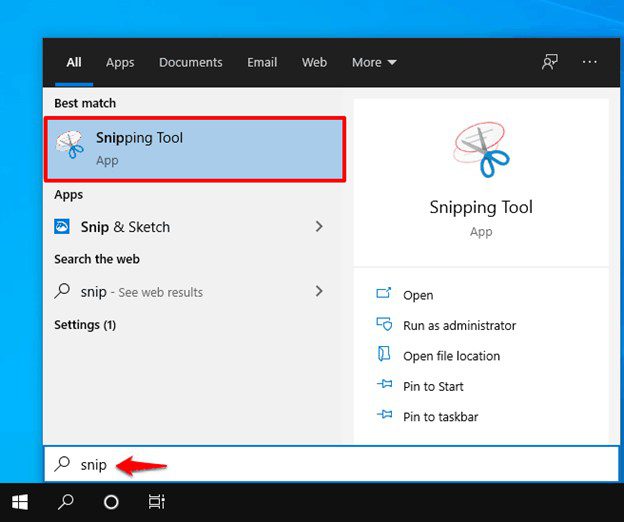
Launch Snipping Tool
Step 2: Select your choice of Snip Type
Select the “New” tab in the Snipping Tool window. Then select any of the 4 snip types:
- Free-form Snip: You can take a screenshot in any weird shape by drawing around the screen.
- Rectangular Snip: Drag the mouse to take a rectangle-shaped picture.
- Window Snip: Take a picture of a particular window or chat box.
- Full-screen Snip: Take a screenshot of the full screen.
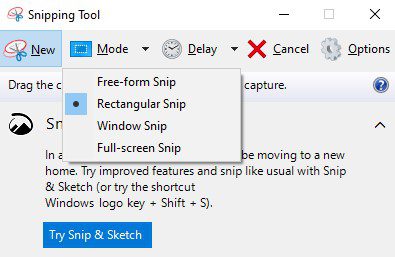
Choose Mode
Step 3: Capture the screenshot
Please choose the area you wish to clip using your mouse or trackpad and draw around it. To take a screenshot, let go of the mouse or trackpad.
Step 4: Edit the screenshot and save it
Once you’re done with capturing the screenshot, the next step is to edit it. You can add text, highlight objects, and even crop the screenshot to your desired aspect ratio. Click on the Save button to preserve your progress on your Toshiba Laptop.
You may refine and customize your screenshots with the Snipping Tool, which offers a more user-friendly interface and more editing options than keyboard shortcuts. This is an excellent tool if you require greater control and precision over the captured area while capturing screenshots on your Toshiba laptop.
Screenshot on a Toshiba Laptop via Gemoo Recorder
Gemoo Snap is a versatile and free-of-cost tool that caters to a wide range of screenshot needs. It is suitable for professionals like designers, educators, developers, and marketers, as well as for everyday use. Gemoo Snap is compatible with Windows and Mac. No matter whether you want to screenshot on Gateway, Toshiba, or Lenovo Laptop, it will meet your various needs. The program is simple and lightweight, enabling you to take quick screenshots. You can use it to provide feedback on designs or assignments, report errors, or perform any other tasks that can enhance your productivity. In addition, you can annotate your screenshots with your thoughts and either paste them or share a link.
Key Features of Gemoo Recorder
- Capture screenshots of a webpage in its entirety or a specific section by scrolling and pausing at the desired location.
- Add backdrops, and round corners, and draw shapes to enhance your screenshots.
- Share annotated content from your clipboard, you can take a screenshot and annotate it before copying it to the clipboard.
- You have the option to automatically upload your screenshots to the cloud or save them locally, depending on your preference
- OCR functionality for text retrieval is enabled.
Here’s how to screenshot on a Toshiba laptop:
Step 1: Free download and install Gemoo Snap on your computer > Launch it and enter your account and password to log in to Gemoo Snap, or you can just sign in with your Google account.
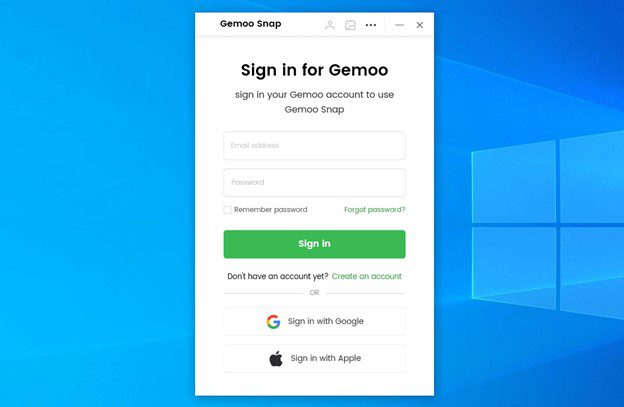
Sgin in Gemoo Snap
Step 2: Click the “Quick Screenshot” button on the main interface. And you can also tap the shortcut key PrintScreen to launch the function.
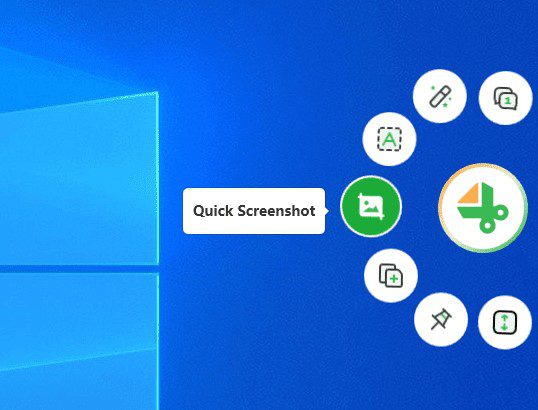
Click Quick Screenshot
Step 3: Please drag your mouse over the desired area to customize it and then let go.
Step 4: The captured screenshot will be uploaded to Gemoo Cloud automatically, or you can choose to save it locally.
FAQs about Screenshots on a Toshiba Laptop
1. How do I find the Snipping Tool on my Toshiba laptop?
To launch the Snipping Tool, use the Windows key + R to open the Run dialog box and then type “snippingtool.exe” to launch the program or use the Start menu search function.
2. Can I change the default save location for screenshots?
Yes, you may change where your snips are saved by launching the Snipping Tool, going to “Options,” and then selecting the new location in the “Save Snips” field.
3. Why can’t I capture screenshots using keyboard shortcuts?
If you use keyboard shortcuts often on your Toshiba laptop, you may want to turn off the Function (Fn) key. If you want to turn off your laptop’s Function key, consult the handbook.
Final Thought
In conclusion, there are various ways to take screenshots on a Toshiba laptop, all of which are simple. Take snapshots of your screen, windows, or chosen areas using the Snipping Tool or pressing certain key combinations. Using keyboard shortcuts, you may easily and quickly capture screenshots on your Toshiba laptop. They’re flexible; you can get to them quickly by pressing a few keys.
On the other hand, the Snipping Tool gives you more leeway and editing choices, so you may take screenshots of precisely defined regions of the screen and then edit or annotate them as needed. Each approach has useful features and may accommodate a variety of customers. Take screenshots quickly and easily on your Toshiba laptop using the keyboard shortcuts or the more advanced features of the Snipping Tool. Don’t forget to weigh your alternatives and choose your best approach. The snapshot above methods makes recording and saving data, distributing files, and diagnosing problems on your Toshiba laptop simple.

