How to Take Shortcut with Snipping Tool on Windows 10 & 11

Taking a screenshot on Windows has become vital for almost everyone in today’s digital era. The Snipping Tool, included in Windows 10 and later, is a widely used program for its convenient screen capture features. You may screenshot a specific area, a window, or the full screen using the Snipping Tool. Capturing just a certain region of the screen has never been easier than with this powerful utility.
The Snipping Tool streamlines screen capture by providing simple controls and a clean UI. You may improve the efficiency of your screen capture process by learning how to use the Snipping Tool’s numerous snip kinds, shortcuts, and functions. Mastering the Snipping Tool may help everyone, from professionals to students to casual users, work faster and communicate more clearly.
This detailed tutorial will review all the Snipping Tools that Windows 10 and 11 offer. We’ll explore the various snip kinds, show you where to find the tool, and walk you through taking screenshots using the Snipping Tool in detail. Here’s how to use the snipping tool shortcut in Windows 10/11.
Also Read: Top 11 Snipping Tools for Linux >
Table of Contents: hide
Snipping Tool Shortcut-Screen Capture for Windows 10/11
How to Screenshot via Snipping Tool on Windows 10/11
Snipping Tool Shortcut-Screen Capture for Windows 10/11
Windows 10 and 11 have a built-in screen capture tool called the Snipping Tool, which makes it easy to take screenshots of precisely defined screen regions. It’s a simple tool for capturing screenshots for archival, documentation, and debugging needs. Whether you’re a student, a professional, or a casual computer user, you may benefit immensely from mastering the Snipping Tool. Various snip kinds in the Snipping Tool are designed to capture various parts of the screen, giving it a flexible tool for users of all skill levels. Here are the four types of snips:
Free-Form Snip
This type of snip lets you record an area on your screen in any shape you want. You may quickly and easily pick the area you want to capture using your mouse or touchpad by drawing a rectangle around it.
Rectangular Snip
This snip variety allows you to capture a rectangular part of your screen. Using the Snipping Tool is as easy as clicking and dragging the mouse to determine the area you wish to capture.
Window Snip
Window snip captures a specific part of your device’s screen. The Snipping tool will give the Open Windows option; you only have to click on the content you want to capture.
Full-Screen Snip
Here is the tool if you want to grab everything on your screen. The Snipping Tool can take screenshots of your screen, including any active windows and programs, with a single click.
The Snipping Tool is useful for grabbing a little area, a large window, or a full screen. These four snip kinds provide options when taking screenshots, making meeting a wide range of requirements easier. By learning about the many kinds of snips, you can choose the one that best suits your needs and get the most out of your screen captures.
How to Screenshot via Snipping Tool on Windows 10/11
Regardless of your Windows version, the Snipping Tool provides a dependable and simple technique for taking and saving screenshots. Let’s snap screenshots in Windows 10 or 11 now that you know what the Snipping Tool can do and how to utilize it. This section will go through how to use the Snipping Tool in Windows 10 and 11, as well as the differences between the two versions.
Follow the steps below to Take a Screenshot on Windows 10 Using the Snipping Tool.
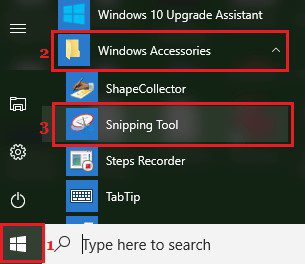
Step 1: Click on the Search Bar and type the Snipping tool.
Step 2: Launch the Snipping Tool by clicking its result in the search.
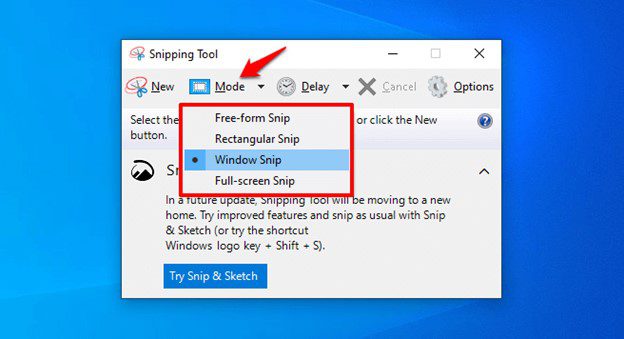
Step 3: From the Mode option, choose the snipping mode that best suits your needs: Free-Form, Rectangular, Window, or Full-Screen.
Step 4: Put the snipping cursor where you want to begin taking screenshots.
Choose The Snipping Tool
Step 5: Highlight the area you want to capture by dragging your mouse pointer on the screen.
Step 6: Remove your finger from the mouse to capture the screenshot.
Step 7: Snipping Tool, an image editor, will launch after the screenshot is taken. Use the editing features of the snipping tool to adjust your screenshot accordingly.
Step 8: After editing, save the file on your computer by going to the file tab and selecting the Save As option.
Follow the steps below to Take a Screenshot on Windows 11 Using the Snipping Tool.
Step 1: Open the start menu and type the snipping tool in the search bar.
Launch Snipping Tool
Step 2: Launch the Snipping Tool from the search results or the Apps menu.
Step 3: Select New, then the appropriate snip type, and take the screenshot described above for Windows 10.

Take A Screenshot
Step 4: The Snipping Tool editor will launch after the screenshot has been taken.
Step 5: Adjust the snapshot and add notes using the provided editing tools.
Step 6: Select Save As from the file menu to save your screenshot and choose a desired location.
Note: Remember that taking screenshots from the snipping tool is easy and allows you to capture any part of your screen conveniently.
How to Screenshot on Windows without Snipping Tool?
It’s apparent that people are increasingly relying on screenshot tools for various purposes such as giving feedback on assignments, reporting software bugs, and more. To meet these growing demands, new software such as Gemoo Snap has been developed. This screen capture software is designed to provide users with advanced features, and it also has a Chrome extension version. Gemoo Snap is compatible with both Windows and Mac operating systems. If you are a Windows user and feel that the default snipping tool does not meet your needs, then Gemoo Snap is a better choice for you. Let’s take a closer look at its main features.
- Capture highlight moments from games or TV shows and automatically upload them to the cloud with shareable links.
- Annotate images and add feedback and ideas with text, lines, or shapes. You can also hide sensitive information with mosaics to protect privacy.
- Beautify your captures with ease by using Gemoo Snap’s tools to add backgrounds, round corners, and draw shapes.
- Extract uncopyable text from images, videos, PDFs, and websites, allowing you to capture and copy information effortlessly.
- Take full-screen or whole webpage screenshots by scrolling.
Follow the steps to take screenshots on Windows:
Step 1: Launch Gemoo Snap on your computer and log in using your account credentials. Alternatively, install the Chrome extension by clicking “Add to Chrome.”
Step 2: Select a function by clicking on it. To use the Quick Screenshot feature, you can also press the PrintScreen shortcut key. Then, drag your mouse over the desired area and release it.
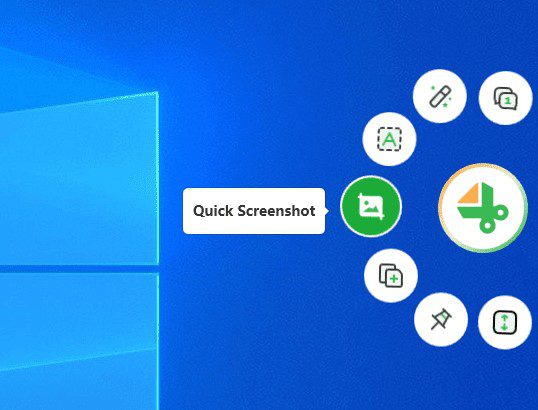
Click Quick Screenshot
Step 3: Once you have completed the screenshot, Gemoo Snap will automatically upload it to Gemoo Cloud.
Uploading
FAQ about Shortcut with Snipping Tool
1. Can I assign a custom keyboard shortcut to open the Snipping Tool?
To access the Snipping Tool, perform a particular keyboard operation. Open the Properties and find the Shortcut Keys or Tabs window. Press the combination to make a keystroke sequence (like Ctrl+Alt+S) the shortcut. To permanently save the modifications, choose “Apply” and “OK.”
2. Can I capture screenshots using the Snipping Tool in fullscreen mode?
Yes, with the Snipping Tool, you can take screenshots even while the screen is full. The Snipping Tool has a “Full-Screen Snip” option in its Mode menu. With this method, you may easily take a screenshot of the full screen with only one click.
3. Can I capture screenshots of specific windows or applications with the Snipping Tool?
You may take screenshots of individual windows or programs using the “Window Snip” option in the Snipping Tool. First, choose “Window Snip” from the Mode menu to screenshot a window or program. Only the active window or program will be captured by the Snipping Tool.
Final Thought
In conclusion, Windows 10 and 11’s Snipping Tool is a helpful built-in tool for taking screenshots. It’s adaptable and simple to use because of its many capabilities, such as recording many snips at once. The Snipping Tool allows you to grab whichever part of the screen you need, a whole window or the full screen. It’s also handy to create shortcut keys and save screenshots in various file types. Learning the ins and outs of the Snipping Tool’s keyboard shortcuts will help you save time and effort while taking screenshots. Use this effective method to quickly and easily capture and save screenshots.