How to Completely Remove Image Watermark in GIMP

Removing image watermarks can be a crucial task for various purposes, such as editing, publishing, or personal use. In this blog post, we will explore how to completely remove image watermarks using GIMP, a popular open-source image editing software. With GIMP’s powerful tools and techniques, you can effectively eliminate watermarks and have clean, professional-looking images.
Remove Image Watermark in GIMP
Table of Contents: hide
Why do some GIMP Images have watermarks on them?
Best Way to Remove GIMP Watermark
How to Remove Watermarks Using GIMP
What are GIMP images?
GIMP images refer to images that have been created, edited, or manipulated using the GNU Image Manipulation Program (GIMP). GIMP is free and open-source software that offers a wide range of features and tools for image editing and enhancement. GIMP images can range from simple photographs to complex digital artwork, and they can be created from scratch or imported from various file formats.
With GIMP, users have the flexibility to modify images, apply filters and effects, adjust colors and tones, and perform other advanced editing tasks. GIMP’s versatility and capabilities make it a popular choice among graphic designers, photographers, and artists for creating and editing stunning visuals.
Why do some GIMP Images have watermarks on them?
Watermarks are commonly used to protect copyrighted images or to indicate ownership. They serve as a deterrent against the unauthorized use or distribution of images. GIMP images may have watermarks for various reasons, including:
- Copyright protection: Photographers and artists often add watermarks to their images to safeguard their intellectual property rights.
- Branding and promotion: Companies or individuals may use watermarks to promote their brand or website by adding their logo or name to the images.
- Proof of concept: Watermarks can be used as temporary placeholders during the editing or review process, ensuring that the final version will be released without the watermark.
Best Way to Remove GIMP Watermark
Wipit is the best way to remove watermarks from GIMP, which also excels at eliminating watermarks from other platforms such as PicsArt, Photobucket, Placeit, and more. With Wipit, you can effortlessly remove watermarks from various sources, allowing you to regain full ownership of your images. Say goodbye to unwanted watermarks and confidently showcase your content with the help of Wipit’s advanced watermark removal capabilities.
Wipit Highlight Features
- Batch upload images and preview watermark removal through slide review for efficient processing and assessment.
- Utilize AI technology to intelligently identify and select the watermark area, ensuring accurate differentiation and precise removal.
- Achieve seamless removal by zooming in and out to paint over the desired watermark with precision.
- Take control and establish ownership by uploading and customizing your own watermark, safeguarding your images and intellectual property.
Here are the steps to remove GIMP watermark with Wipit
Step 1: Download and install Wipit for free, then upload images from your computer to initiate the process.
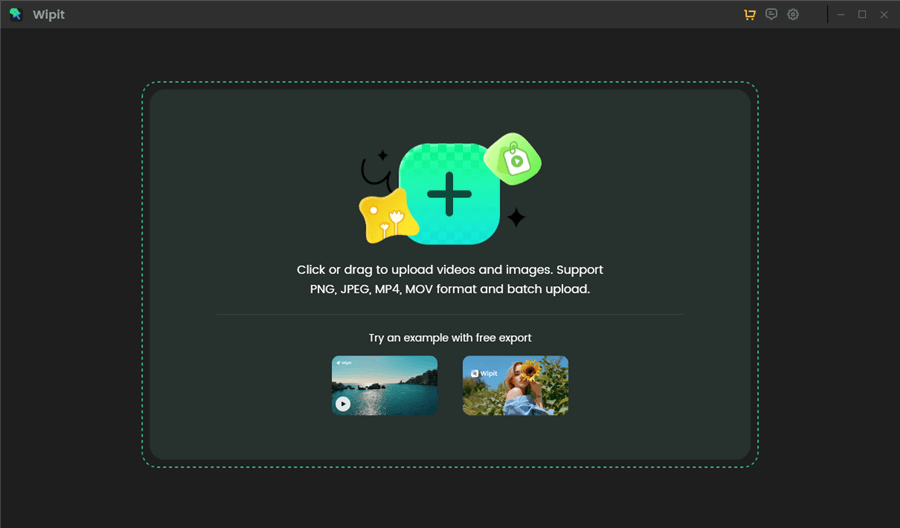
Upload Images from Your Computer
Step 2: Choose the AI Select Area mode to automatically detect unwanted drawings using AI. Alternatively, use the brush tool to manually paint over the drawing you want to remove with precision.

Select the Watermark Removal Area
Step 3: Preview the watermark removal effect, and when satisfied, save the output to your computer by clicking the Export button.
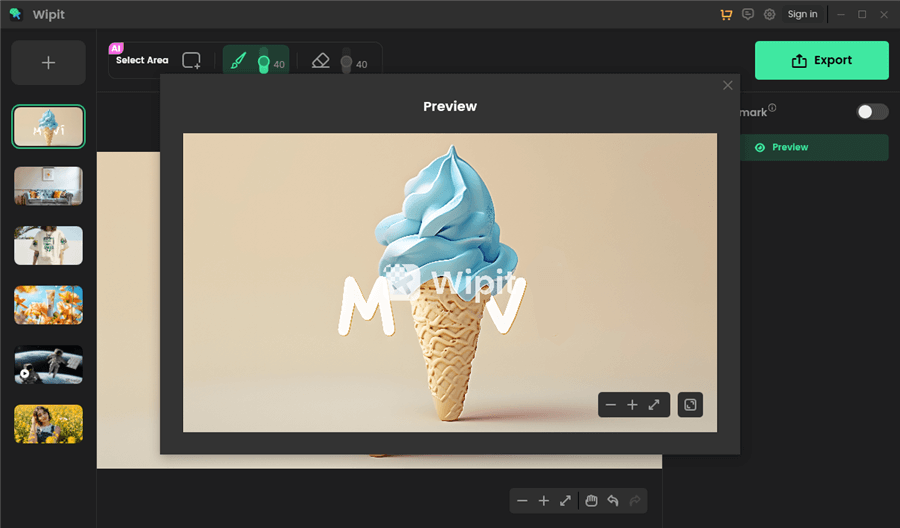
Preview Watermark Removal Effect
Wipit only removes watermarks and elements from user-owned or authorized content. Users must avoid infringing on others’ intellectual property rights. Unauthorized use of copyrighted material is illegal, and Wipit and Gemoo strictly condemn such software usage.
How to Remove Watermarks Using GIMP
GIMP, or GNU Image Manipulation Program, is a powerful open-source software tool used for photo editing and graphics design. It is widely embraced by a global community of professionals and volunteers. With a focus on image manipulation and photo retouching, GIMP offers a range of features to resize images, crop photos, and enhance pictures.
When it comes to removing watermarks using GIMP, there are several effective techniques available. While cropping the watermark or using plug-ins are options, we will primarily use the Clone Stamp and Healing tools for this task. These tools allow you to clone and seamlessly blend nearby areas to cover the watermark, resulting in a clean and watermark-free image.
Removing watermarks from GIMP images can be accomplished by following these steps:
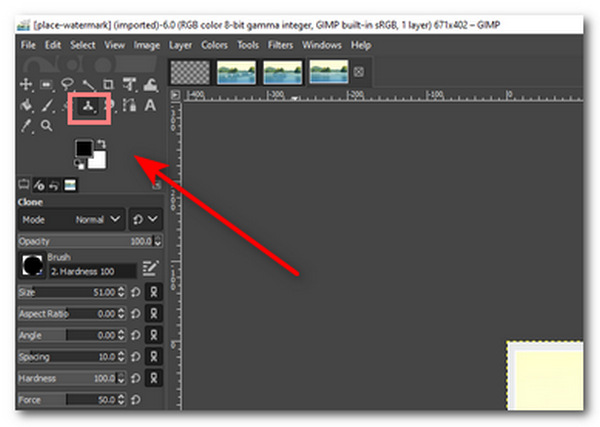
Step 1: Launch the GIMP program on your PC. Open your desired image in GIMP.
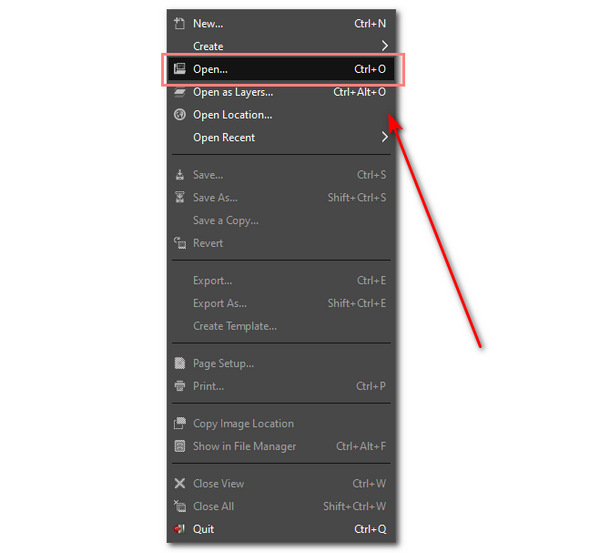
Open your desired image in GIMP
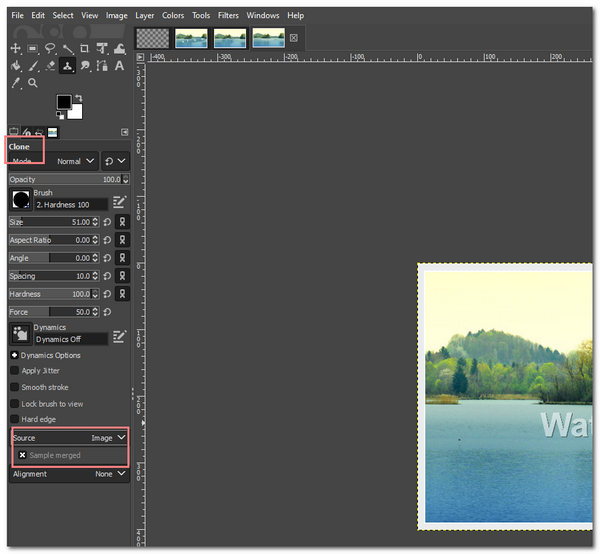
Step 2: Use the Clone Tool to sample and clone nearby areas that can be used to cover the watermark. Adjust the brush size and opacity as needed.
Sample and Clone Nearby Areas
Step 3: Carefully clone the sampled areas over the watermark, ensuring a seamless blend with the surrounding pixels.
Clone the Sampled Areas over the Watermark
Step 4: Use the Healing Tool to further smooth and refine the cloned areas, making them indistinguishable from the original image.
Step 5: If necessary, adjust the brightness, contrast, or color of the cloned areas to match the rest of the image.
Step 6: Zoom in and inspect the edited areas for any noticeable artifacts or inconsistencies. Make additional adjustments as needed.
Step 7 Finally, you can now save your finished and edited image. Click File, then select Save.
Tips for Deleting Watermarks Using GIMP
This is a list of tips you must remember when removing watermarks on GIMP.
- Opting for a soft brush or a smaller-sized Clone Stamp tool can help you achieve precise and accurate results when cloning and covering the watermark.
- Layer masks in GIMP allow you to control the visibility and blending of the cloned areas. By using layer masks, you can refine and adjust the opacity of the cloned regions, ensuring a seamless integration with the original image.
- GIMP offers a variety of tools and techniques for image editing. Don’t be afraid to explore and experiment with different tools like the Healing tool, the Blur tool, or the use of filters. Each image may require a slightly different approach, so try out different methods to find the best one for your specific watermark removal task.
- While removing the watermark, aim to maintain the natural look of the image. Pay attention to details, textures, and colors to ensure that the edited areas blend harmoniously with the rest of the image.
- It is always a good practice to keep a copy of the original image before making any modifications. This way, you can revert back to the original if needed or start anew if the editing process doesn’t go as desired.
Also read: Proven Ways to Remove Photobucket Watermark >
FAQs on How to Remove Watermarks Using GIMP
1. Is it legal to remove watermarks from images?
The legality of removing watermarks depends on the specific circumstances and the rights associated with the image. Always ensure you have the necessary rights or permissions before modifying or using copyrighted material.
2. Can GIMP completely remove all types of watermarks?
GIMP provides powerful tools for removing various types of watermarks, but success depends on factors like the complexity of the watermark and the image itself. Some watermarks may be more challenging to remove completely.
3. How long does it take to remove a watermark using GIMP?
The time required to remove a watermark using GIMP varies depending on factors such as the size and complexity of the watermark, the image quality, and the skill level of the editor. Simple watermarks on uncomplicated images may be removed relatively quickly, while more intricate watermarks or complex images may require more time and effort.
Conclusion
With GIMP’s extensive array of tools and techniques, removing image watermarks becomes an accessible and efficient process. By following the steps outlined in this guide and utilizing the tips provided, you can achieve professional-looking results and enhance the visual appeal of your images. Remember to respect copyright laws and obtain proper permissions when working with copyrighted material.