Markups are visual enhancements applied to screenshots or images that include text, arrows, shapes, or freehand drawings. They are commonly used in various scenarios, including providing instructions, highlighting specific areas, or collaborating on design projects. While markups can be valuable tools for communication and collaboration, there are times when you may need to remove them to restore the original image.
How To Remove Marker from Screenshot?
Suppose you want to share a screenshot without the distractions of annotations, or you need to present a clean version of an image for professional purposes. In such cases, knowing how to remove markups effectively and efficiently is important, ensuring that your screenshots convey the intended message. The purpose of this article is to guide you on how to remove markups from screenshot. There could be instances when you need the original, unaltered image without any added annotations or visual aids. That’s when it becomes important. So, here’s how to do so!
Also read: How to Rotate an Image in Canva Easily >
Table of Contents: hide
Use the Default Photos App
The Photos App is a versatile and user-friendly application that plays a pivotal role in managing and enhancing your collection of images and videos. One of the core functions of the Photos App is its efficient media organization capabilities. It automatically sorts and groups your photos and videos based on date, location, and even recognized faces. Furthermore, its editing tools enable users to make quick enhancements, from simple adjustments like cropping and rotation to more advanced tasks such as color correction and filters. The Photos App also provides creative options for adding captions, text, and effects to images, allowing users to express their vision creatively.
Here are the steps to use the default Photos App to remove markups from screenshots:
Step 1: On your iOS device, launch the Photos App.
Step 2: Go to the screenshot you want to change.
Step 3: To open the screenshot, tap on it.

Markup Image
Step 4: Look for editing tools, which may be represented by icons such as a pencil or a wand.
Step 5: Locate the tool to delete or alter the picture markup.
Step 6: After clicking that, you will be presented with a plethora of editing options to help you in revealing the markup portion.
Step 7: Then, drag the brightness, shadows, and brilliance sliders to 100%.
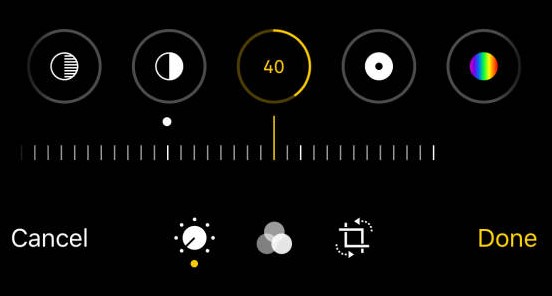
Increasing Brightness
Step 8: Save the altered screenshot after you’re pleased with the modifications. The markup in the screenshot should now be deleted.
Use Snapseed
Snapseed is a powerful photo editing application for Android and iOS devices. Developed by Google, Snapseed offers a wide range of tools and features to enhance, adjust, and edit images. It provides a user-friendly interface and professional-grade editing capabilities, making it popular among photographers and casual users. When removing markup from screenshots, Snapseed offers a dedicated tool that allows you to easily erase unwanted annotations or drawings, restoring the original image to its pristine state.
To remove markup from a screenshot using Snapseed, follow these steps:
Step 1: Download and install Snapseed from your device’s app store if you haven’t already.
Step 2: Import the screenshot you want to alter into Snapseed.
Step 3: Once the screenshot has been loaded, click the “Tools” button at the bottom of the screen.
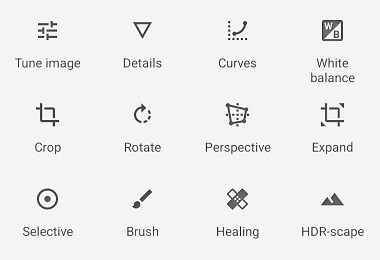
Tools Option
Step 4: After you’ve selected the picture, go to the tool’s menu. Then, in the top-left corner, pick the Tune Image option.
Step 5: Once done, you must drag several settings. Begin by increasing the brightness to 100 or higher.
Step 6: Then, reduce the contrast to -100. Then, increase the highlights and ambience to 100 or higher.

Highlights Option
Step 7: If you increase the shadows to 30 or more, you can see the concealed area of the screenshot.
Bonus Tip – Remove Makers with AI Image Remover Wipit
Wipit is a powerful AI image watermark removal software that offers batch upload functionality and excellent watermark removal results. With Wipit, you can easily eliminate watermarks from your images, giving them a clean and professional appearance. Leveraging advanced artificial intelligence technology, Wipit intelligently detects and removes watermarks from images while preserving the integrity of the original content. Whether it’s logos, text, or other types of watermarks, Wipit provides a seamless solution to restore your images to their original state.

Best AI Waternark Remover – Wipit
Best features:
- Remove watermarks, emojis, logos, objects, people, and text from videos and images using advanced AI processing algorithms.
- Works seamlessly on both Windows and Mac operating systems.
- You can easily upload a combination of videos and images together in batch mode using Wipit.
- Wipit offers smart AI edge recognition for removing watermarks or objects from images, along with adjustable brush and eraser tools for the precise removal of unwanted elements.
Major limitations:
- No web version is available.
Tips on Removing Marker from The Screenshot
When removing markups from screenshots, employing the right techniques and tools is essential for achieving clean and professional-looking results. While various tools claim to remove markups efficiently, only a few truly excel. With practice, you’ll be able to remove markups from screenshots with ease and produce an image that faithfully represents your original picture.
Here are some valuable tips to help you successfully remove markups from your screenshots:
1. Choose the Right Tool for the Job
When selecting a tool for markup removal, it’s essential to consider its capabilities and reputation. Look for software that offers dedicated features for markup removal, as these tools are more likely to provide accurate results. Paid and advanced tools often come with various functionalities specifically designed for precise editing, making them a wise choice for tackling markups of different colors and complexities. Reading user reviews and seeking recommendations from graphic design or photography professionals can guide you toward a tool that suits your needs.
2. Leverage Transparency of Black and White Markups
Markups created using black or white colors possess inherent opacity, making them easier to handle during removal. Lowering the opacity of these colors often renders them transparent, facilitating their erasure while preserving the underlying image. In contrast, markups in vivid solid colors like red, green, or blue might prove more stubborn due to their distinct presence. To address this, consider applying color adjustments, like converting the markup color to grayscale or toning its saturation, before attempting removal.
3. Explore Editing Tools with Healing Capabilities
Photo editing software with advanced features like the Healing Brush or Clone Stamp tool can be invaluable for markup removal. These tools work by sampling nearby areas and blending them seamlessly over the markups, effectively ‘healing’ the affected regions. For complex backgrounds or areas with intricate details, these tools provide an effective means of removing markups while maintaining the visual coherence of the image. Take time to adjust brush sizes and settings to match the texture and characteristics of the surrounding area for optimal results.
4. Utilize Color Replacement Techniques
Some editing tools offer color replacement functionalities that can aid in markup removal. This technique involves changing the color of the marked-up areas to a hue that blends more naturally with the background. By modifying the markup color to match surrounding elements closely, you can minimize the visual impact of the markup and seamlessly integrate it into the original image. Experiment with color correction tools to achieve a harmonious and balanced appearance.
5. Precision and Patience are Key
The process of removing markups demands precision and patience. Zooming in on the screenshot allows you to work meticulously on specific areas, ensuring accurate removal while avoiding unintended alterations. Patience is crucial, particularly when dealing with intricate or detailed markups. Take your time to perform small, deliberate edits and frequently zoom out to assess the overall impact of your changes. This meticulous approach ensures that your efforts result in a seamless, natural-looking image.
6. Practice and Experimentation
Effective markup removal often involves a degree of experimentation. Practice on less critical images to familiarize yourself with different tools, techniques, and their outcomes. Test various settings, brushes, and approaches to understand their effects. This hands-on experience will help you develop confidence in your editing skills and provide insights into the most effective strategies for different scenarios. As you gain expertise through practice, you’ll be better equipped to handle markup removal on important screenshots with finesse and precision.
Final Thought
Markup removal from screenshots is a challenging operation requiring careful planning and execution. You may proceed with assurance and accuracy if you follow the advice. Choose reliable and cutting-edge software for quick markup removal, especially when working with various colors. Use the opacity inherent in black-and-white markups to simplify removal and embrace their transparency.
Also, healing and color replacement functions are available in many editing softwares to help you restore your screenshots to their original glory. Take your time perfecting your technique and trying out new approaches so that you can get polished outcomes. These tips will allow you to properly remove markups, resulting in clean and professional photos that may be used for various reasons.