Every Mac user knows the importance of seamless communication, especially in today’s virtual landscape. However, like all technology, Macs aren’t exempt from occasional glitches. Like Preview not working on Mac, another common problem many face is the Mac microphone not working. This disrupts regular activities and significantly hinders attending virtual meetings or simply connecting with family and friends.

Fix Mac Microphone Not Working
In the subsequent sections, we’ll break down the potential causes of this issue. By understanding these causes, users can better troubleshoot and apply effective fixes. This guide provides a straightforward approach, ensuring even those not so tech-savvy can get their Microphone up and running quickly.
How Can I Test My Mac Microphone?
Have you ever wondered if your softphone or voice dictation program is causing issues or if your headset simply isn’t transmitting sound to your computer? You can check the Microphone on your Mac computer very easily. Here is a step-by-step guide to help you with its OS:
Mac users can follow these steps:
Step 1: Launch the QuickTime application.
Step 2: From the “File” menu, select “New Audio Recording.”
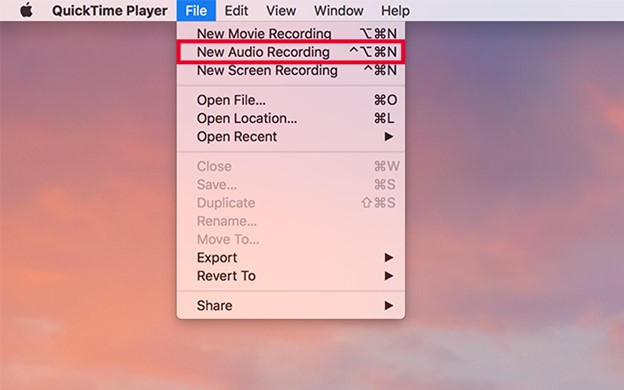
New Audio Recording
Step 3: If prompted to choose a microphone, select your headset.
Step 4: With your headset ready, hit the record button and speak a few sentences.
Step 5: After stopping the recording, press play. If your voice plays back, it confirms that your Mac’s Microphone is in good shape.
Remember, these tests only confirm if your computer recognizes the Microphone. If you still face issues in specific applications, it might be worth looking into individual application settings.
Further Reading: How to Reduce Background Noise on Mic >
Why Is My Mac Not Recognizing My External Microphone?
When you’re experiencing issues with your Mac not recognizing an external microphone, several factors might be contributing to this problem:
Input Source Confusion
Your Mac has a default setting where it uses its internal Microphone for audio input. The computer might not immediately switch to the new device when you connect an external microphone. To resolve this, go to the Mac’s sound settings. Here, you’ll find an option for input sources. Select the external Microphone from the list, ensuring the Mac acknowledges and uses it.
App Permissions
If an app on your macOS isn’t picking up sound from your Microphone, it might not have the correct permissions. macOS, being careful about security, wants you to permit apps to use features like the Microphone. To check and give permissions:
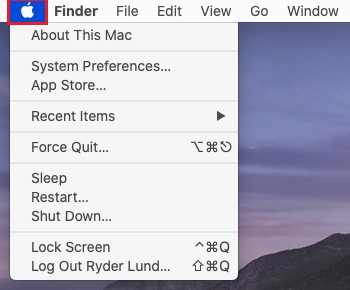
Mac System Preferences
Step 1: Click on Apple’s Icon on the top-right corner of the screen and choose Mac’s ‘System Preferences.’
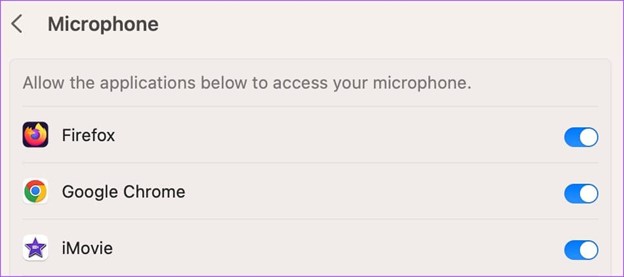
Step 2: Choose ‘Security & Privacy’ and go to the ‘Microphone’ tab.
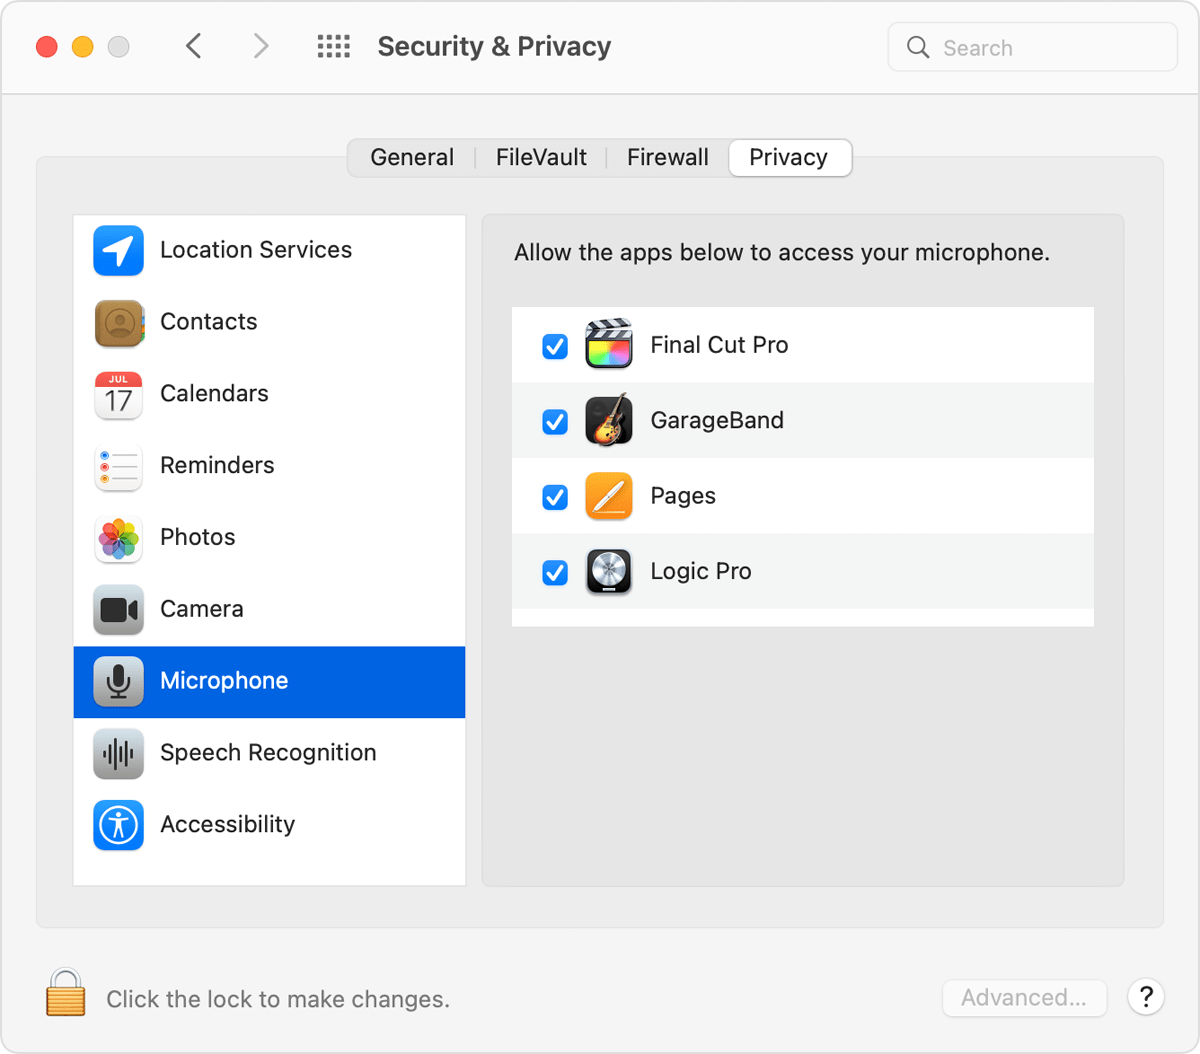
Open Microphone Tab
Step 3: From the list of the different apps, look for the app that is giving you a problem. See if the box next to the app is checked. This permits it to use the Microphone.
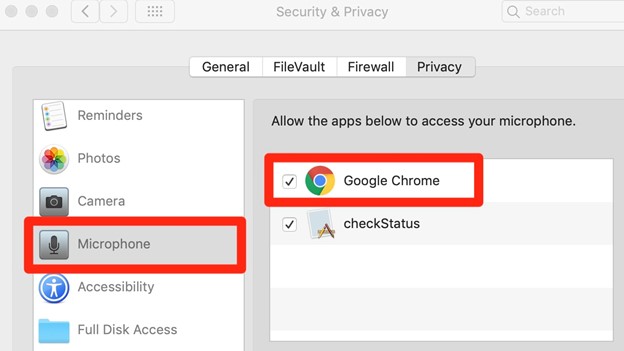
Check Google Chrome
Hardware Compatibility
It’s essential to ensure that the Microphone is compatible with Mac systems. Some microphones are explicitly tailored for other platforms or devices and might not function optimally with a Mac. Reviewing the product’s specifications or consulting the manufacturer’s documentation to determine compatibility with macOS is recommended. If the Microphone isn’t designed to work with a Mac, it may not be recognized or function as expected.
By addressing these potential issues, users can effectively troubleshoot and resolve common problems associated with external microphones not being recognized by Mac computers. It’s always advisable to routinely check system settings, update permissions, and verify hardware compatibility to prevent such issues.
How to Get My External Microphone to Work on My Mac?
Are you having trouble with the external Microphone on your Mac? We get how that can be a mood damper, especially before a significant event. Let’s get this sorted out. Here’s a breakdown of eight solutions to get your Microphone up and running:
Check the USB Port or USB Hub
Ensuring your Microphone’s connection point is integral to its functioning.
Step 1: Make sure the USB connection is secure and not loose.
Step 2: Test your Microphone on another USB port on the Mac.
Step 3: If using a USB Type-C hub, validate its functionality with other devices. Should it be the hub causing issues, you might want to further look into it.
Adjust External Microphone Levels
Sound clarity is paramount, and sometimes the Microphone’s volume settings can be the obstacle.
Step 1: Locate any physical volume control on your Microphone, like a dial or knob.
Step 2: Make the necessary adjustments until you achieve clear audio.
Restart Your Mac
To proceed with complex methods, it is better to try using a simpler one that can resolve the problem. It is simply restarting your device. Here is what you have to do.
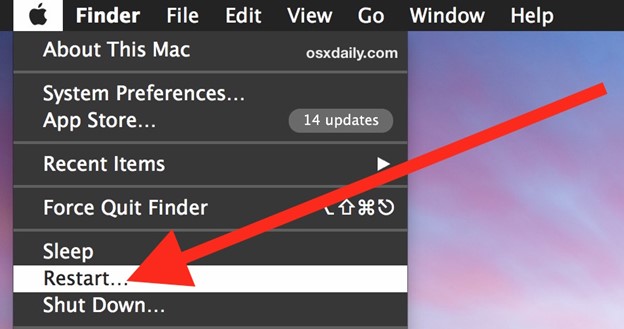
Restart Your Mac
Step 1: Go to the Apple icon in the top-left corner of your screen. Click the icon.
Step 2: Check the menu on the screen and then choose the option “Restart.”
Step 3: The system will restart.
Restarting provides your computer with a fresh start, which can clear up any temporary glitches or problems. It’s always a good initial step to take when troubleshooting.
Verify the Input Source
Macs sometimes need a reminder about which Microphone to prioritize.
Step 1: Press Command + Spacebar and type “System Settings.”

Open System Settings
Step 2: Go to “Sound.”
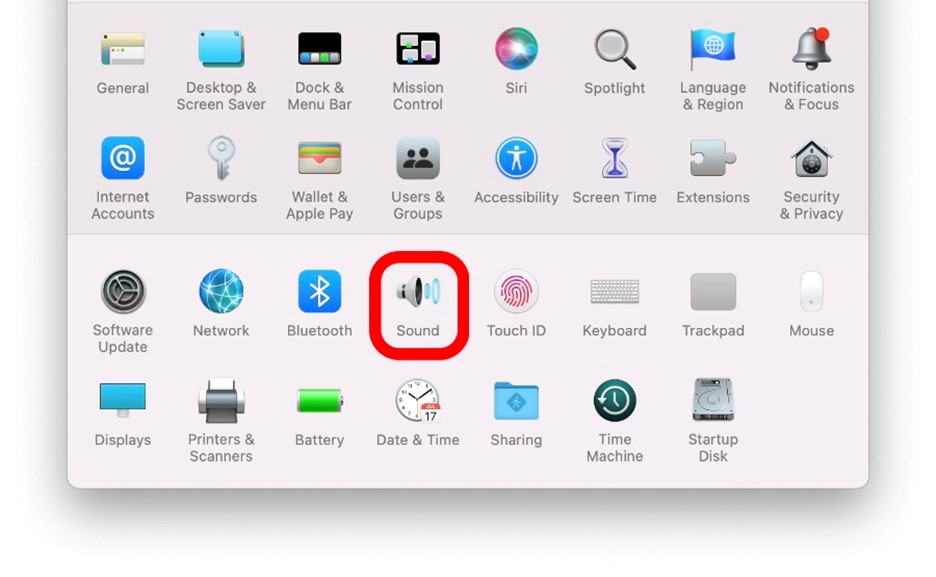
Go To Sound
Step 3: In the “Input” section, make sure your external Microphone is selected.
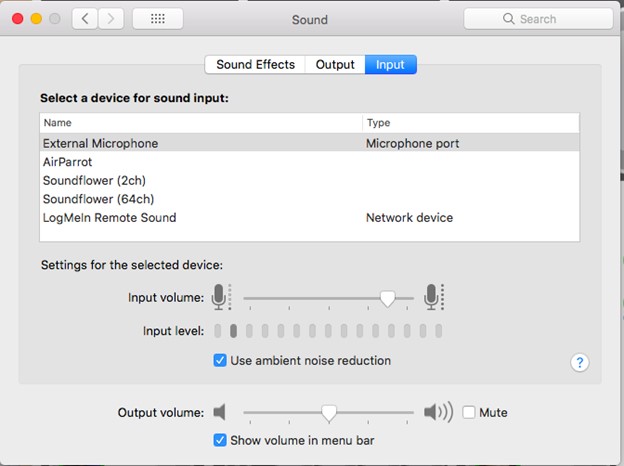
Choose an External Microphone
Step 4: Adjust the input volume slider if necessary.
Double-Check App Permissions
Some apps need a formal invite to access your Microphone.
Allow Apps To Access
Step 1: Use Command + Spacebar to open “System Settings.”
Step 2: Navigate to “Privacy and Security” and choose Microphone.
Step 3: Go to the “Microphone” section, ensuring the apps in question have permission.
The SMC Reset
This often resolves those pesky hardware-related issues, especially on MacBook with T2 chips. If you have an M-Series Mac, a standard restart should suffice. You can follow the guidelines below for executing an SMC reset for T-Chips Macs.
Step 1: Select Apple’s Icon and Shut Down to power off your Mac.
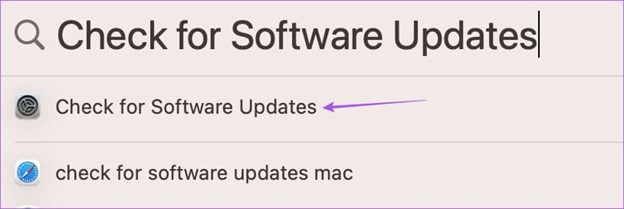
Check for Software Updates
Step 2: Press and hold the power button for the next 10 seconds and release it. Press it again to turn on your Mac, and you’re done!
Update macOS
An outdated macOS might not play well with all hardware.
Step 1: Quickly access “Software Update” using Command + Spacebar.
Step 2: Install any available updates to ensure compatibility.
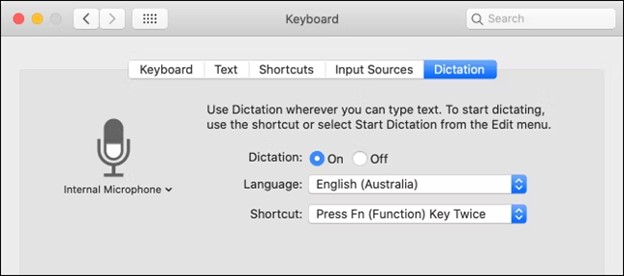
Turn On Dictation
It’s an out-of-the-box solution but worth a shot.
Turn on Diction
Step 1: Navigate to “System Preferences.”
Step 2: Select “Keyboard” and enable the “Dictation” option.
Bonus Tip. How to Record Microphone on Mac
Are you looking for a reliable audio recording tool for your Mac? Free Online Gemoo Voice Recorder might just be what you’re seeking. When it comes to audio recording on a Mac, finding a device that combines ease of use with professional-grade features can be challenging. Designed with the user in mind, Gemoo eliminates the complexities often associated with audio recording, making it an ideal choice for beginners and seasoned professionals.
Gemoo Recorder’s approach is straightforward: simplify the recording process without compromising quality. It offers a hassle-free experience, ensuring users can focus on their content rather than navigating a maze of settings. Whether you’re capturing podcast episodes, lectures, interviews, or personal notes, Gemoo Recorder is tailored to make the process intuitive and efficient.
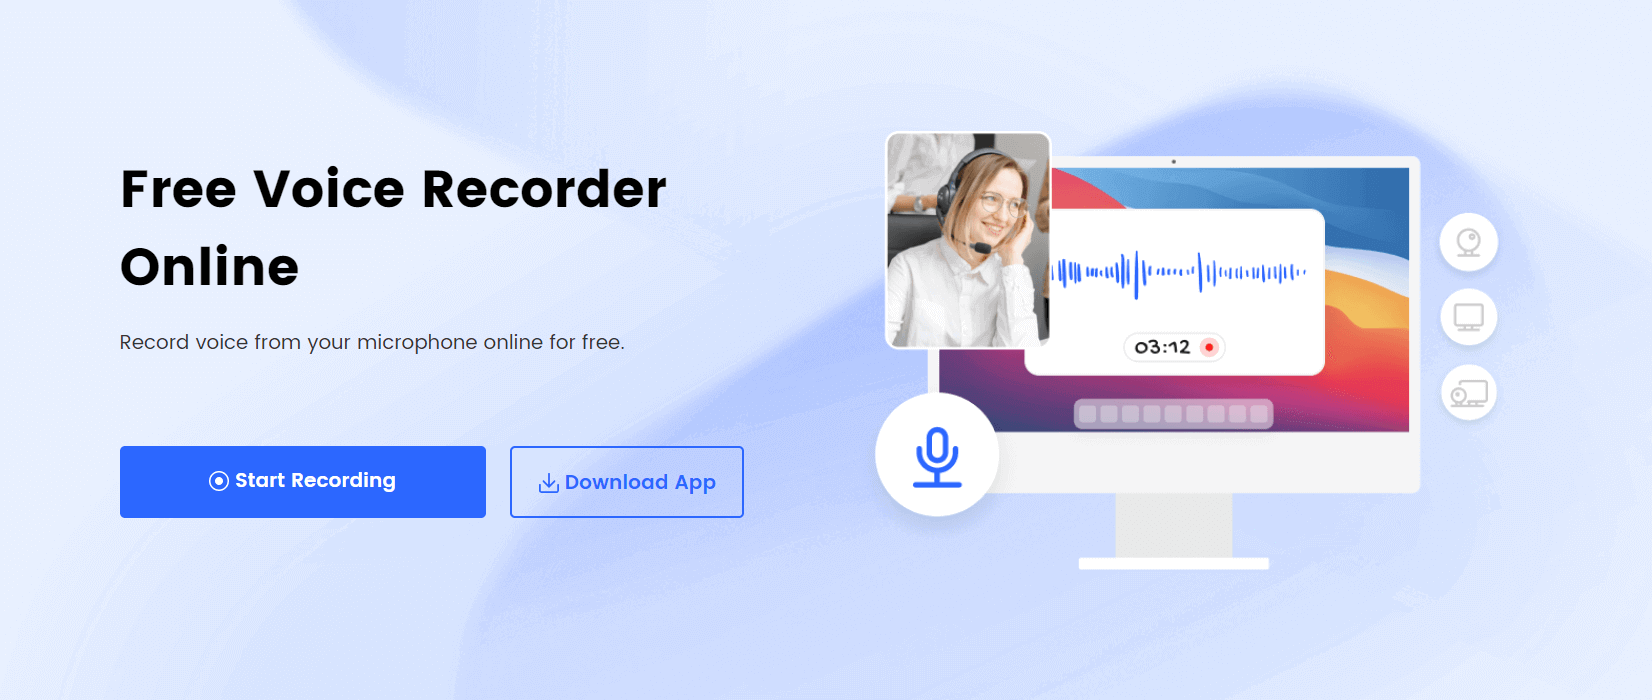
Gemoo Online Voice Recorder Landing Page
Step 1: Go to Gemoo’s Free Voice Recorder Online and click on the Start Recording button.
Step 2: Select the “Audio Only” option from the main interface to ensure you’re capturing just the audio.
Step 3: Navigate to the More Settings option, and here you can select the Microphone from which you’re recording.
Step 4: When done, click on the red stop button to stop your recording. Your audio will then be uploaded to Gemoo – just ensure you’re connected to a stable internet connection.
Final Thought
With technology at the heart of most of our daily interactions, it’s essential for devices, especially something as basic as a microphone, to function without hitches. A Mac microphone not working can disrupt many of our tasks. If this guide helped you, consider sharing it with others—it could help them too! We genuinely care about what you think, so please share your thoughts and feedback. It makes our community stronger and brighter. Thank you!