Microsoft PowerPoint is the most remarkable software when it comes to presentations. It got released on April 20, 1987. This application soared in popularity due to its unique features. People use it for different purposes and create content using its vast potential.

PowerPoint Not Recording Audio
Like any other application, you can face errors and bugs while using PowerPoint. One of the most common ones revolve around the inability to record audio in your recordings. Although facing such issues can really hamper your desired goal, these can be easily fixed. In this article, we will walk you through how to fix PowerPoint, not recording audio, in simple ways.
Also read: How to Fix Screen Recording Not Working Windows 10?>
Table of Contents: hide
How To Fix PowerPoint Not Recording Audio?
PowerPoint might not be able to record audio due to certain reasons. While those reasons are important, knowing how to fix this issue is crucial. Following are seven easy ways you can overcome it.
Restart Computer
Restarting your computer is the most simple and universal way to fix any issue. While this may seem quite basic, fortunately, it does help most of the time.
Restart your computer by applying these two steps.
Step 1: Click on the Windows Start button.
Step 2: Select the Power button and then click on Restart.
Check Privacy Settings
If restarting your computer does not work, the next way to solve audio not being recorded is to check the privacy settings of your Account. Several times, a privacy setting might create hindrances in recording PowerPoint with audio.
Step 1: Open PowerPoint and click on Account in the lower left corner of the screen.
Step 2: Select Manage Settings under Account Privacy.
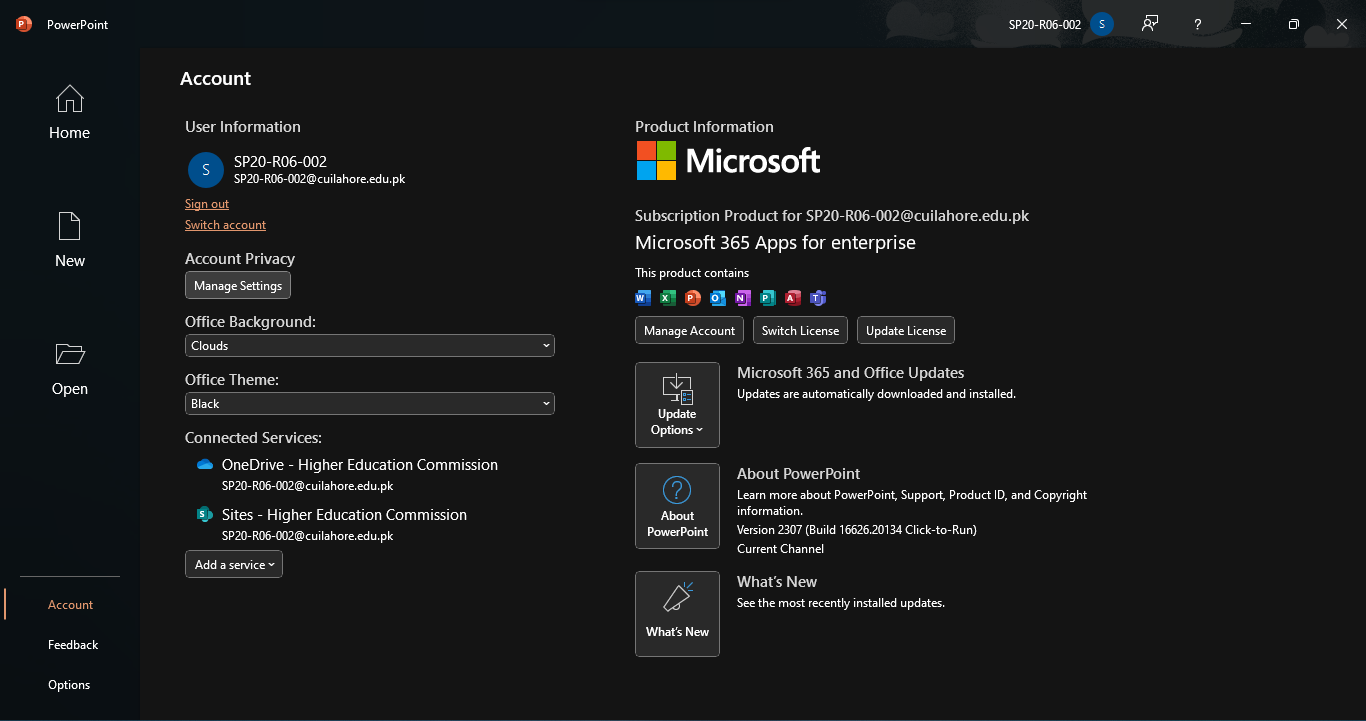
Manage Settings
Run PowerPoint as Administrator
You can try running PowerPoint as an administrator, which might eliminate this problem. Apply the steps given below to do it.
Step 1: Open the PowerPoint application.
Step 2: Right-click on it and choose Run as an administrator.
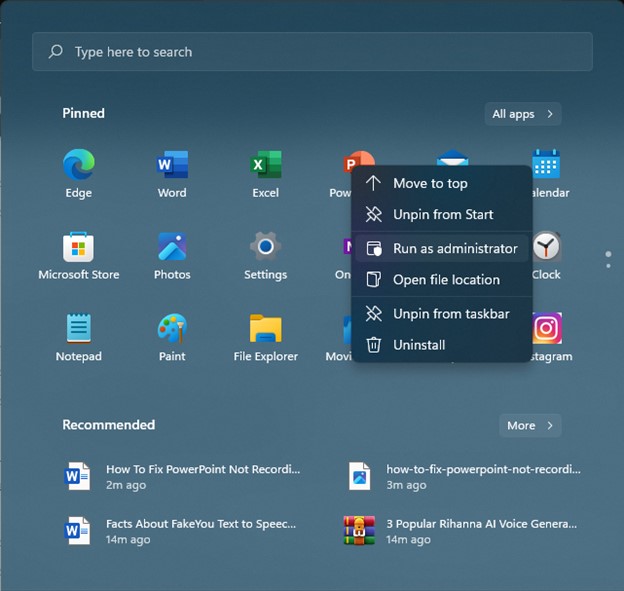
Run as Administrator
Step 3: A pop-up will appear on the screen. Click Yes to confirm, and now your PowerPoint will run as administrator.
Run Audio Troubleshooter
Sometimes the root cause might be the audio of your computer. Try troubleshooting audio by following the steps written below to accomplish it.
Step 1: Click on the Windows Start button and then open Settings.
Step 2: In the settings window, select System.
Step 3: Click on Sound in the upper left corner and then click on Troubleshoot.
Update Audio Drivers
Commonly, the audio drivers in your PC get updated through the Windows update. But, if your PowerPoint is having issues recording audio, you can check the status of your audio drivers.
To update audio drivers, follow these four steps.
Step 1: Click the Windows Start button and search for Device Manager.
Step 2: Click on Device Manager. Then, select the right arrow icon next to Sound, Video, and Game Controllers in the lower left corner.
Manage Settings
Step 3: Click on the Update Driver by right-clicking your audio card in the expanded menu.
Step 4: Click on Search Automatically for Drivers in the newly opened window.
If new audio drivers are available, follow the steps to install them.
Reinstall PowerPoint
You can reinstall PowerPoint after uninstalling it. Follow these steps to do it quickly.
Step 1: Search Microsoft 365 in your browser.
Step 2: On the website, you can either log in to an existing account or create a new account. If you want to create an account, click the sign-in option at the top right.
Follow the steps shown on the screen. You will likely have to use your email address.
Step 3: Once signed in, click the red button labelled Buy Microsoft 365.
Step 4: Download PowerPoint after making your payment. Pick the version you want and press the install office button. Once the download has finished, you will likely have an installer in your downloads folder.
Step 5: Click the installer and wait until the installer finishes its processes. Search for the app by accessing the search bar and open it.
Update Windows
If you have tried the above methods and cannot record audio, update your windows. It requires a few clicks only.
Apply the steps given below to update your Windows in a go.
Step 1: Select the Windows Start button in the lower-left corner of your screen.
Step 2: Click on the Settings button.
Step 3: In settings, select Update and Security. Select Windows Update in the upper left corner.
Step 4: In the Windows update, click Check for updates.
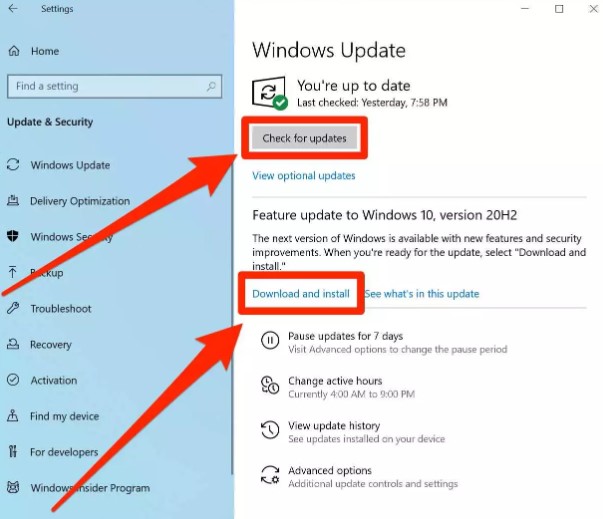
Click On Check For Updates
Pro-tip: If there is a new update, it will automatically start downloading.
Also read: How to Fix Videos Not Playing on Twitter >
Utilizing A PowerPoint Alternative for Screen Recording
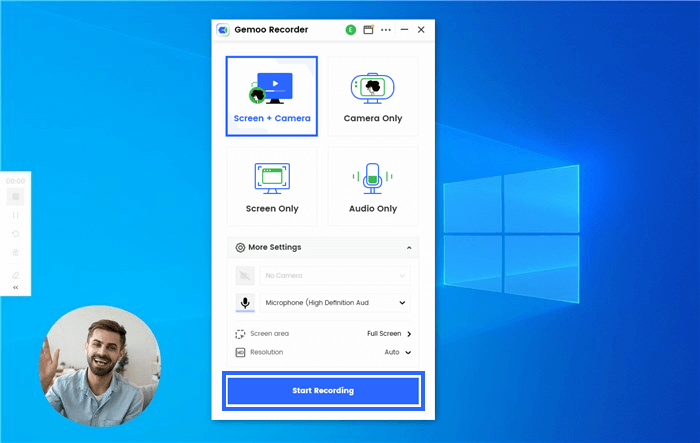
If you have tried all the above fixes and PowerPoint still fails at recording, go for a screen recording tool. Many options are available online, but opting for the right one is crucial. Gemoo Recorder is one of the best screen recording tools. It is a high-quality recording application that offers a ton of advanced features.
Gemoo Recorder is very easy to use with no prior technical information needed. It has amazing built-in features that let you edit your recordings as per your needs. This tool can be utilized from personal to professional settings. It is used by businesses, educators, and brands as well.
Key Features of Gemoo Recorder
- Compatible with both Windows and Mac
- Offers a User-friendly interface
- Gets the jobdone quickly with zero hassle
- Offers premium editing and annotating features
- Makes sharing recordings very easy with a single click
- Protects and ensures the safety of your content
Follow the steps given below to record premium-quality videos using Gemoo Recorder.
Step 1: Download Gemoo Recorder from its official website and install it. Following its installation, launch the tool. Enter your credentials in the tool and click on Sign in.

Sign in to Gemoo
Step 2: Open the menu and click the Screen and Camera option. Click on Start Recording to initiate your recording.
Hit the “Start Recording” Button
Step 3: After a 3-second countdown, your screen will be recorded.
You have the option available to edit and annotate even while recording screen. Select Add Annotation to use it.
Step 4: Click on the Stop button to end your recording.
Once your recording is done, it is uploaded directly to the tool. You can search and save it on your device.
Final Thought
Even after the release of several different softwares for presentations in the 21st century, PowerPoint still holds vital significance. Its usage in educational, business and personal areas cannot be underestimated. With more features and updates in the application, it has become even more advanced. Yet errors are still inevitable. And if you are recording audio and not being successful at it, it sucks. Therefore, this article discussed easy methods you could leverage and get rid of how to fix PowerPoint, not recording audio problems. Feel free to comment if you have any more questions, and we will get back to you.