In this recent era of technology, the medium of content has revolutionized to a great degree. Currently, individuals depend on videos as their main source of entertainment and business-related material. Hence, screen recording tools have soared in usage and popularity to a large extent. If you are a Windows 10 user, you must know its built-in screen recorder, Xbox Game Bar.
How to Fix Screen Recording Not Working Windows 10?
Xbox Game Bar is a very secure and advanced screen recorder. It can be used for a wide range of screen-capturing purposes. These include gaming videos, educational lectures, online meetings, brand marketing, etc. While a screen recorder can function and record high-quality videos, errors during its usage are quite common. In this article, we will walk through the reasons and fixes behind why is screen recording not working. Please stick with us to know more.
Table of Contents: hide
Why Is My Screen Recording Not Working On Windows 10?
Why Is My Screen Recording Not Working On Windows 10?
There can be several reasons you cannot record your screen. Although this error creates a stressful impact on your work, knowing the reasons behind it will aid in solving the issue more efficiently.
Here are a few reasons you are failing to record your screen.
Lack Of Permissions
Usually, certain applications require permission to run. Therefore, if you have not enabled permission for the Xbox Game Bar and Microphone to work, it will result in not working on Xbox Game Bar.
Copyright problems
The owner might have put copyright restrictions on the content you are trying to screen record. Hence, you will struggle to screen record such sort of videos. It is one of the many reasons you cannot capture and record your screen.
Storage issues
Your computer might not contain enough storage space. Such situations can negatively affect the outcome of desired results, and you struggle to record your screen.
Graphic Drivers
Your computer’s graphic drivers have a vital role in capturing visual content. Hence poorly functioning and outdated graphic drivers pose an issue in screen recording.
How To Fix Screen Recording Not Working On Windows 10?
Now that we have discussed the potential reasons behind screen recording not functioning properly on Windows 10. Let us dig deeper and discuss how we can fix this issue.
Check If the Xbox Game Bar Is Enabled
Sometimes Xbox Game bar is not enabled, and therefore it causes issues in recording your screen. You can simply check if this is the case by applying these steps and recording your screen afterwards. If it starts recording, you are good to go.
Step 1: Click the Windows Start button and select the Settings option.
Step 2: Search for Gaming in the settings option.
Step 3: In gaming, check Enable Xbox Game Bar to record game clips and more.
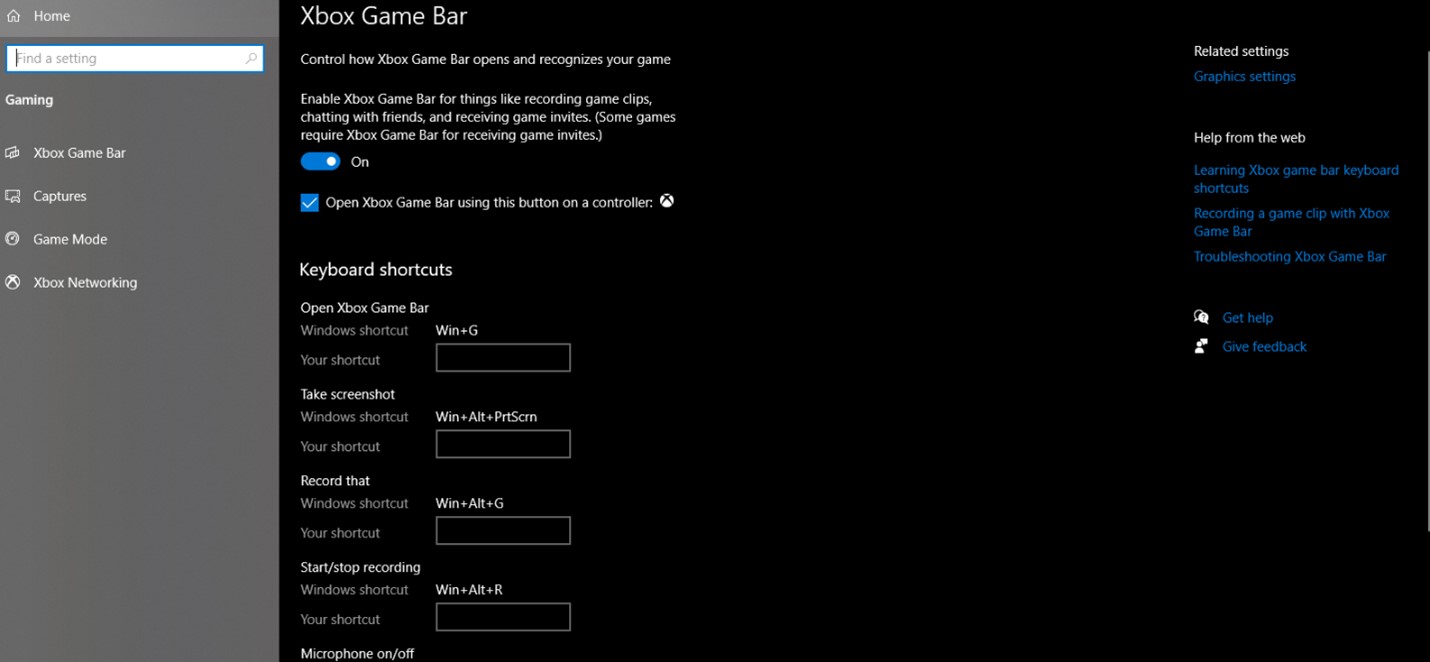
Xbox Game Bar In The Settings Option
Enable The Microphone Device
It is a very common occurrence that you have not been given access to your computer microphone. Hence, it fails at recording audio in your screen recordings.
Below are the easy-to-apply steps to enable a microphone device in Windows 10.
Step 1: Click the Windows Start button and select the Privacy option.
Step 2: In privacy, search for Microphone.
Step 3: In microphone settings, click on Change and ensure Microphone access for this device is turned on.
Step 4: Click and turn on Allow apps to access your microphone option. And double check it to make sure it is turned on.
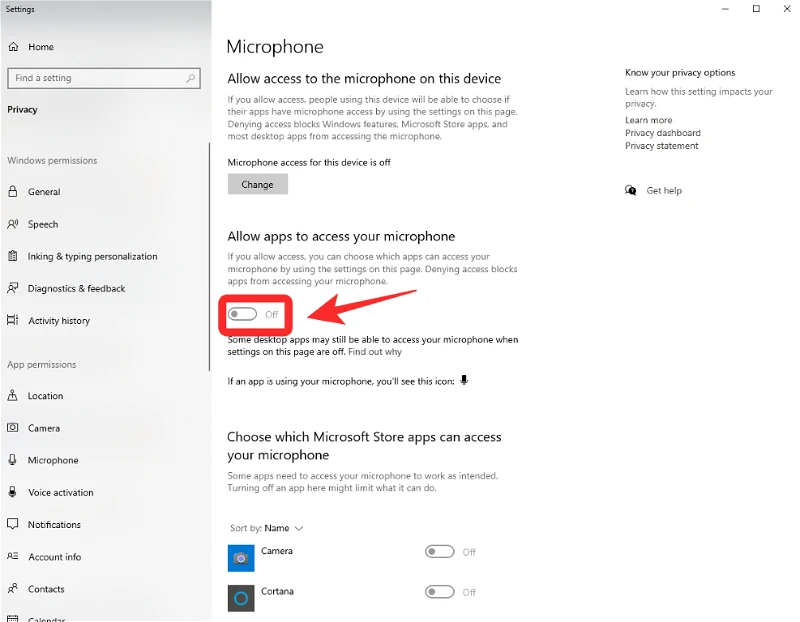
Microphone Settings
A quick tip: Try to record your screen again if you have not enabled microphone access before. It will most certainly start recording your audio in the videos.
Use Task Manager
A lot of times, applications running in the background can slow down the functioning of your applications. In such a scenario, opening a task manager to shut them down is recommended.
You can open Task Manager in Windows 10 by following these two simple steps.
Step 1: Select the Windows Start button and search Task Manager
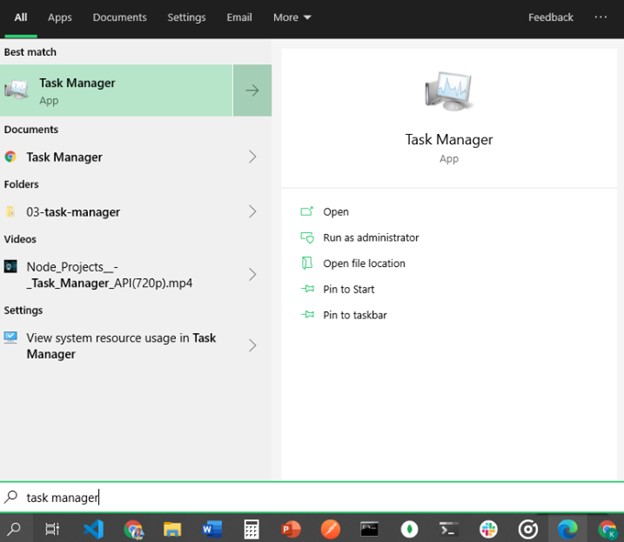
Task Manager
Step 2: Once it is displayed on the screen, click on Task Manager and navigate the unwanted applications.
Pro-tip: You can also access Task Manager by pressing Ctrl + Shift + Esc simultaneously.
Update Graphics Driver
Update your graphics driver, as sometimes an updated version might be causing a hindrance in the recording of your screen.
Here are a few easy you can apply to update the graphics driver on Windows 10:
Step 1: Click on the Windows Start button and search Device Manager
Step 2: Open it and select Display Adapters.
Step 3: Select your graphics card and open the Driver tab.
Step 4: Select Update Driver and then click on Search automatically for updated driver software.
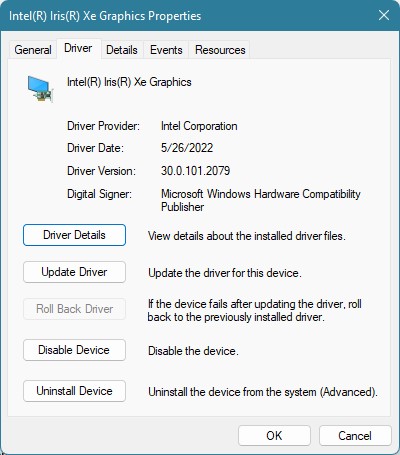
Update Driver
Step 5: Also, click on Browse my computer for driver software and go for a downloaded driver.
Step 6: Select Let me pick from a list of available drivers on my computer and click on Have Disk
Step 7: Search the folder which has the new driver and Click Next
Restart Your Windows 10 Computer
Sometimes your computer needs a fresh start to allow its built-in tools to work properly. Hence, try to restart it and see if that helps.
Following are the two steps you need to apply to restart your computer:
Step 1: Select the Windows Start button.
Step 2: Then click the Power button and select the Restart option.
Try Xbox Game Bar Alternative- FocuSee
You can use an alternative screen recording tool if the above fixes do not work. FocuSee is one of the most reliable screen recording applications. It has a user-friendly interface. Moreover, it allows you to record according to your needs, whether it’s your web camera, screen or voice. This tool is compatible with both Mac and Windows.
This application is built with advanced editing features. And using these amazing features, you can add a touch of your creativity to your recorded videos. With FocuSee, you can record your screen, webcam, or both simultaneously, and enhance your recordings with automatic captions, zoom effects, and various editing tools.
It also provides preset sizes for popular social media platforms, ensuring that your videos are optimized for different channels. Additionally, FocuSee allows you to export your videos in high-quality formats up to 4K resolution or as GIFs, giving you the flexibility to adapt your content to your specific use case and audience preferences.
Key Features of FocuSee
Let’s discuss the main features of this prime screen recording tool.
- Auto-generate and edit captions for 100% accuracy
- Choose layouts: side-by-side, overlay, or screen only
- Trim, cut, crop, speed up, or slow down parts for conciseness
- Customize appearance with camera frames and filters
- Add backgrounds, adjust corners, shadows, illustrations, and padding
- Preset sizes for YouTube, Twitter, TikTok, etc.
Follow the steps given below to record high-quality videos using FocuSee.
Step 1: Open the official website of FocuSee and download it. Following its download, install and launch the tool. Enter your username and password, and then click on Sign in.
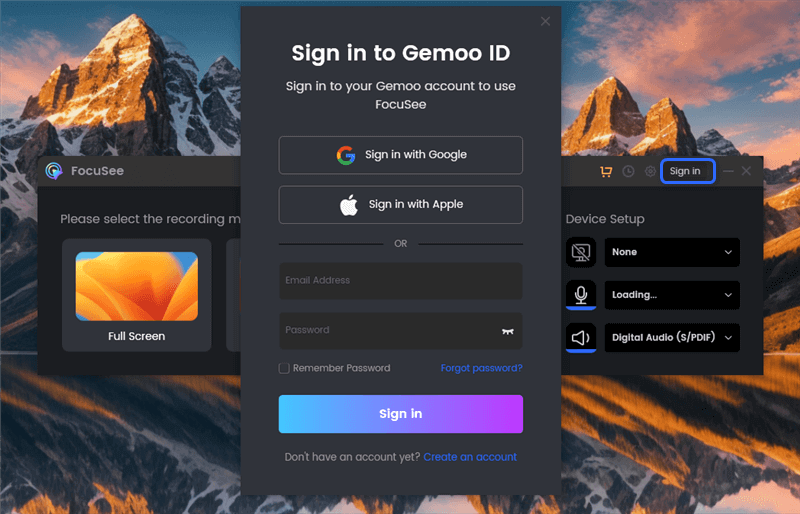
Create an Account and Activate FocuSee
Step 2: Select from the three recording modes, and setup your camera and microphone. Click on Start Recording to begin your recording.

Three recording Modes of FocuSee
Step 3: After selecting the recording mode, focus on screen recording. Once the recording is complete, you can immediately obtain a video with excellent visual effects. After recording, you can change the background, adjust the cursor style, add captions, and more.
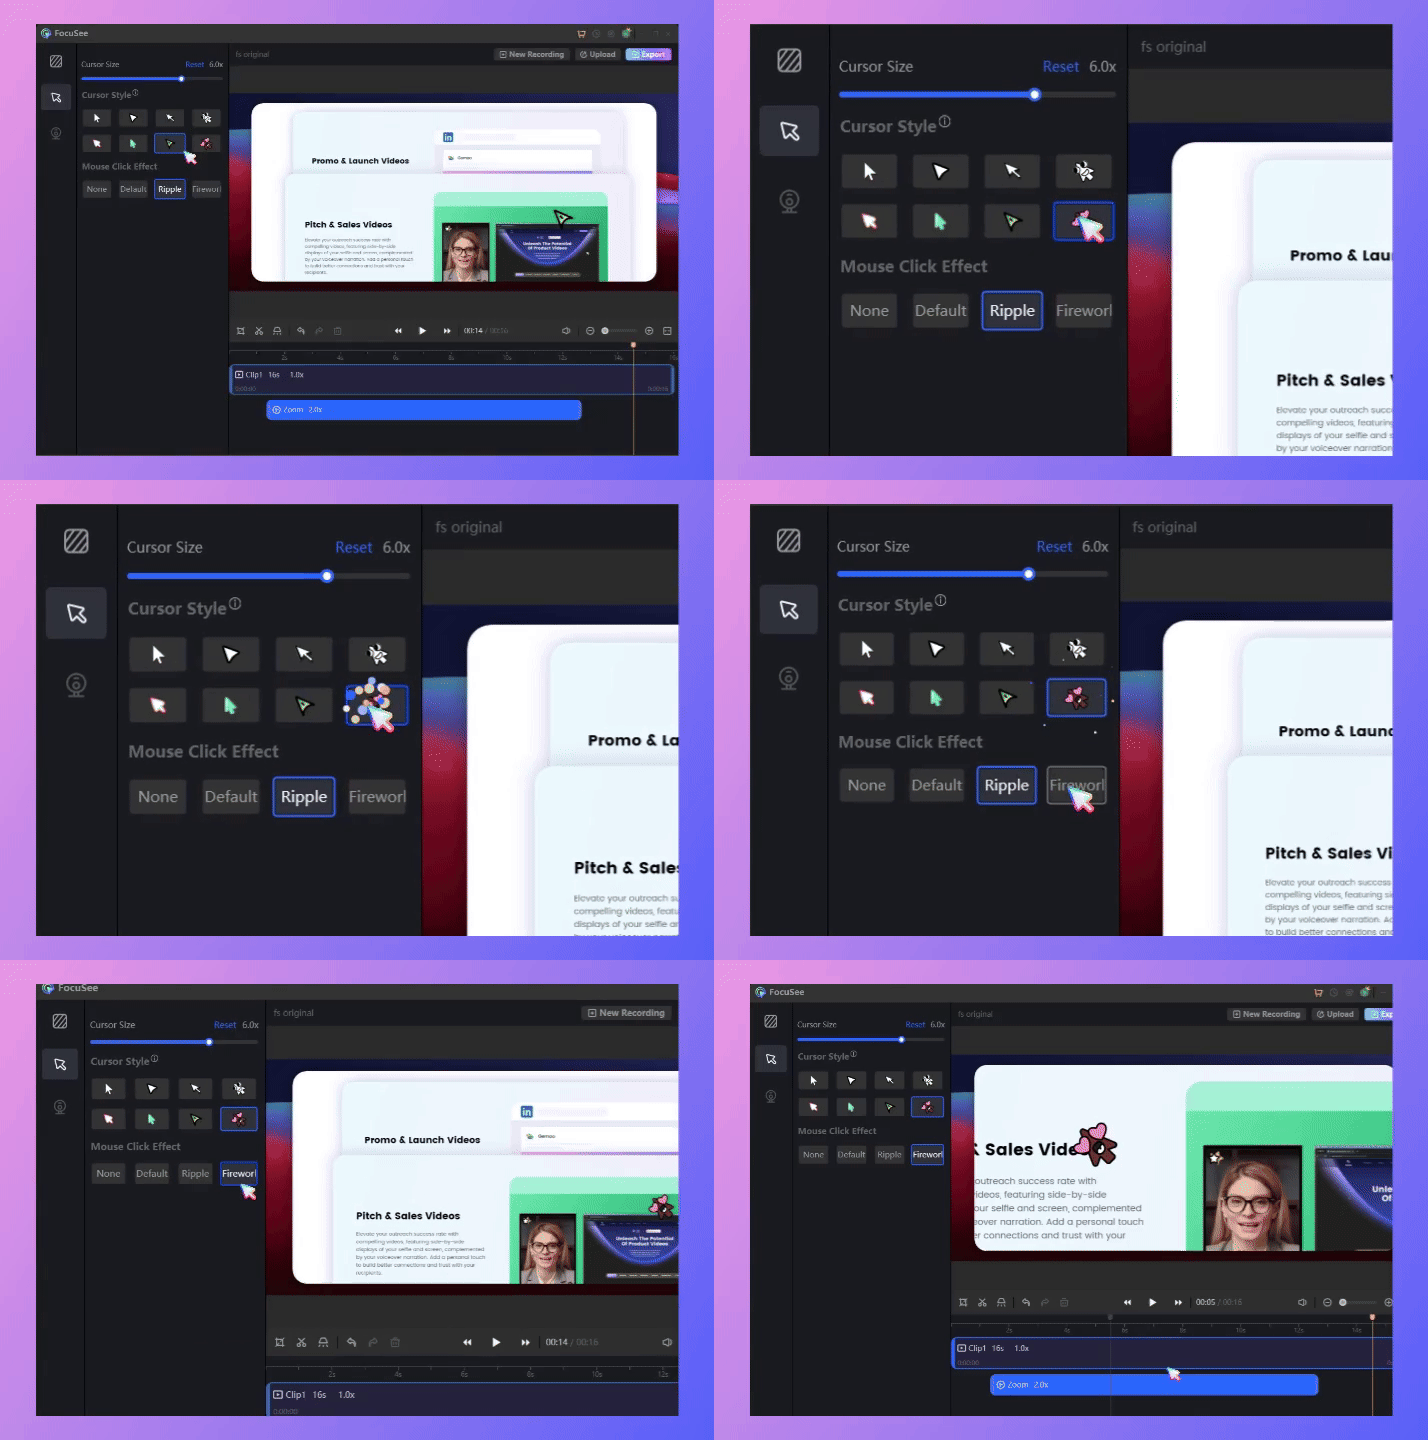
Mouse Cursor Settings
Step 4: Export. Then, export the recorded video as an MP4 or GIF file, or easily share it via a link.
Final Thought
The concept of screen recording is a unique and fascinating one. The use of screen recording tools is way too common now. Although Windows 10 offers a secure screen recorder, you can always download and use another one. Gemoo recorder is one of the most secure screen recorders integrated with a pool of amazing features. In this article, we shed light on why screen recording is not working and shared some tips to get rid of this issue. We hope this article was a beneficial read for you. Don’t forget to share it with your friends; if you have any confusion, feel free to comment.

