Since we live in a digital world, online meetings have become essential to our routines. Because of the continuing epidemic, video conferencing services like GoToMeeting are more widely used than ever. However, the capability to record these discussions for future reference or to share with people who could not attend is crucial. While recording a GoToMeeting session isn’t particularly complicated, it might be intimidating to first-timers.

Record GoToMeeting
You may use various tools and techniques to record these sessions, but not all are created equal in quality and convenience. However, if you’re unaware of the best way to Record GoToMeeting on your device, we’ve got you covered. In this article, you’ll discover the finest ways to record GoToMeeting. Let’s get going!
Table of Contents: hide
Record in GoToMeeting with Built-in Feature
Record in GoToMeeting with Built-in Feature
GoToMeeting is a well-known online conferencing service that facilitates simple remote team communication between employees and customers. Due to its dependable and efficient features like screen sharing, video conferencing, and virtual whiteboard, this platform has become a fixture in the remote work environment. GoToMeeting’s ability to capture your screen is one of its most valuable features.
Online meetings, including all audio, video, and screen sharing, may be effortlessly recorded with only a few clicks with this tool. This is helpful for individuals who missed the meeting or wished to share what was discussed. Users who want to record their meetings but don’t want to deal with installing and setting up other software will appreciate the built-in screen recording capability.
To understand how to record GoToMeeting using the built-in feature, follow these steps:
Step 1: Open GoToMeeting on your device or browse its website on your preferred browser. Launch or join the meeting you wish to record.
Step 2: Now, from the Control Panel of GoToMeeting, click the REC button and then Start Your Recording to initialize the recording.
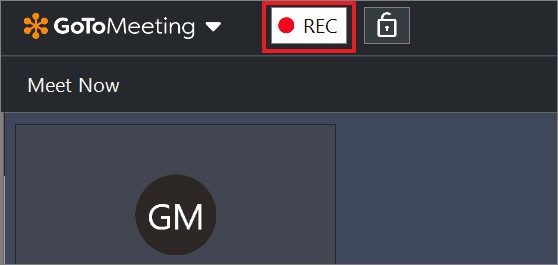
Click the REC Button
Step 3: After being done with the recording procedure, click on the REC button again and then select Stop Your Recording to end capturing the meeting. You will find the recording in the Meeting History.
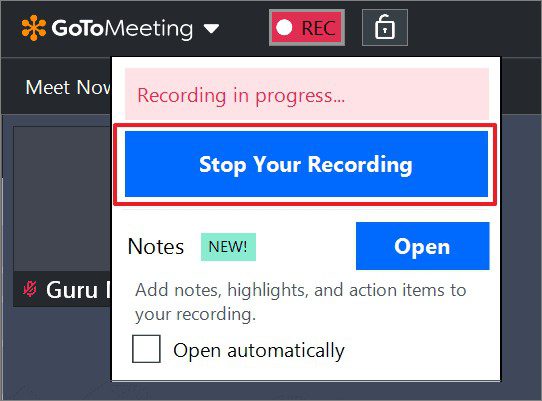
Click on Stop Your Recording
Record GoToMeeting on Win&Mac
Do you want to create watermark-free and captivating GoToMeeting videos? Look no further than Gemoo Recorder is a comprehensive screen recording tool that allows you to record your screen exactly how you envision it. With Gemoo Recorder, you can mix and combine audio, webcam, and screen recordings to record a unique and engaging video. Plus, our annotation tools, such as arrows and numbers, allow you to add depth and clarity to your content. But that’s just the beginning of what Gemoo Recorder can do. Discover all of our features and benefits by reading on.
- Capture the entire screen or just a specific tab in your browser.
- Provide various options to highlight key points, including voice-overs, cursor effects, and real-time annotations.
- Add popular GIFs to make your videos more engaging and creative.
- If you prefer not to appear on camera, you can choose a personalized avatar to represent you.
- Compatible with Windows and Mac operating systems, as well as popular browsers like Chrome and Firefox.
Here’s how to record GoToMeeting on Gmeoo Recorder:
Step 1: Download and install Gemoo Recorder on your computer. Once installed, launch the program and select the recording mode you prefer. Click on the “Start Recording” button to begin.
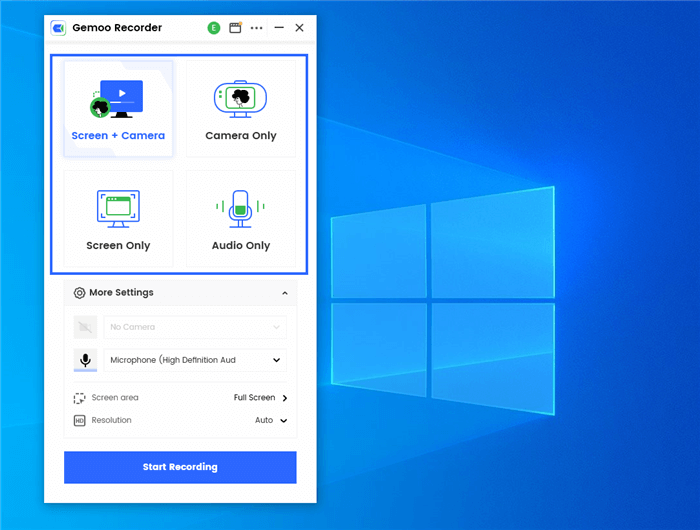
Select Recording Modes
Step 2: If you choose the “Screen Only” mode, wait for the 3-second countdown before the recording starts. You can add annotations during the recording if needed.
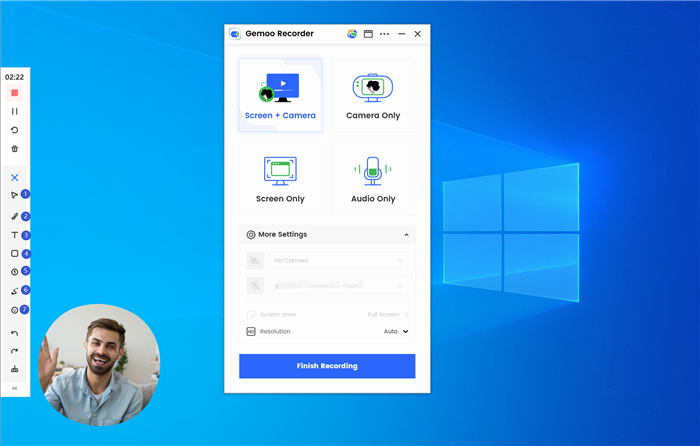
Add Annotations
Step 3:To finish the recording, click on the “Red Stop” button. The recording will be automatically uploaded to the cloud.
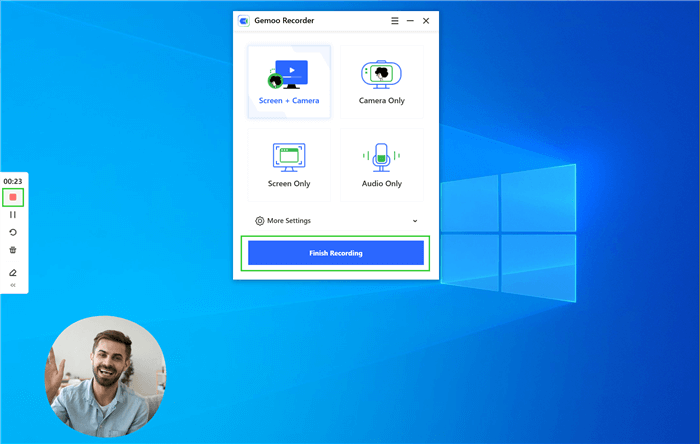
Finish Recording
Record GoToMeeting Online-Screen Capture
Wondering how to record GoToMeeting without the built-in feature? This section has got you covered! Although GoToMeeting has a built-in recorder, it has some limitations on recording and meeting length size, which is annoying if you wish to record extended conferences. Due to this, people prefer using third-party screen recorders. And the best tool in this scenario is Screen Capture, an online tool that saves you the time of downloading a screen recording tool.
Online meetings can be easily and effectively recorded using Screen Capture and saved as video files. Users can capture the audio from the conference and any material shown on their screen, including the GoToMeeting window. Screen Capture’s interface is intuitive and easy to use. Users may easily begin recording meetings with only a few clicks, and the resulting videos will be of professional quality.
To understand how to record GoToMeeting on your device using the online Screen Capture tool, follow the steps below:
Step 1: Go to Screen Capture on your preferred browser and customize your recording from the available options, i.e., Microphone, Webcam, Sound, and Watermark.
Step 2: After customizing, click the Start Recording button and select the GoToMeeting window in the popup to initialize the recording.
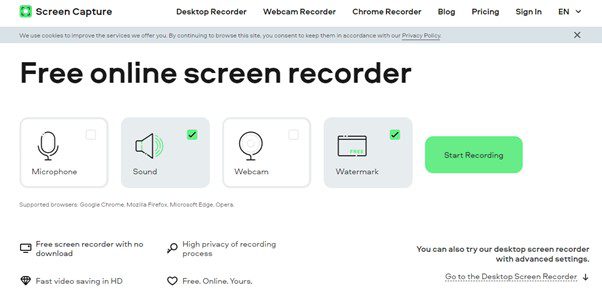
Click on Start Recording
Step 3: Now, create or join the GoToMeeting you wish to record. Once done with GoToMeeting, stop the recording and click on Download to save the recording.
Record GoToMeeting on iPhone and Android
Do you wish to record GoToMeeting on iPhone and Android? This is the section for you! Since the built-in screen recorder of GoToMeeting has some limitations, people prefer recording the screen through other tools. And if you were unaware of it before, you can use the built-in screen recorders on your iOS and Android smartphones to record the GoToMeeting conferences/calls since they don’t impose any time or size limitations. However, if you don’t know how to use the built-in screen recorders of your phone, you can refer to these steps:
For iPhone
Step 1: Ensure you’ve added the screen recording button in your iPhone’s Control Centre. If not, go to Settings, then Control Centre, and add the Screen Recording button in your Control Centre.
Step 2: Now, for iPhone 8+ and earlier versions, swipe up the screen to access Control Centre, and for iPhone X and later models, you can access it by swiping it down from the top right corner.
Step 3: Tap the white circle button and turn on the microphone. After that, tap on Strat Recording to initialize the recording. Now, launch the GoToMeeting.
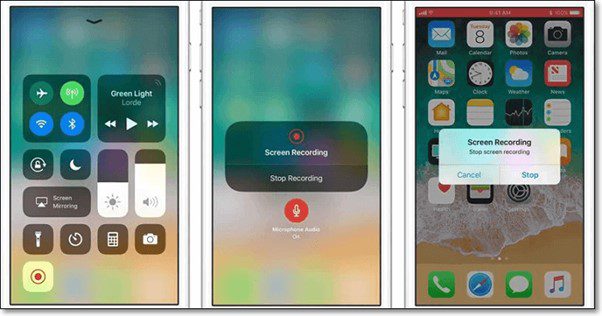
Tap on Start Recording
Step 4: Once the GoToMeeting conference is recorded, access the Control Centre and tap the white circle button to stop the recording.
For Android
Step 1: Access the Notifications Centre by swiping down from the top and tapping on Screen Recorder.
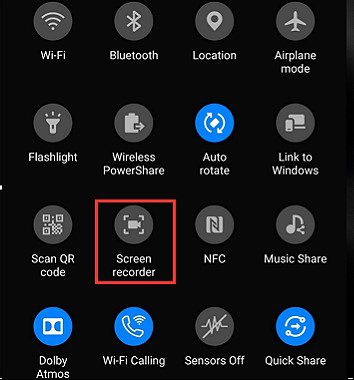
Step 2: Select whether you wish to record the Microphone and tap Start to initialize the recording.
Step 3: Open GoToMeeting on your Android device and connect to the video call, meeting, or conference you wish to record.
Step 4: After successfully recording, tap on the rectangle button in the recording menu to end recording the GoToMeeting conference.
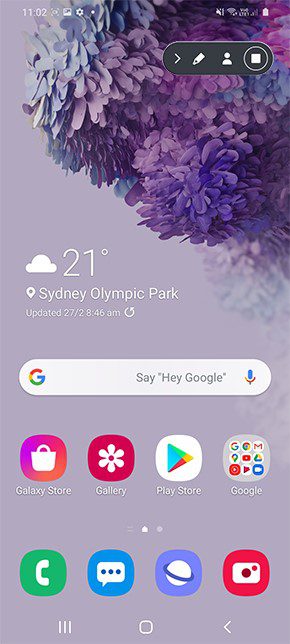
Stop Recording
FAQs-How to Record GoToMeeting
1. Where can I find the GoToMeeting recordings?
There are typically two options for locating a previously recorded GoToMeeting. You can search either the cloud or the local file, depending on where you’ve configured it to be kept. You may access it from the Meeting History page after it has been uploaded to the cloud. When you save a video to your computer, it will be under C:\Users\Documents. You can also modify the default storage locations.
2. Is it possible to record the GoToMeeting as an attendee?
Yes, you can record the GoToMeeting as an attendee. The recording will contain the audio from your session, everything that happens on-screen, and any files transferred between participants. However, the host must be present during the meeting to grant the other participant recording permission or designate the other participant as a replacement host.
3. What is the file format of GoToMeeting recordings?
GoToMeeting meetings are automatically recorded and stored as.wmv files. If you like, you may also save them in.mp4 or.mov format. As file formats vary in playback compatibility, file size, and quality settings, users may choose the best one.
Final Thought
Every GoToMeeting plan should strive for a successful webinar with happy attendees, but this isn’t always possible owing to factors like conflicting schedules and time zone variances. Connectivity to the internet also plays a role in this. Due to this, people wish to Record GoToMeeting on their devices. And we hope you know how to record GoToMeeting using different ways after reading this article. Moreover, if you’ve questions or suggestions related to recording GoToMeeting, please use the comments section.

