How to Screen Record Disney Plus on All Device

Disney+ has strict content protection measures in place to prevent piracy and unauthorized distribution of its content. We do not recommend recording copyrighted videos without permission.
Disney Plus, often known as Disney+, is a prominent streaming platform like Netflix and Hulu that provides various movies and TV episodes from Disney, Pixar, and National Geographic. So many people want to record Netflix, Hulu, and Disney Plus. They have swiftly become household names because of their enormous collection and innovative programming. It may be necessary, on occasion, to record Disney Plus videos on your device’s screen and save them locally for later offline viewing.
Screen Record Disney Plus
However, many customers face issues while trying to screen-record their preferred content. This restriction is annoying, particularly if users want to store and share their favorite media. But if you’re wondering How to Screen Record Disney Plus on your device, you’re at the right place. In this article, you’ll learn the right ways to screen-record your favorite movies or shows on Disney Plus. Let’s get going!
Table of Contents: hide
How to Screen Record Disney Plus with Gemoo Recorder-Win&Mac
How to Screen Record Disney Plus on Windows PC
Screen Record Disney Plus on Mac
How to Screen Record Disney Plus with FocuSee
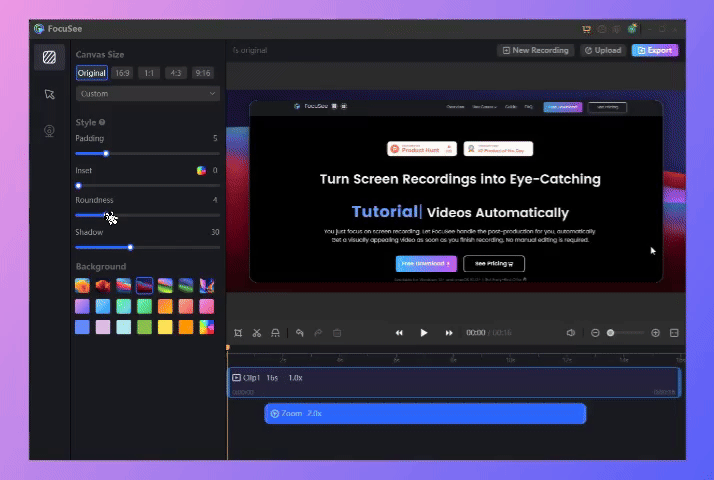
To begin with, we present a comprehensive solution that caters to both Windows and Mac users for screen recording their Disney Plus. Regardless of the Windows version you are using, FocuSee is a reliable option for screen recording. It is considered one of the top screen recorders for Windows and Mac in 2024, capable of capturing and recording your screen in high definition.
FocuSee offers a variety of options for recording your computer screen, including the ability to record screen and audio or screen and webcam. You can customize your recording by mixing and combining different elements to suit your needs. Additionally, you can enhance your video content with outstanding video backgrounds, awesome mouse cursors, and other visual aids to make it more engaging. These are just a few of the many features and benefits that FocuSee has to offer. To discover more, continue reading!
FocuSee Highlight:
- Emphasize important information or get a closer look at details with smooth zooming capabilities.
- Choose to record the entire screen, a specific window, or a custom region, giving you control over what content is captured.
- Trim, cut, and edit your recordings within the software.
- Access a variety of video backgrounds to create a professional and consistent ambiance for your videos.
- Utilize customizable hotkeys for quick control over the recording process without interrupting your workflow.
Follow the straightforward steps below to record your screen on Windows with ease
Step 1: To enable and play the Disney Plus movies you want to record on your computer.
Step 2: Install FocuSee and open it on your computer. Then, select from the three modes: Full Screen, Custom, and Window, then click on the red Rec button to initiate the recording process.
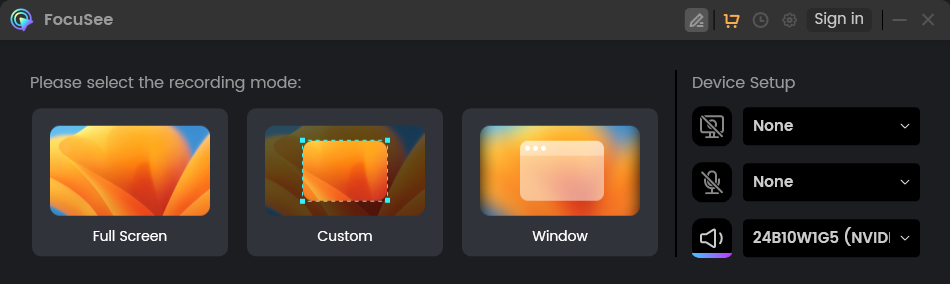
Three recording Modes of FocuSee
Step 2: After a three-second countdown finishes, screen recording will start.
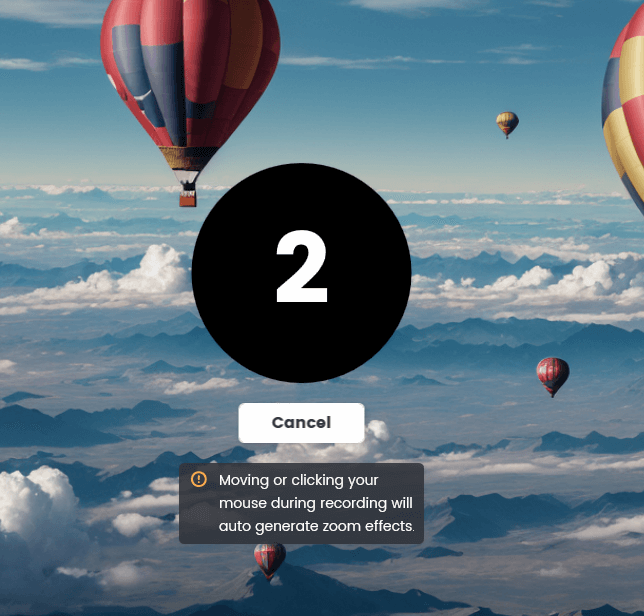
Three Second Timer
Step 3: To end the screen recording process, you can press the red ‘Stop’ button located at the bottom of the window.
Step 4: After recording, you can customize and edit the video, such as trimming, cutting, enhancing the background, changing the mouse style, and customizing zoom effects. You can even directly choose from various social media video preset sizes to change the aspect ratio of the video.
Customize Your Recording Video
Further Reading: Make a Memorable Intro Outro Video >
How to Screen Record Disney Plus on Windows PC
Looking for an official way to screen record Disney Plus on your Windows PC? This section has got you covered! The first thing to know is that Disney Plus doesn’t provide a built-in option to record its movies or shows on Windows like every popular streaming platform. However, don’t worry because there are a few workarounds to complete the screen recording. You can use the built-in screen recorder, Gemoo Recorder, i.e., Xbox Game Bar, on your Windows PC to screen record Disney Plus.
Windows 10 includes the Xbox Game Bar, a built-in feature that provides easy access to several useful functions and settings for PC gamers. Without leaving the game, you may quickly access functions like system performance monitoring, talking to friends, changing the music, and taking screenshots. The Xbox Game Bar is extensively modifiable, allowing players to add or delete options as they see fit. Besides that, it can also record Disney Plus shows and movies on your Windows PC.
To understand how to record Disney Plus using Xbox Game Bar, follow the steps below:
Step 1: Launch Xbox Game Bar on your PC by pressing Win + G keys on your keyboard or searching for Xbox Game Bar in the Windows search menu.
Step 2: Open Disney Plus on your browser or launch its app on your PC. Navigate to the show/movie you wish to record.
Step 3: Once you’ve started streaming the movie/show, open the Xbox Game Bar window and click the Record button to initialize recording Disney Plus.
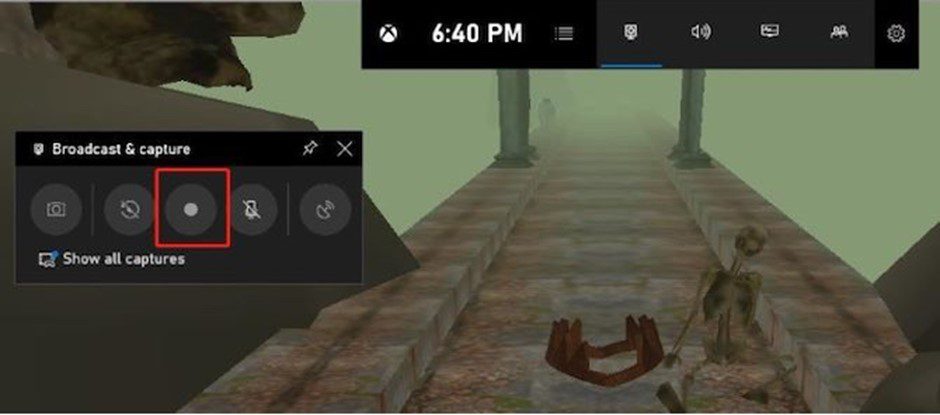
Click on Record Button
Step 4: After successfully recording the part you wish to record, click the red rectangle button in the Xbox Game Bar recording window to stop recording your Disney Plus. Your recording will be saved in Captures inside Videos on your PC.
Screen Record Disney Plus on Mac
Wondering how to record Disney Plus on Mac? Find the answer here! Like Windows, Disney Plus doesn’t offer an official way to record its movies or shows on Mac. You need to use your Mac’s built-in screen recording tools to screen record Disney Plus. And one such professional screen recording tool on Mac is QuickTime Player.
Apple Inc. created the QuickTime Player, an extensible software framework included in Mac OS X. It’s supplementary software that helps your Mac playback, generate multimedia, and save it. Macs are included with QuickTime Player, an all-purpose media player that supports several audio and video file types. The capability to encode and transcode digital data into other formats is also provided. The screen recorder in QuickTime Player is a great tool for capturing presentations or gameplay on a Mac. It also includes editing features, including the ability to trim, duplicate, and combine audio and video segments.
To understand how to record Disney Plus on Mac using the QuickTime Player, follow the steps below:
Step 1: Open QuickTime Player and click on File from the top menu. Now, click on New Screen Recording from the menu.
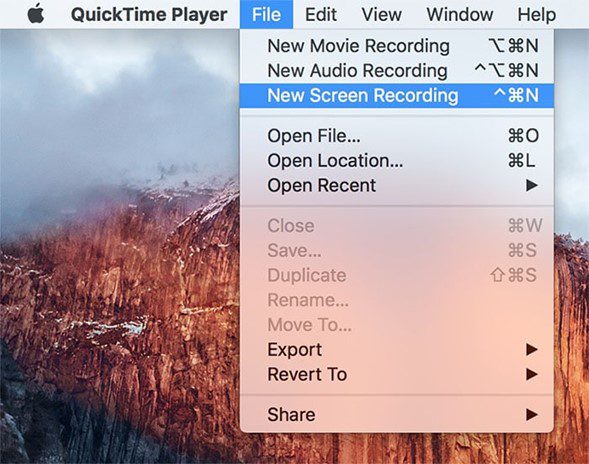
Click on New Screen Recording
Step 2: Now, go to Disney Plus on your preferred browser or launch its app. After that, open the movie/show you wish to record.
Step 3: Open the Screen recording popup of QuickTime Player and click on the red Record button to start recording Disney Plus movie/show.
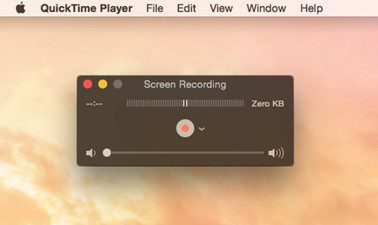
Click on Record
Step 4: Once done with recording Disney Plus, click on the Stop button. Now, preview the recorded video in QuickTime Player. You can also edit it using the built-in tools. To save, click on File and then Save to save the recording.
How to Screen Record Disney Plus on iPhone/Android
If you use Disney Plus on your smartphone to watch movies or TV shows, you sometimes wonder how to screen record them. Since there’s no official way to screen record Disney Plus on smartphones, and recording with a built-in screen recorder results in a black screen, you need a third-party tool to record Disney Plus on your smartphone. And one such quality tool is PlayOn Cloud.
Several streaming services, like Netflix, Amazon Video, Disney Plus, etc., are compatible with PlayOn Cloud’s recording features. Because of its screen-capture capabilities, it can be used to watch certain region-locked movies. You may have some difficulties while attempting to record movies on your phone. Disney’s older films are available for download and recording using PlayOn Cloud. This software is great since it allows you to try Disney Plus free for 7 days.
To screen Disney Plus on your iPhone or Android device using PlayOn Cloud, follow the steps below:
Step 1: Download and install PlayOn Cloud from App Store on your iPhone or Google Play on your Android device. After installing, launch the app on your mobile.
Step 2: Select Disney Plus from the available channels on PlayOn Cloud and navigate to the show/movie you wish to record.
Select Disney Plus
Step 3: After streaming the required movie/show, record it using the built-in recorder of PlayOn Cloud.
FAQs About Screen Record Disney Movies
1. Is there an official way to screen-record Disney movies?
Due to copyright and licensing restrictions, Disney Plus does not offer an official option to screen-record its material. The site employs digital rights management (DRM) methods to stop its materials’ illegal duplication and dissemination. However, users may capture and record Disney Plus material using a variety of third-party screen recording applications and apps. Taking unauthorized recordings of protected works may get you in serious trouble with the law.
2. What are the best tools to record Disney Plus on Windows, Mac, and smartphones?
Many professional third-party and built-in tools let you record Disney Plus on your Windows and Mac computer. However, you need a third-party tool for smartphones because if you record using the built-in screen recorder, you will get a black screen. For Windows and Mac, the built-in screen recorder, i.e., Xbox Game Bar and QuickTime Player or third-party tools like Gemoo Recorder, are your best bet. And for smartphones, PlayOn Cloud is a reliable tool to record movies and shows on Disney Plus and other streaming platforms. However, the best tool for recording Disney Plus depends on your choice and requirements.
3. Can you watch Disney Plus with your friends from different locations?
Using Disney Plus’s GroupWatch feature, you can watch with friends even if you’re not all in the same room. Users may invite up to six individuals who aren’t in the same room to watch movies and TV programs together with GroupWatch. Viewers can manage the playback, pause, and rewind functions if they all have a Disney Plus membership. Users may talk to one another during the viewing party using the integrated chat tool. It’s fun to include loved ones in your Disney Plus enjoyment anywhere globally.
Final Thought
Despite the fact that Disney Plus doesn’t provide an official way to record screens, you can easily record Disney Plus content on any device using the right tools. If you’re using a screen recorder for anything other than private use, you should be sure to comply with copyright laws and get the necessary permissions before publishing or sharing your video. Besides that, we hope you know How to Screen Record Disney Plus after reading this article. Moreover, please consider forwarding this article to friends, family, and colleagues who may gain anything from reading it, and also your questions are welcome in the comments sections.