You just got your first Mac computer and you can’t seem to complete even the most basic operations? That’s not a surprise, since MacOS has a significantly different look and feel than Windows, and built-in functionalities are named and organized in a much different way. This feeling can be very frustrating and even cause the user to regret switching to a Mac.
How to Resize an Image on a Mac?
There is no real reason to worry about this transition – most users adopt the logic of the Mac very quickly and start using its commands without thinking. It certainly helps to practice, which is why you shouldn’t hesitate to play around with your images and try to resize them in different ways. This article will instruct you how to resize an image on a Mac and provide some veteran tips that can improve the final outcome.
Also read: How to Resize Image without Distortion? >
Table of Contents: hide
How to Resize an Image on a Mac using Preview
How to Resize an Image on Mac without Loss of Quality
How to Resize an Image on a Mac using Preview
While there are several ways to resize an image on a Mac computer, the simplest one involves an application named Preview that is already present on the machine. This app does much more than merely let you preview the pictures, and one of its most convenient function is precise and effortless resizing. The process is really intuitive and requires only minimal technical proficiency, while it allows for very precise control of the image dimensions and resolution. Here is what you need to do to resize an image using Preview:
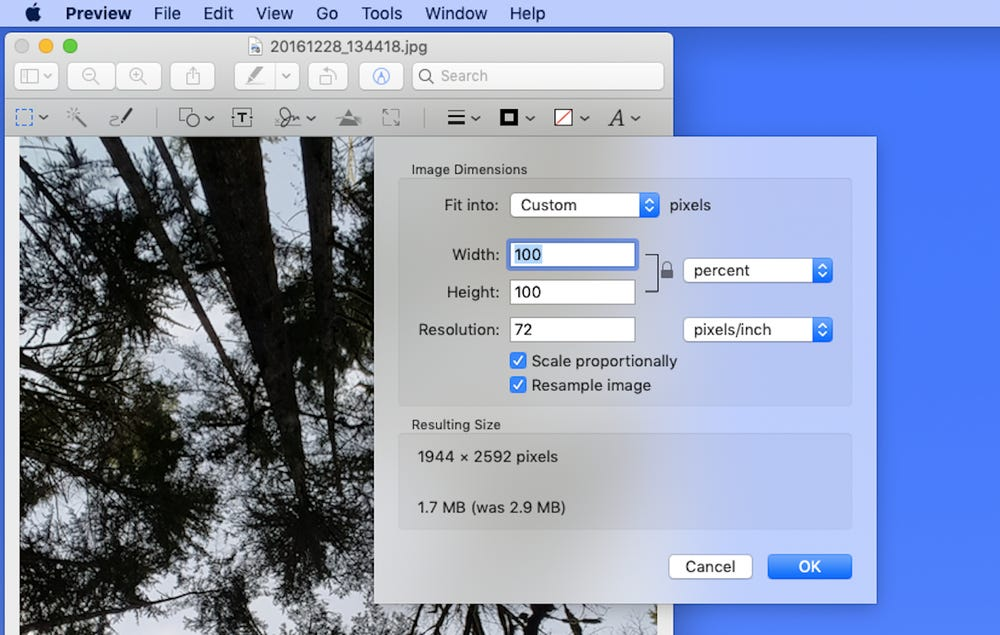
Step 1: Find the image on your hard disc or cloud drive, right-click on it and open it with Preview
Step 2: Go to Tools menu in Preview, then scroll down to find Adjust Size option
Step 3: Set up the target resolution and image dimensions, and check the option Scale proportionally
Step 4: Check the new pixel and file size of the image and click OK if you are happy with the values
Also read: How Can I Resize Image in Figma Without Cropping? >
How to Resize an Image on Mac without Loss of Quality
Third-party tools for image resizing can produce even better results and allow you to keep the images super-sharp even after you change their dimensions. One of the best resizing tools on the web is Gemoo Image Resizer, a free software application that can complete this task without the need to download and install anything on your Mac. You can expediently resize any image with this online tool if you complete the following steps.
Resize Image without Losing Quality
Step 1 – Upload an image from your Mac to Gemoo Image Resizer website
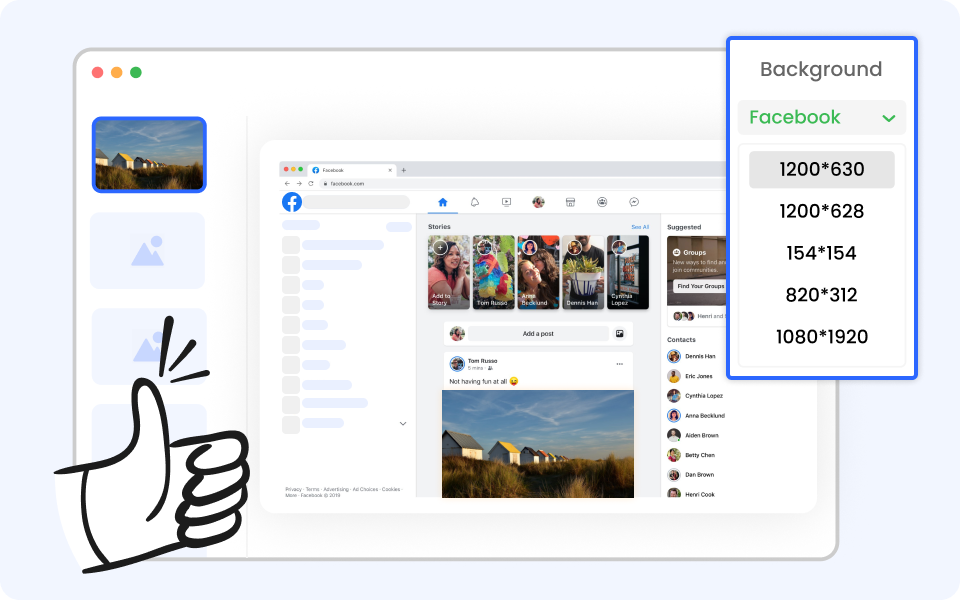
Step 2 – Select one of pre-defined formats for social media, or enter your own dimensions in pixels
Step 3 – Decide whether you want to crop out any part of the image
Step 4 – Download the resized image to your computer in PDF, JPG, or PNG format
5 Tips for Resizing Images on a Mac
It’s true that image resizing requires only minimal design skills, but you can get better results if you adhere to some unwritten rules. The following list of expert tips is by no means exhaustive, and represents only the starting point for your understanding of image processing and formatting.
Resize Image on Mac
Tip #1 – Consider the real-life size of the image
The intended placement in real life (or on the web) should guide your decisions regarding the image size. If you want to print the image in a large format in the future, reducing its size too far below the dimensions of the print might compromise quality. On the other hand, images that will be used as thumbnails in a brochure can be downsized with no worries.
Tip #2 – Keep the file size reasonable
You should be aware that large images require a lot of space on your hard disk on in your iCloud storage, so you should rationalize based on available space. Even if you have ample storage at your disposal, you should keep the file sizes under a sensible limit. That’s especially true if you create a lot of photos and other images on a regular basis, as the files can pile up really quickly before you notice.
Tip #3 – Adhere to limits set by publishing platforms
Images that are prepared for publishing on social networks and other online platforms should ideally be resized to fit the maximum set by the platform. Most social media tend to keep maximum image resolutions relatively low, but there could be some websites (i.e. stock image libraries) where very large images are accepted. Be sure to check the specifics before you resize the images.
Tip #4 – Don’t mess with the proportions
It’s almost never a good idea to disrupt the balance of the image by changing the ratio between height and width. Such a transformation could distort some of the objects in the image and create an absurd visual effect. Most methods for image resizing allow you to keep the original proportions, but in some cases you might need to check this option during the setup.
Tip #5 – Avoid compressing your image
Any methods for reducing the file size that depend on compression could potentially reduce image quality and are thus best avoided. If you absolutely have to downsize, it’s better to reduce the dimensions of the image than to risk losing some of the details and sharpness from the original image.
Frequently Asked Questions about Resizing Images on Mac
1. What is the most optimal image size for social media posts?
Every social network has its own standards when it comes to image size and aspect ratio. If you are preparing images for Facebook, 1200 x 630 and 1080 x 1080 pixels are formats that should serve you pretty well, but on Twitter it’s recommended to use 800 x 418 or 800 x 800 instead.
2. Are there any other native applications for Mac that can be used to resize an image?
In addition to the apps mentioned in the text above, there are dozens of other image resizers that works perfectly well on a Mac. Some of the best software tools from this class include PhotoMarks, Pixelmator 3, PhotoResize Pro, and Batch Image Resizer.
3. Should I delete the original image after I save the resized version?
If the primary reason for resizing the image was to reduce the amount of space needed to store it, then it makes perfect sense to delete the old version. However, make sure that the new version is functional before you permanently remove the original file from your Mac computer or cloud storage.
Conclusion
Working on a Mac can be totally intuitive once you learn how the OS functions and which apps are best suited for specific tasks. When you need to resize an image, you have a choice between a native app called Preview, and third-party products such as Gemoo Image Resizer. It’s best to try several methods and find the one that feels the most natural to you. After you adopt the right tool and develop an understanding about the most optimal image sizes for certain uses, you can take full control of the visual material you keep on your Mac. Let us know which apps do you typically use to resize images on a Mac in the comments below the article.