How to Record Powerpoint Presentation with Webcam?

Pictorial representation is often considered more effective than verbal representation when conveying information to an audience. In recent years, this is widely used when teachers deliver a lecture and team workers give a report. This is because visual aids, such as graphs, charts, and images, can help people better understand complex concepts and retain information for longer periods. One tool that has helped many institutions, including business schools, improve their communication and increase understanding among people is Microsoft PowerPoint.
Record Powerpoint Presentation with Webcam
While PowerPoint slides effectively convey information, some users wish to enhance their presentations by adding a webcam recording. This enables the presenter to combine pictorial representation with a better verbal explanation, resulting in a more engaging and effective presentation. In this article, we will show you four ways to record PowerPoint presentations with a webcam using easy-to-follow steps. If you want to learn how to record PowerPoint slides with your webcam, stick with us, and we will guide you through the process.
Also Read: How to Embed a Video in a PowerPoint >
What Should You Prepare for PPT with Webcam?
Before recording a PowerPoint presentation with a webcam, certain prerequisites need to be considered. These prerequisites ensure that screen recording in high quality can convey the intended message effectively. This section will discuss the prerequisites for a successful PowerPoint presentation with webcam recording.
📃 PPT Slides
To deliver a successful presentation, it is essential to have a well-prepared, visually appealing, captivating PowerPoint presentation to keep the audience engaged. To create a successful presentation, it is important first to retrieve the purpose of your presentation and verify the key message you want to transfer. Once you clearly understand your objectives, you can organize your content and design your slides.
Making a good presentation needs to possess various traits, including being clear, to the point, engaging, well-organized, relevant, and delivered with confidence. Its purpose should be easy to understand, allowing the audience to comprehend the message easily. An important factor that contributes to its effectiveness is the visual appeal of the presentation, which can be achieved through the use of high-quality pictures, animations, and media related to the topic that enhances the message.
📷 Webcam or Built-in Camera
To record Powerpoint slides with a webcam, it is important to ensure that your device’s camera is set up correctly and meets the requirements for high-quality video. Poor quality video can make it difficult for viewers to engage with your presentation, detract from the content, and ultimately reduce the effectiveness of your message. This is why it is important to take the time to properly set up your camera and test it before recording to help users perceive the information with great understanding.
For ideal results, it is suggested to use a dedicated webcam with a high-quality lens and sensor, as this will provide the best image and video quality. Additionally, it is important to ensure that it is properly set up on the tripod and angled to capture the desired shot. A stable and level surface is also necessary to avoid shaky recordings, which can be a great hurdle for viewers. On the other hand, if you use your computer’s built-in camera, ensure it is up to mark and records high-quality video.
💡 Good Lighting Conditions
An essential element of recording a PowerPoint presentation with a webcam is ensuring the room is well-lit. This is important because it lets your audience see your face and expressions, making your presentation more engaging and impactful. Besides this, it can also help to create a professional and polished look for your recording. Additionally, when you are visible and lit, it helps to establish a personal connection with your audience. They can see you as real, making it easier for them to connect with your message. So, ensure you are in a well-lit room to create a more engaging and effective presentation.
How to Record PPT with Webcam?
Want to know how to record Powerpoint slides with a webcam? Let us help you! Various methods exist to record Powerpoint slides with a webcam; choosing the right one depends on your specific requirements. This section will discuss four ways to record a PowerPoint presentation with a webcam, with easy and quick steps. These methods will help you choose the best option for your needs and enable you to create high-quality presentations easily.
Record PPT with Webcam via Gemoo Recorder
Gemoo Recorder is a screen recording tool widely used for recording Powerpoint presentations with a webcam. As a professional screen recording application, it can well meet the need for capturing high-quality screens and videos. It is a handy choice among users due to its intuitive interface, robust features, and ability to capture screen and webcam simultaneously. It also allows users to add annotations, texts, and other effects to their recordings, making them more engaging and visually appealing.
Step 1. Free install Gemoo Recorder on your computer and select the Screen + Camera feature. Open the PowerPoint presentation.
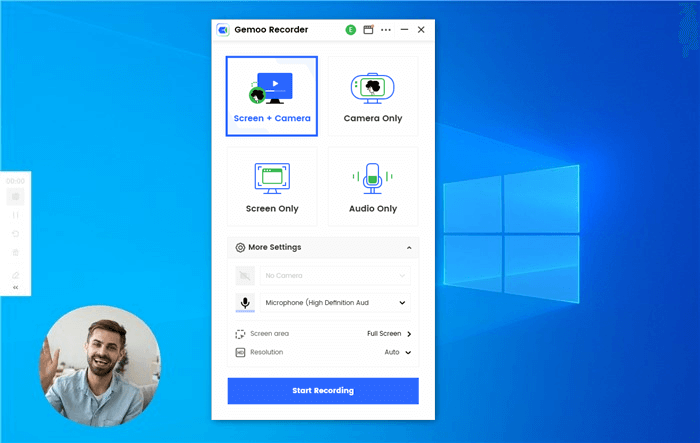
Select Screen & Camera Recording Mode
Step 2. Click the Start recording button to trigger the 3-second countdown, after which the recording will be started.
Best Screen Recorders for PC Games – Gemoo Recorder
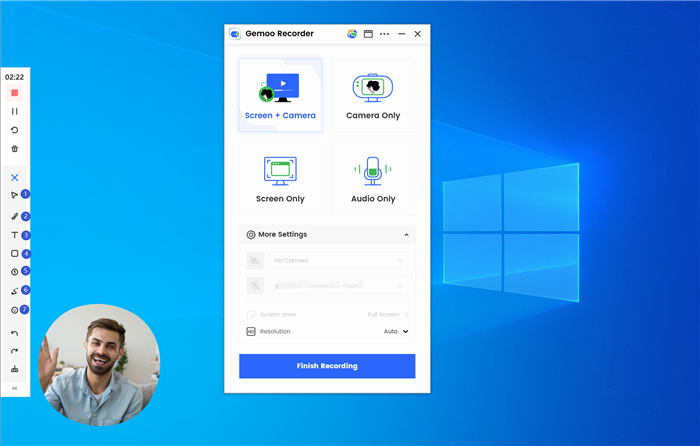
Step 3. Click the red “Stop” or “Finish Recording” button to stop the recording process. And then your recording will be saved to the cloud.

Upload Succeeded
Record PPT with Webcam via PPT Built-in Tool
PPT Built-in Tool is a feature in Microsoft PowerPoint that allows users to record presentations with their webcam. The main features of the PPT Built-in Tool include the ability to record both the Powerpoint slides and the presenter’s webcam at the same time. The tool also allows users to pause and resume recording, as well as the option to add narration and laser pointer during the recording process. Users can also preview and edit their recordings before saving the final version. To use the built-in tool, follow these steps:
Step 1. Launch PowerPoint on your PC and navigate to “Slide Show” tab in your PowerPoint.
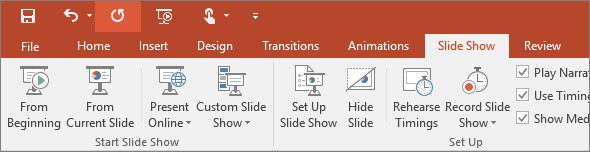
Click On Slide Show
Step 2. Select the “Record Slide Show” option and choose your webcam and microphone in the Settings menu.
Step 3. Click the “Record” button and wait for the recording to begin after three seconds.
Step 4. Once you have finished presenting, click the “Stop” button and follow the steps to save it at your desired location.
Record PPT with Webcam via OBS Studio
OBS Studio, short for Open Broadcaster Software Studio, is a free software application for video recording. It is available for Windows, Mac, and Linux operating systems and offers many features, including audio and video mixing, scene creation, transition effects, and more. It can also be used to record or stop record Powerpoint slides with a webcam using the below-mentioned steps:
Step 1. Open OBS Studio and add your webcam as a source by clicking “+” > “Video Capture Device” in the Sources panel and choosing your webcam from the Device drop-down box.
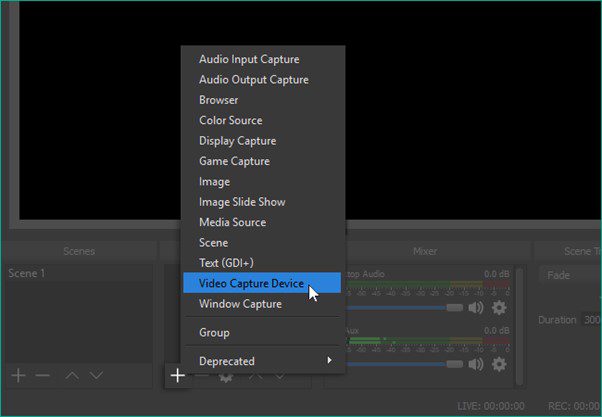
Click on Video Capture Device
Step 2. Choose the “High” setting and add your microphone as an optional source.
Step 3. Open the Powerpoint slides.
Step 4. Click “Start Recording” under “Controls” to begin recording your webcam, and stop the recording at any time by clicking “Stop Recording” under “Controls.”
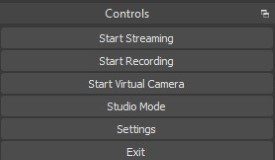
Click on Start Recording
Record PPT with Webcam via QuickTime
Are you a Mac user and want to record ppt with a webcam? Quicktime player is your answer! It is a multi-media tool pre-installed in all the latest Mac laptops. It has become a handy tool for many users due to its immaculate features, like recording the entire screen or just a portion with and without a webcam. Besides this, it is also used for editing recorded videos. To record Powerpoint slides with a webcam on a Mac, follow these steps:
Step 1. Download and launch QuickTime Player. Then, click on “New Movie Recording” from the “File” drop-down menu.
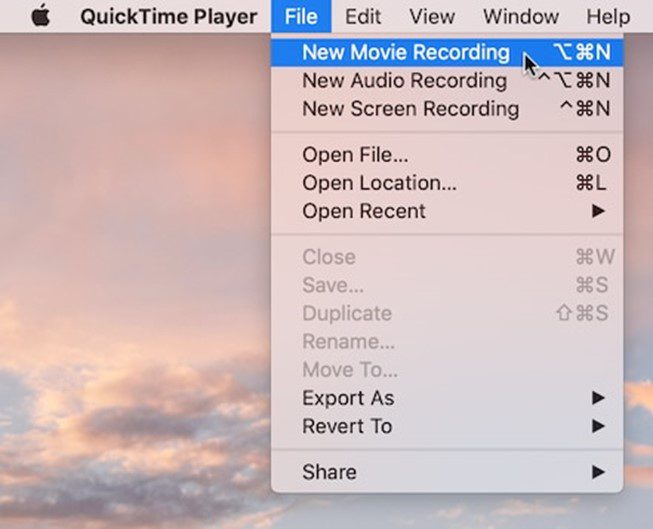
Click on New Movie Recording
Step 2. Choose your preferred camera, microphone, and recording quality from the “Options” menu.
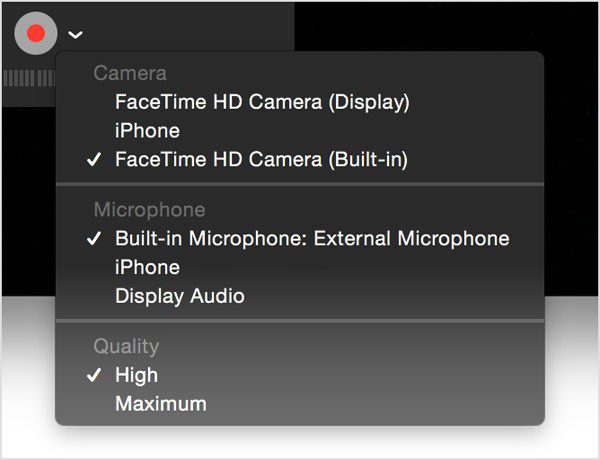
Select Preferred Settings
Step 3. Locate and open your PPT slides.
Step 4. Press the “Record” button to begin recording and click the “Stop” button (or use the Touch Bar) to stop recording.
Faqs about Recording PPT
Having doubts regarding recording ppt presentation with a webcam? Worry no more! This section will answer some commonly asked questions to remove any ambiguity, so let us look into that:
Why should I record my PPT presentation?
Recording a Powerpoint presentation has many advantages, as it allows you to create a more engaging and interactive learning experience for your audience. Besides this, it can save you time and resources, as you can easily share the recording with others who may have missed the live presentation. From the recorder’s point of view, it allows them to revisit the presentation and make necessary edits or improvements for future use.
How long does it take to record a PPT presentation?
The time it takes to record a PowerPoint presentation with a webcam will depend on several factors, such as the presentation’s length, its complexity, and the level of preparation. However, as a general estimate, you can expect it to take about twice or thrice time the length of the presentation to record, as you may need to pause and re-record certain sections, adjust settings, or make other edits. For instance, if your presentation is 30 minutes long, it may take around one to one and a half hours to record.
What file format should I save my recorded PPT presentation in?
When saving a recorded Powerpoint presentation, the format chosen will depend on the intended use of the presentation. When the recording is done for online training, marketing, and educational purposes, then mostly MP4 is selected. On the other hand, the AVI format is a high-quality video format suitable for advanced video editing, making it ideal for professional video production or broadcasting.
Final Thought
In conclusion, recording Powerpoint presentations with a webcam is an excellent way to combine verbal and visual illustrations and significantly enhance the effectiveness of a presentation. This article has provided four different methods with easy steps to help you record your presentation with a webcam. By following these methods, you can create engaging and informative presentations that are easy to understand and remember. Sharing these presentations with friends and family can help spread your ideas and message to a wider audience. We hope this article has been helpful to you, and we welcome your feedback in the comment box below.