You will often need to record audio when using your computer regularly. For example, you could wish to record lecture videos, broadcasts, voice chats, computer game background music, or favorite tunes. As a result, it’s critical to choose a reliable audio recorder to collect sound from the computer microphone/speaker.
Here, we would like to introduce a free and open-source audio editor and recorder – Audacity. It is a multi-track recording program, which allows you to easily record audio on Windows, Mac, Linux, and other operating systems. Here in this post, we’d like to introduce the details on how to record desktop audio and microphone in Audacity. Besides, you can solve the problem when Audacity won’t record computer audio.
How to Use Audacity to Record?
Record Desktop Audio on Mac with Audacity
Record Computer Audio with Audacity Windows 10/11
Audacity is a full-featured audio recording program that can capture live audio from a microphone or mixer. It fully supports 16-bit, 24-bit, and 32-bit resolutions. Furthermore, it has many editing options and effects to improve the recorded audio and export it into various audio formats.
Features of Audacity
However, it would help to acknowledge that Audacity is a little tough for beginners to use when recording computer audio. Because Audacity’s creators have structured the files. For downloading and installing Audacity, you can begin by visiting Audacity’s main download page. This website provides simple access to Audacity for Windows and Mac and other information.
Then, check the detailed steps below to record audio with Audacity.
Audacity has been a top-notch audio-recording tool for a while now, especially for those who create podcasts, explainer videos, or add background audio to their Roblox gameplay narration. Its user-friendly interface, editing and preview tools and visual monitoring make audacity a great choice to record computer audio. Here, let’s see how to record desktop audio on Mac with Audacity in detail.
Step 1: Set Mac’s sound settings to your preference.
To begin, you’ll need to download and install Audacity. Click the “Apple” symbol on the menu bar and choose “System Preferences.” Find “Sound” button and take a look at all available choices and choose “microphone.”
Step 2: Audacity should be able to identify a microphone.
Suppose you set it in this way on your Mac, open Audacity. In the main menu, choose “Audacity” and then select “Preferences” from the drop-down menu.
Note: You can verify this by clicking “Devices” on the left and selecting the microphone you want to use.
Step 3: Record audio from your Mac computer.
You can now begin recording audio on your Mac after making all of these settings. After playing the audio, press the “record” button to start recording. The recording can be stopped by pressing the “stop” button on the device.
You can listen to the audio file you just recorded by pressing the “play” button on your computer once you’ve finished recording. Using your computer’s speakers or headphones, you can listen to the recorded audio.
Step 4: Add sound effects to the video.
The “Effect” tool can add sound effects to the recorded audio. For example, this free Mac audio recorder offers you a wide range of effects. Once you’ve clicked the “Effect” option, you can choose a particular effect from the drop-down menu.
Step 5: Edit recorded audio.
Many common editing functions are available in Audacity, such as Cut, Delete, Duplicate, Copy, etc. Click Edit to access the editing functions if you need to make changes to the audio. Duplicate the audio file before editing or applying effects in Audacity since the actions and changes you make are irreversible.
Step 6: Make a copy of the recorded audio.
Click “File” and then choose “Export Audio” or “Export Selected Audio” to save the recorded audio to your Mac. You can export it as an MP3 file from here.
You can utilize the keyboard shortcuts in Audacity to swiftly capture computer sounds. You can also use the following Mac keyboard shortcuts to take full control of the operation while seeing the collected audio.
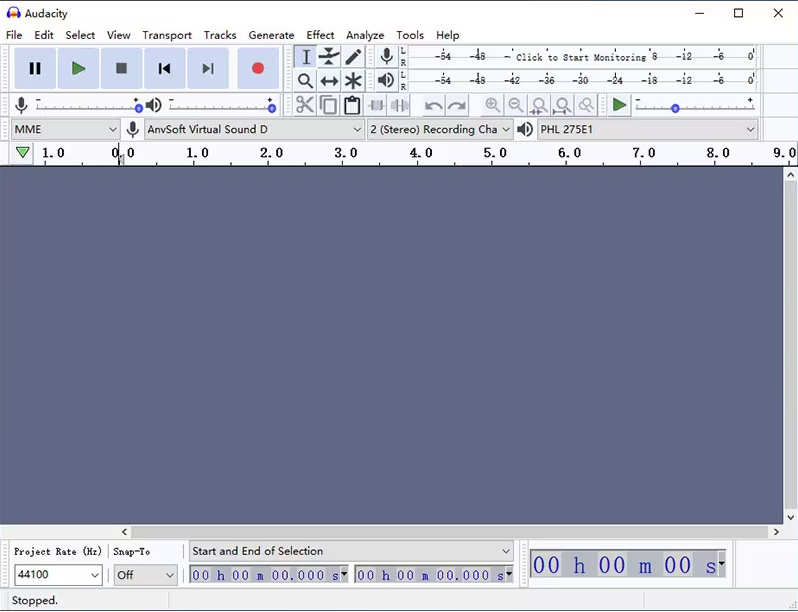
Audacity makes it simple to fetch sound from your Windows 10 system with its user-friendly option. You won’t have to navigate through complex menus because the option is easy to find and use for recording audacity record desktop audio. This section will demonstrate Audacity to capture computer audio on Windows 10.
Step 1: Install Audacity for Windows.
After downloading, you can install and operate it by following the on-screen directions. Before recording computer audio, verify the playback device and make sure Windows recognizes the microphone.
Step 2: Set Audacity for audio recording.
Right-click on the sound or volume icon in the bottom-right corner. Then, under audio input devices, choose your microphone. You can also increase the sound quality by adjusting the audio input parameters at this phase. Check whether Audacity is configured to identify your computer microphone. Select “Preferences” from the menu bar after clicking “Edit.”
Recording on Audacity with a Microphone
Select “Windows WASAPI” from the drop-down menu after selecting “Devices” from the left menu. In this section, you can choose the default device enabled in your sound device settings.
To capture computer audio, make sure the default playback device is set to “Speakers” or “Headphones,” and leave the channel set to 2 Channels. To confirm the operation, click “OK.”
Step 3: To begin recording computer audio in Audacity.
Click the “Record” button. When the audio recording is finished, click the “Stop” button.
Step 4: Audio editing
Captured audio can be previewed and saved. Audacity has a plethora of editing tools. So, after the audio recording, you can modify the obtained audio file. If you wish to add sound effects to the recorded audio, utilize the “Effect” function and then apply the desired effect.
Step 5: Export recorded audio
When you’re satisfied with the audio, save it to your PC. Select “Save Project As” from the drop-down list after clicking the “File” option on the menu bar. You can also choose “Export” and then choose your desired output audio format, such as MP3, WAV, or OGG, from this menu.

Save Audio Recorded by Audacity
When you initially start recording audio using Audacity, you may see an error message stating, “Error when opening sound device.” Your external microphone, which is now connected in, is not a viable choice. A few of the fundamental reasons of Audacity fails to capture audio are as follows:
It is possible to resolve the problem of Audacity not recording on Windows 11 and previous versions by changing the Audio Host setting to MME. In Audacity’s preferences, MME is the default option for the Audacity Device Toolbar. All audio devices are supported with Audacity MME, including microphones and headphones.
If this solution does not work for you, check the following troubleshooting guide:
Step 1: Exit audacity. Then restart your computer and launch Audacity once again.
Step 2: Via the system clock, right-click on the Speaker symbol to bring up the context menu. Later, choose Sounds, then Recording from the drop-down menu.
Step 3: Go to the Windows Settings menu. Select System from the drop-down menu. In the left-hand panel, choose Sound. Then choose the Sound control panel from the drop-down menu.
Step 4: Navigate to the Recording tab in the Sound popup window. Choose the device on which you want to record audio.
Step 5: Specify the advanced features that you want. To save your changes, click OK. Later, you care-record audio using Audacity, available for Windows.
Choose Hardware and Sound from the left Sound panel to resolve the issue of Audacity not recording on Windows 8, Windows 7, and prior versions of the operating system.
As we all know, Audacity is a free and open-source audio editor and recording software used for only recording sound or music. So, if you want to record screens, FocuSee serves as an excellent choice, specifically focusing on screen recording capabilities for both Mac and Windows users. This powerful software offers a range of features while maintaining a user-friendly interface.
One of the notable advantages of FocuSee is its versatility in capturing screen recordings. Whether you need to capture the entire screen, a specific window, or a custom region, FocuSee provides the flexibility to record exactly what you require, ensuring precision and efficiency in your recordings.
A standout feature of FocuSee is its ability to zoom in and out during screen recordings. This functionality enhances the viewing experience by allowing you to emphasize specific areas of your screen. By zooming in, you can draw attention to important details, making it easier for your audience to follow and comprehend the content you are presenting. This dynamic and engaging feature sets FocuSee apart as an exceptional tool for tutorials, demonstrations, and presentations.
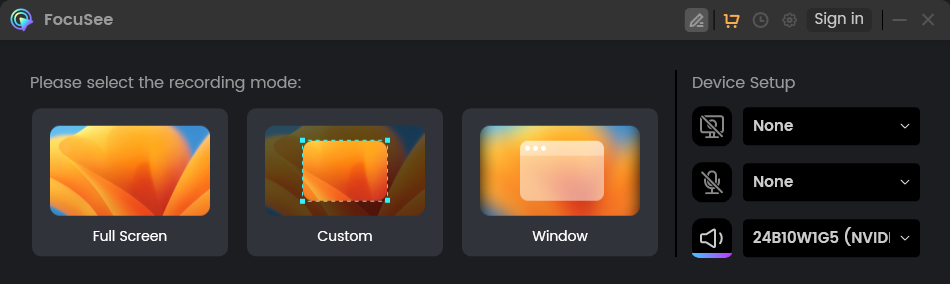
Three recording Modes of FocuSee
Key Features of FocuSee
Audacity is one of the most widely used audio recording and editing applications available. Even though it is free to use, most people find it to be a little tough to get around. If you are experiencing problems using Audacity, follow the instructions outlined above to make the best audio recorder work for you and your projects.
FocuSee
How to Use Audacity to Record?
How to Record Desktop Audio on Mac with Audacity
Record Computer Audio with Audacity Windows 10/11
How to Fix Audacity Won’t Record Internal Audio on Desktop?
Bonus Tip – Record Video with FocuSee
The Bottom Line
60 seconds, let's create a better FocuSee together ✨
Join 1K+ innovators shaping 30+features✨ & claim your Gift! 🎁

Share your thoughts & earn a coupon instantly!
Warm reminder: This survey does not involve any of your private data.
Page 1 of 10


Coupon Code:
FSUS10
Note: Copy and use the promo code FSUS10 at checkout(valid within 24 hours)