Easy Ways to Improve Sound Quality of Recorded Videos

In today’s modern world, recording videos has become an important tool for communication as a medium of expression and documenting life experiences. The Sound quality in recorded videos should be up to mark and fulfill the purpose of the recording. If the audio is muffled or unclear, it can distract listeners from the original context, reduce their viewing experience, and limit the effectiveness of the video as a communication tool.

Improve Sound Quality of Recorded Videos
However, there are different ways through which you can overcome this issue. Here, we will tell you about four different ways How to improve the sound quality of a recorded video. From choosing the right microphone and environment to setting up the position, you will learn about every tiny detail to bypass the poor sound quality issue. So, if you want your next recorded video to have crisp and clear audio quality, then stick with us!
Also read: How to Make Mic Sound Better? >
Table of Contents: hide
What Gives the Best Sound Quality of a Recorded Video?
How to Improve Sound Quality of Recording Video?
Way 1. Adjust the Position of Your Microphone
Way 2. Choose the Correct Microphone
Way 3. Ensure the Surroundings Quite
Way 4. Record Video with Professional Tool
Way 5. Use a Mixer to Split up Audio Channels
What Gives the Best Sound Quality of a Recorded Video?
Are you wondering what the tricks and tips are for recording the best sound quality? Then this is the right place! The quality of the sound in a recorded video is influenced by various factors, including the type of equipment used, the recording environment, and the software used for recording. These factors, if mishandled, can cause background noises, echoes, high-pitched sound waves, and many more. However, these factors are controllable.
Sound-absorbing materials help reduce unnecessary echoes from the recordings. Additionally, a high-quality microphone with built-in background noise cancellation enhances sound quality. If you are extra conscious about the sound quality, you can also set up a pop shield against the microphone which destabilizes sharp bursts of air released during speaking. Last but not least, you can process the recording using various audio processing tools.
How to Improve Sound Quality of Recording Video?
Looking for the ways you can follow to improve the quality of your sound in the recorded video? You have come to the right place! It is said that the more, the merrier, and the same is the case with the gear you use for your sound recording. The more acoustics features a microphone has, the better the output it will generate. Moving on, there are some other easy-to-follow ways that we will show you to help you overcome this hurdle:
Adjust the Position of Your Microphone
The first way is moving the microphone closer or further away from the source of the sound based on the results of different testing positions because it can greatly affect the level of the audio recorded. This phenomenon in acoustics is called the sweet spot. For several reasons, finding the sweet spot for recording a better sound quality is important as it can impact the volume and clarity of the sound captured.

Adjust the Position of Your Microphone
The hand rule in the microphone adjustment refers to the practice of using your hand as a guide when positioning the microphone. It involves holding your hand in front of the microphone and adjusting its position. This entire process of setting up a microphone may take some trials and be time-consuming in certain scenarios. Still, the effort will pay off with high-quality recording and minimal post-processing required.
Choose the Correct Microphone
Coming at number two, choosing the right microphone is greatly emphasized for benefiting better-recorded audio. It depends on the nature of the task that you are performing. Some microphones are made especially for vocalists, while others are better suited to recording instruments or capturing ambient sounds. When selecting a microphone, consider its frequency response, directionality, sensitivity, the type of recording, and the environment.
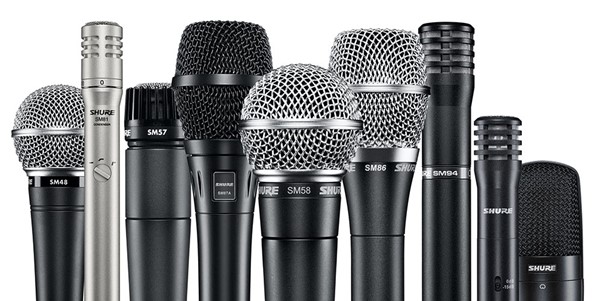
Choose the Correct Microphone
Microphones with a flat frequency response are preferred for accurate sound capture. At the same time, directionality impacts the sound captured and background noise, and sensitivity refers to the microphone’s ability to capture sound. A directional microphone with good noise rejection in noisy environments is ideal, while a microphone with good off-axis rejection can reduce echo in large rooms. Based on these conditions, you can choose your microphone.
Ensure the Surroundings Quite
At number three, we have emphasized the need for silent surroundings for a clear audio recording with lesser distractions. To minimize it, choose a recording location that is as quiet as possible. Close windows, turn off any unnecessary electronic appliances and avoid recording during busy times when there may be more noise in the surrounding area.
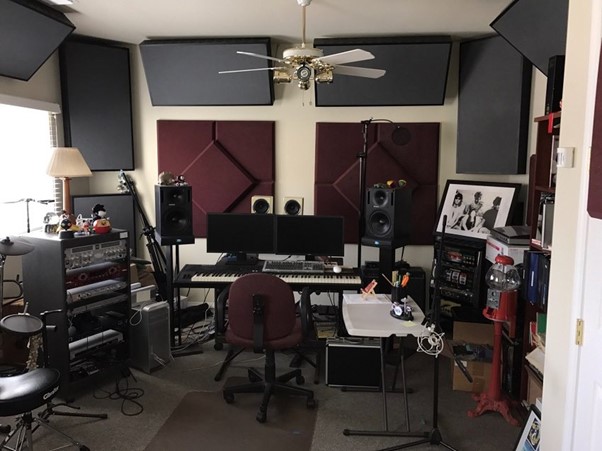
Ensure the Surroundings Quite
Additionally, consider using soundproofing materials on walls, such as acoustic foams or panels, to reduce background noise in the recording environment. They can help to absorb and reduce echo, background noises, and other unwanted sounds in the room. You can produce clean, high-quality audio recordings free from distracting background noise by ensuring that the surroundings are quiet and utilizing soundproofing materials.
Record Video with Professional Tool
Another way to have better sound quality is by using a professional screen recording tool. One easy-to-use tool is Gemoo Recorder. Gemoo Recorder allows recording video on your computer with many options, enabling users to set up the recording conditions according to their requirements. These options include the screen and camera recording, only screen, only camera, and only audio recording. Besides, you are allowed to add annotations to highlight your views during the recordings.
Furthermore, it also allows recording the video according to the user’s prescribed resolution, which is up to 1080p. The recording can either be saved on the cloud or in local storage. Therefore, without any further delay, let’s see the quick steps you need to perform in order to record video on your computer without muffled audio:
Step 1. Download and install the Gemoo Recorder on your desktop and Sign in using your credentials. Once you have logged in, click Screen Only.
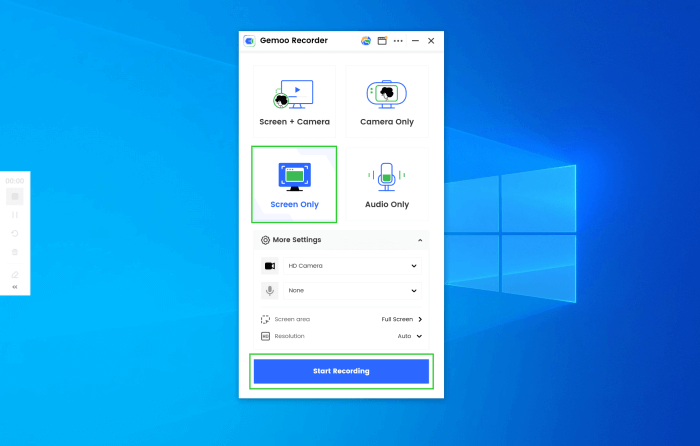
Launch Gemoo Recorder and Choose the Screen Only Mode
Step 2. Once you have decided, click Start Recording to start recording.
Start to Record the Screen
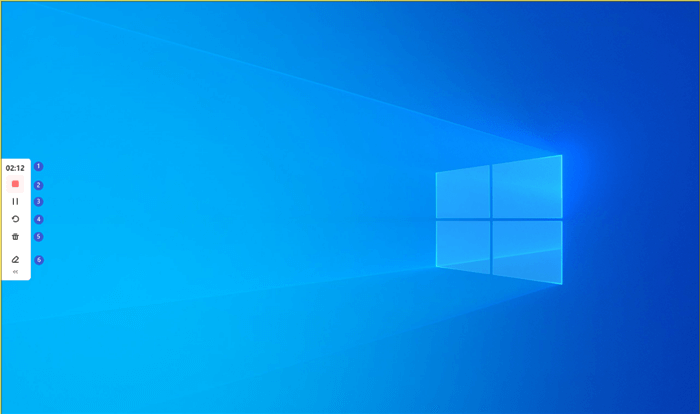
Step 3. Wait for a three-second countdown, and after that, your recording has started, and a pop-up menu appears on your screen’s left. You can check it out for various features while recording. In the end, you can tap on the Red Button to stop recording.
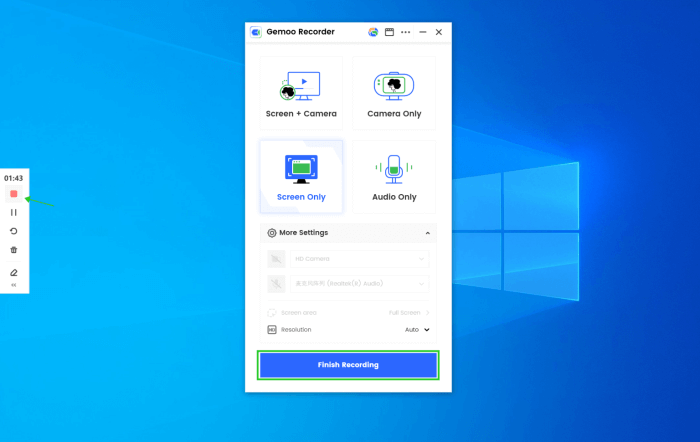
Finish Screen Recording
Use a Mixer to Split up Audio Channels
When using two or more XLR mics, a mixer is useful as it splits up the audio channels, giving you control to adjust the volume and add other audio effects to individual speakers. Without a mixer, every voice ends up on a single audio channel, limiting your control. To ensure that the mixer you choose is suitable, check that it has enough XLR inputs for the number of people you’ll have on the mic.
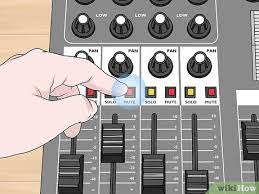
Use a Mixer to Split up Audio Channels
Make a Test Recording
It’s crucial to make a quick test recording before starting your actual recording to identify and address any audio issues beforehand. Some audio issues may not be audible to your ears, so listening to the test recording with headphones and making necessary adjustments to your setup can save you from encountering problems later in your recording session. Although it may add a few extra minutes to yourpreparation time, it’s worth it.
Edit Your Recording Video
It’s common to spend some time in post-production to improve the sound quality of your audio file. Even with proper preparation, unforeseen elements may negatively affect the sound quality. Fortunately, there are many user-friendly software options available to remove background noise, adjust levels, and fix other sound imperfections. Descript is a recommendedsoftware option for its easy-to-use features that can improve the quality of your recordings.
Frequently Asked Questions About Improving Audio Quality
After you have learned this new information, you might have certain questions pop up in your mind. In this part, we will try to answer some common queries. So, let’s jump into the details:
1. How do you clarify muffled audio?
You can clarify your muffled audio using two methods. The first option is applying equalization (EQ). This process is useful if you are not willing to re-record the audio, so it reduces the average and below-averaged frequencies based on a specified threshold. The second option is, recording the audio again in a more open environment with proper use of gears and soundproofing.
2. How to make your mix sound good on all speakers?
To make your mix sound good on all speakers, you must follow protocols such as equalization to avoid any frequency ranges that can cause issues on certain speakers and use reference tracks to compare your mix to professional mixes to ensure it sounds good on all speakers. Furthermore, it is important to have a balanced mix with good stereo imaging and a mastering limiter to add loudness to your mix without sacrificing quality on smaller speakers.
Final Thought
In conclusion, good-quality sound on recorded videos not only gathers the viewers’ attention but also portrays a fine class of professionalism depicted through your work. To benefit from this advantage, one must know How to improve the sound quality of a recorded video using the right apparatus, settings, and tools. Moreover, we hope this article was helpful and informative. If it was, please feel free to share it with your family and friends, and remember to leave a comment with your thoughts or feedback in the comment section.