How to Record Audio on Windows 10 in 2024

When you want to record an unmissable speech, a great interview, a guitar music, or an important meeting, etc., you may need to record audio of them. Then, how can I record sound on my pc? You only need to prepare audio recording software and the audio you want to record. And in order to ensure sound quality and effect, an easy-to-use audio recording tool for computers is essential.
Considering the needs of people to record sound on the computer, there are already many audio recorders for people to choose. And many of them are compatible with Windows 10, one of the most widely used computer systems. To save you precious time, in this article, we have tested and summarized several pretty good audio recording tools and will show you how to record audio on pc, including Windows 10.

Record Audio on PC
Also read: Extract Audio From MKV >
Table of Contents: hide
How to Record Audio on PC with Gemoo Recorder?
How to Record Audio on PC with Voice Recorder?
How to Record Audio on PC with Stereo Mix?
How to Record Audio on PC with Audacity?
| Methods | Best For | OS | Webcam recording |
| Gemoo Recorder | 🚀Recording high-quality audio from PC, video calls, and gameplay | Mac & Windows | ✔️ |
| Voice Recorder | 🚢RecordING audio for interviews, meetings, lectures, podcasts, and voice memos. | Windows, Mac, iOS, and Android | ❌ |
| Stereo Mix | 🚁Recording games or online chats | Windows 7 and above | ❌ |
| Audacity | 🚎Recording sound from PC |
Mac & Windows | ❌ |
| Audio Cable | 🛴Recording music and podcasts | Windows, macOS, and Linux | ✔️ |
Record Audio on PC with Gemoo Recorder
It works well on both Windows and macOS. Gemoo Recorder is the best Loom alternative. It enables you to capture various elements such as camera, sound, and screen. You can effortlessly combine these elements to create a customized recording. Additionally, the software offers a plethora of editing tools and features to help you express yourself creatively. You won’t have to worry about any unwanted advertisements or watermarks in your recordings. Moreover, you can add notes while recording to personalize your content.
Gemoo Recorder Pros
- Offers extensive features and an easy-to-use interface.
- Allows unlimited recording time and watermark-free videos.
- Automatically uploads captured videos to the cloud to prevent loss.
- Provides options to record the entire screen or a specific window.
- Offers real-time annotation features and GIF addition to make recordings more engaging.
Gemoo Recorder Cons
- Some users may find the two sharing options that require permissions uncomfortable in certain situations.
- The software is not compatible with mobile devices.
Please refer to the detailed instructions to begin recording your audio.
Step 1. Free download Gemoo Recorder and install it on your computer. Create a new account if you are a new user, or you can log into it with your Google account.
Step 2. Then, you can see there are 4 recording modes, select “Audio Only” recording mode.
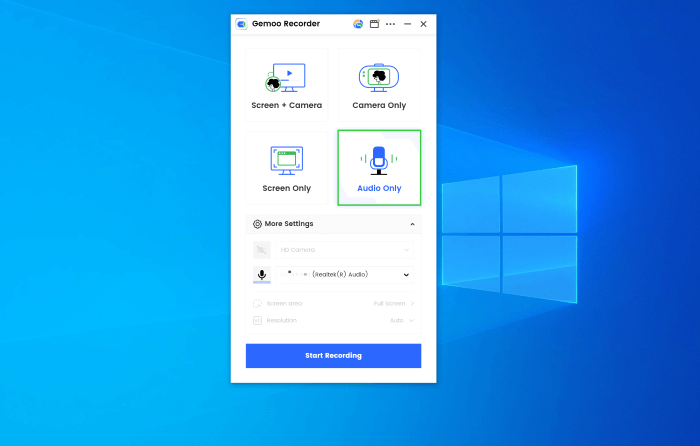
Select Audio Only Recording Mode
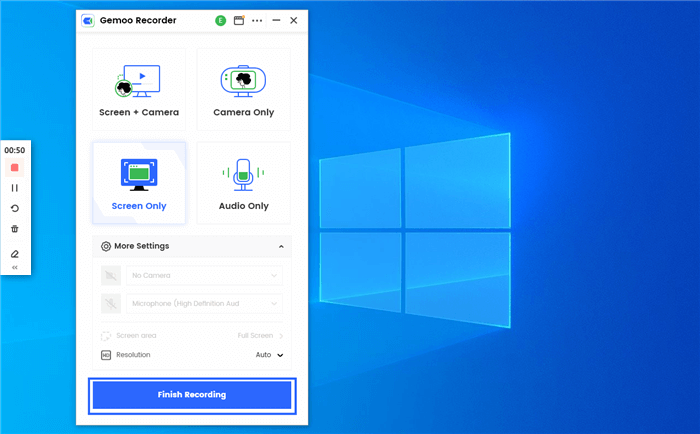
Step 3. Click on the Start Recording button to initiate recording.
Start to Record the Screen
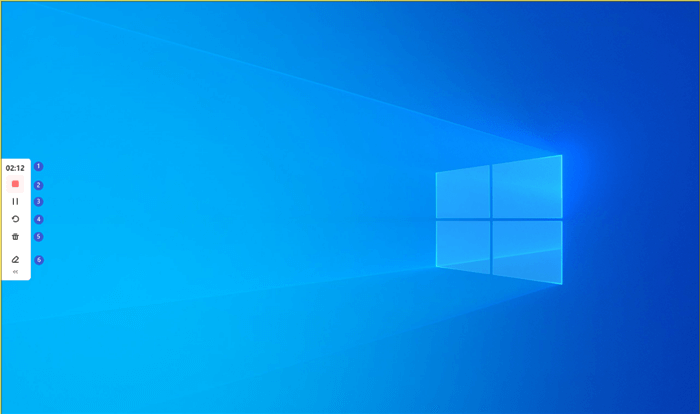
Step 4. You can choose the audio you want to record, like video sound, music, your voice, etc. You can control your recording process by tapping on the control panel in the left sidebar: View recording consuming time, stop/pause/resume recording, restart recording, and delete the recording.
Finish Recording
Record Audio on PC with Voice Recorder
As we all know, many people may prefer the free software that comes with their computer over third-party software. So, does Windows 10 have an audio recorder? Yes, of course! Windows has already launched Voice Recorder to meet people’s audio recording needs.
Voice Recorder Pros
- Voice Recorder software is easy to use and requires no technical knowledge to operate.
- The software records high-quality audio, making it ideal for professional use.
- Voice Recorder software is convenient as it allows you to record audio on the go, without the need for additional equipment.
- The software saves time as it eliminates the need for manual note-taking during meetings or lectures.
Voice Recorder Cons
- The software may have limited storage capacity, which can limit the amount of audio that can be recorded.
- Some Voice Recorder software may not be compatible with all devices, limiting its use
- There may be security concerns with Voice Recorder software, as it can be used to record private conversations without consent.
So let’s see how to record audio on Windows 10 now!
Step 1. Open the Start menu of your Windows computer and type Voice Recorder directly into the search box. When the search result is displayed, just click to launch this software.
Step 2. There is a microphone icon at the bottom of the left panel. Click this icon and you can start recording audio. Besides, pressing the Control and R keys at the same time can also start audio recording.
Record Audio with Voice Recorder
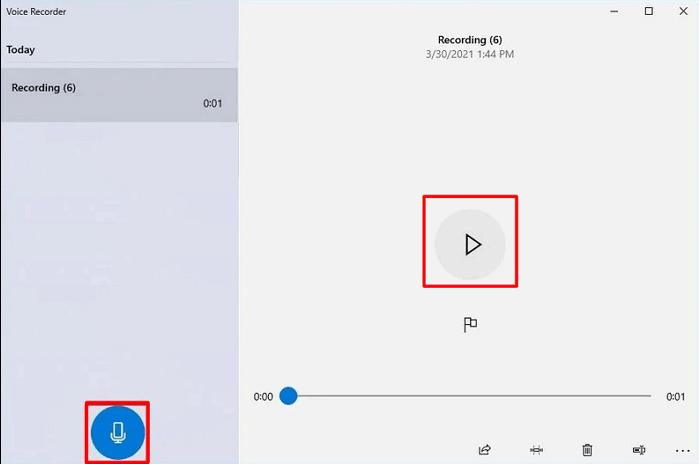
Step 3. Now you can start speaking or playing any audio content you want to record. If you need to end the recording, just click the white square button on the right panel.
Step 4. Once the recording is over, your recorded audio will be automatically saved on your computer. Click the triangle button on the right to listen to the recorded audio.
If you can’t search for Voice Recorder on your Windows 10, you need to go to the Microsoft Store to download and install this software for free.
Also Read: How to Record Audio on Chromebook >
Record Audio on PC with Stereo Mix
In addition to Voice Recorder, Windows computers also come with a special audio recording option called Stereo Mix. And it is also a pretty good solution to how to record voice on Windows 10. However, in the latest Windows version, this feature is generally disabled, so to use Stereo Mix, you must first enable this feature on your computer. Here are the specific steps on internal audio on windows 10 with Stereo Mix.
Stereo Mix Pros
- Allows users to record audio from their computer’s sound card, including streaming audio and system sounds.
- Can be used to create podcasts, music mixes, and other audio projects.
- Can be used to capture audio from video games and other applications.
- Can be a useful tool for troubleshooting audio issues.
Stereo Mix Cons
- Some operating systems do not come with Stereo Mix pre-installed, and it may need to be downloaded separately.
- Users may experience latency or other issues when using Stereo Mix.
- Audio quality is lower than other recording methods.
Check Stereo Mix steps here.
Step 1. Open a recording software and select Stereo Mix in the audio input position.
Step 2. Click Record to start audio recording. Then click the Record button again to end the recording.
Step 3. You can tap on the Play button to listen to your recorded audio.
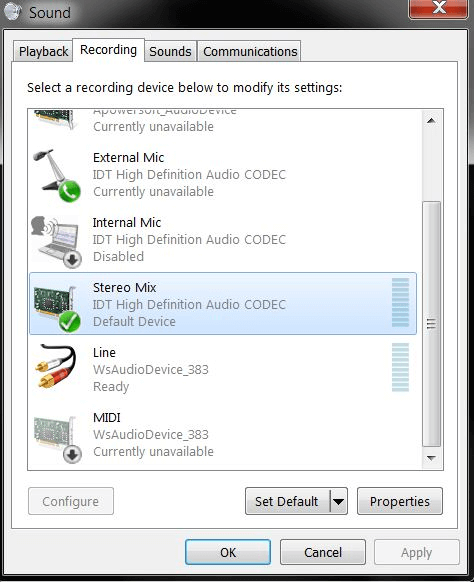
Check Stereo Mix Status
Note: When using Stereo Mix, make sure other recording software is muted or disabled.
Record Audio on PC with Audacity
While the Stereo Mix is very handy for recording the internal sound of a computer, not all computers support this feature. Then you need third-party software to help you complete the audio recording. Audacity is a recommended audio recorder. Compared with the recorders that come with Windows, Audacity’s functions are more comprehensive and detailed. What’s more, it is also a free tool.
Audacity Pros
- Free and open-source software
- Supports multiple audio formats
- Offers a wide range of audio editing tools
- Allows for multi-track recording and editing
- Supports plugins for added functionality
- Available for Windows, Mac, and Linux operating systems
Audacity Cons
- Limited support for MIDI and virtual instruments
- No built-in noise reduction tool
- Can be slow and buggy on older computers
- Lacks advanced audio processing features found in professional software
- Limited video editing capabilities.
Here is how to record audio on Windows 10 with Audacity.

Record Audio on Windows 10 with Audacity
Step 1. Launch Audacity, click Audio Host at the top and select Windows WASAPI inside.
Step 2. Then in the Sound menu on the right side of Audio Host, select Microphone.
Step 3. When everything is ready, click the red round button at the top to start recording audio.
Step 4. When done, click the black square button to end the audio recording.
Step 5. Then find the File option in the upper left corner of the screen and click it. Select Export to export audio as the format you need.
Want to how to record audio with Audacity on Win&Mac in detail, Let’s see it.
Record Audio on PC with Audio Cable
If all the above methods fail, you can also try connecting your headphones to your computer with an audio cable to record the internal sound of Windows 10. All you need is a cable with 3.5mm audio connectors on both ends.

Record Audio with Audio Cable
Audio Cable Pros
- Help improve the sound quality of your audio recordings by reducing noise and interference.
- Used with a variety of audio devices, including microphones, speakers, and headphones.
- Less expensive than physical audio cables, making it a more cost-effective solution for those on a budget.
- Generally easy to install and use, even for those with limited technical knowledge.
Audio Cable Cons
- Sometimes introduce latency or delay in the audio signal, which can be problematic for live performances or recording sessions.
- May not be compatible with all audio devices or software programs, which can limit its usefulness.
- Some users have reported issues with the sound quality of the audio cable, including distortion and loss of signal strength.
Follow the steps below to record audio on Windows 10!
Step 1. Connect one end of the audio cable to the computer and the other end to your headphone.
Step 2. Still, open the Sound Control Panel. You can open this window by referring to Step 1 in Part 2.
Step 3. Select Playback at the top of this panel. If your headphone is successfully connected to the computer, there will be a Speakers option. Right-click on Speakers and select Set as Default Device.
Step 4. Then select Recording at the top. Also, right-click on Microphone and choose Set as Default Communication Device.
Step 5. Right-click Microphone again and select Properties. After the new window pops up, check Listen to this device. Finally, click Apply.
Step 6. Now you can use any audio recorder you have to create the internal sound on Windows.
Frequently Asked Questions
You may also encounter other problems while recording audio on your computer. Below we have listed the most frequently encountered problems and their corresponding solutions.
How to record audio on Windows 10 without a microphone?
If you don’t have a microphone, you can use the Stereo Mix to record sound on Windows 10. For detailed steps, you can go to Part 2 of this article.
How to record audio on Windows 11?
Like Windows 10, Windows 11 also has a built-in audio recorder-Voice Recorder. You can search for this software directly in the Windows search bar. Then launch the software and follow the steps in Part 1.
The Bottom Line
The above are several commonly used and efficient methods to record audio on pc. There is always a method that suits you. We hope that with this article, you will no longer have to worry about how to record audio in Windows 10.