Mac is a popular brand of computers developed by Apple and is widely known for its sleek design and user-friendly interface. One of the many useful features of a Mac is the ability to take screenshots, as it can be useful for various purposes in both personal and professional contexts, such as a student capturing an online lecture for future reference or a designer capturing an image of a website or software interface for inspiration. And it’s not difficult to remove screenshots on a Mac desktop to free up storage space and maintain desktop organization.
Screenshot Not Working on Mac
However, sometimes users may encounter a frustrating situation where the screenshot on mac is not working properly. This can happen for various reasons, such as software glitches, hardware malfunctions, or malware infections. This article will explain multiple fixes to eradicate the issue, from simple solutions like restarting your Mac to more advanced options like checking for malware. So, stick with us to learn how to resolve this issue and get back to taking screenshots with ease.
Table of Contents: hide
Why Screenshot Not Working on Mac?
How to Enable Screenshots on My Mac?
Why Screenshot Not Working on Mac?
Are you baffled due to the screenshot not working on Mac? Do not worry! There are several reasons behind it; the most common is incorrect keyboard shortcuts or incorrect use. Another reason is that you may miss screen capture permission Mac anydesk. And then the incorrect system settings, which can prevent you from taking screenshots. These settings may have been altered accidentally or by an application. In such cases, adjusting the system settings can usually resolve the issue.
However, if the issue persists, it may be necessary to delve deeper and explore other possible causes, such as malware infections, which can also interfere with the screenshot feature on a Mac and causes various issues, including disabling or preventing certain features. Additionally, third-party applications can also cause conflicts with Mac’s built-in screenshot tool, preventing it from functioning correctly.
How to Enable Screenshots on My Mac?
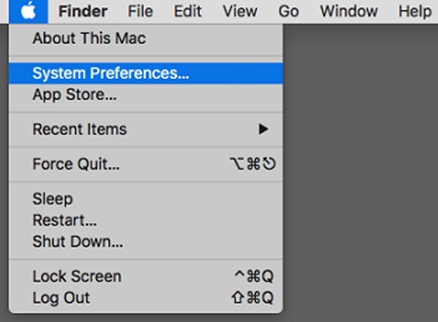
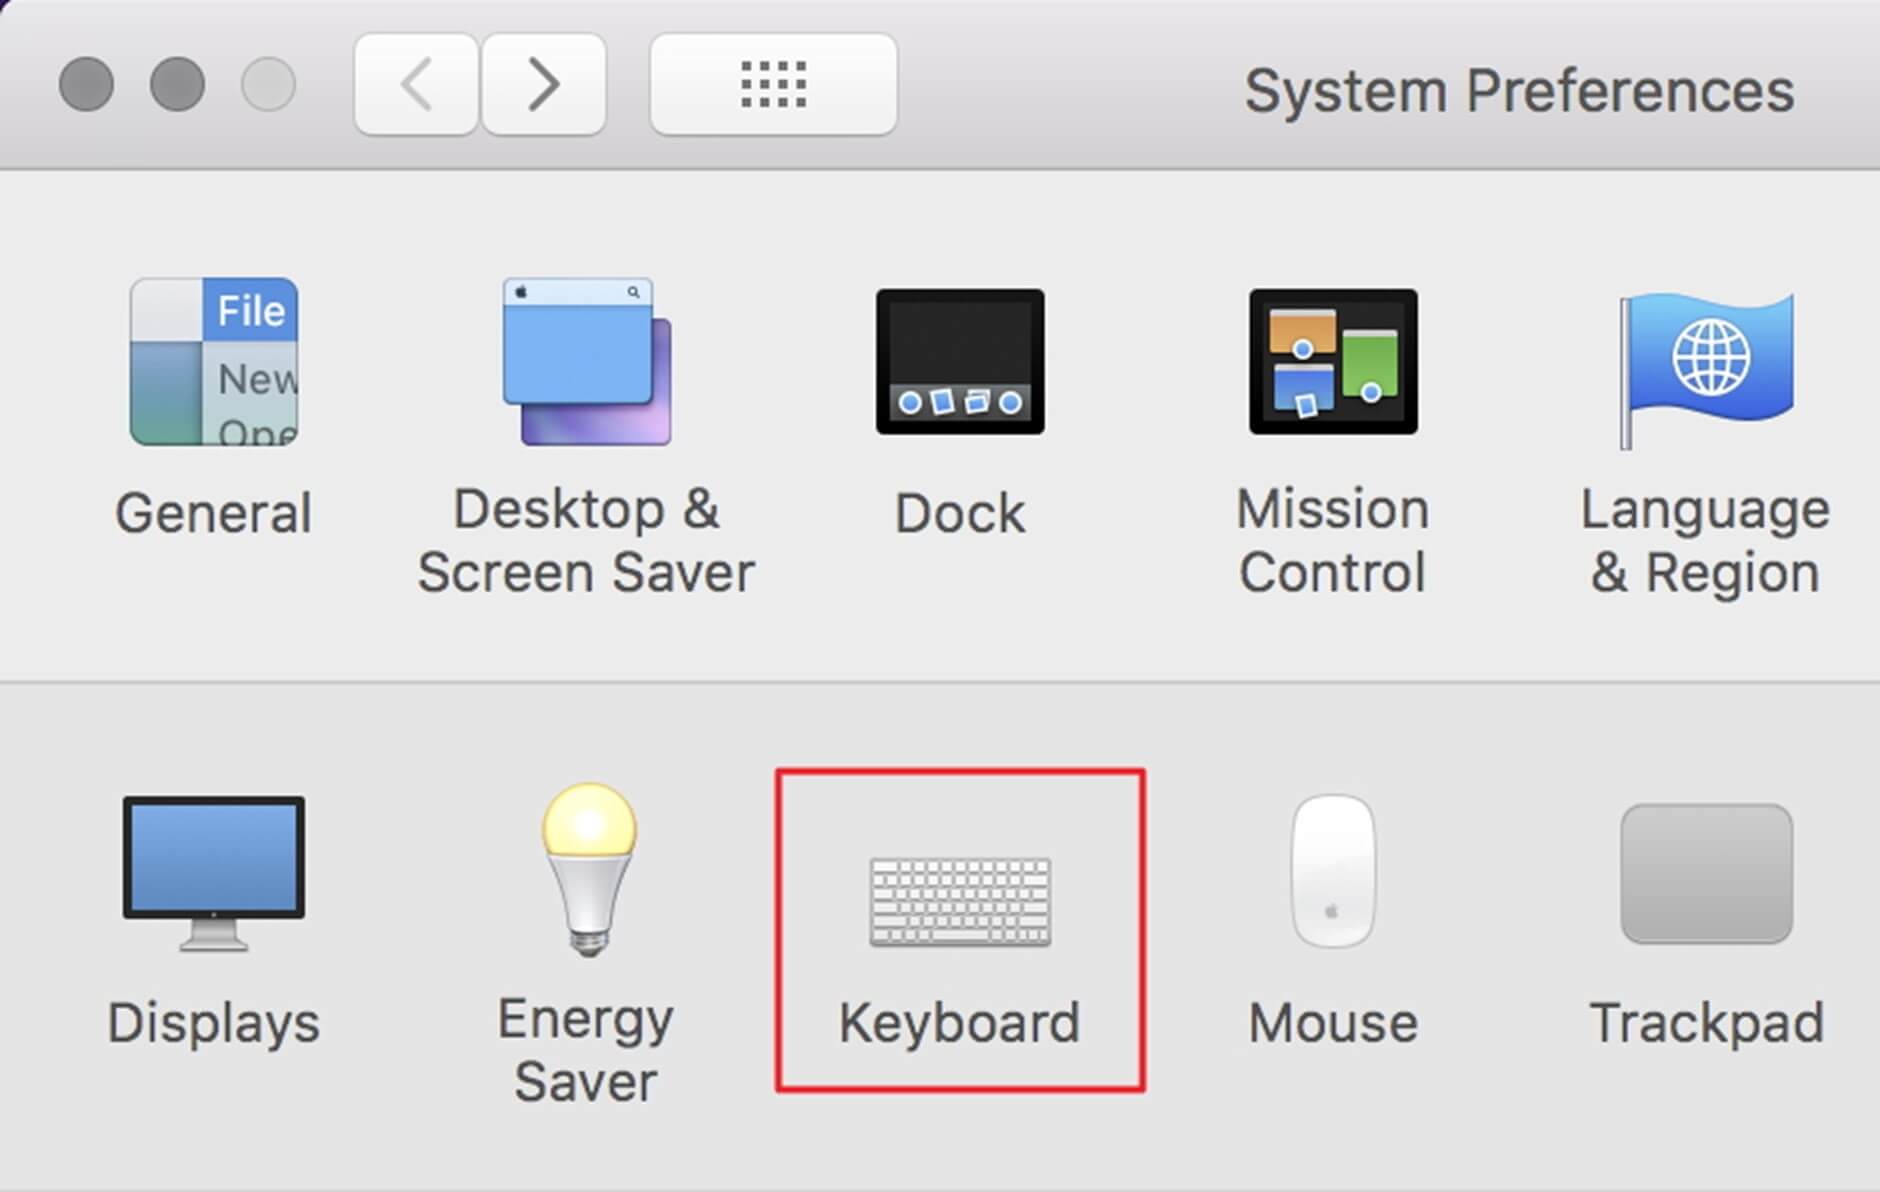
Are you unable to take screenshots on your Mac? Do not panic! Enabling screenshots on your Mac is a simple process that can be accomplished in a few steps. Firstly, click on the Apple menu at the screen’s top left corner, and select System Preferences. Next, click on the Keyboard option in the System Preferences window. If the list looks different, type ‘Keyboard’ in the search pane at the top right of the System Preferences window.
Enable Screenshots on My Mac
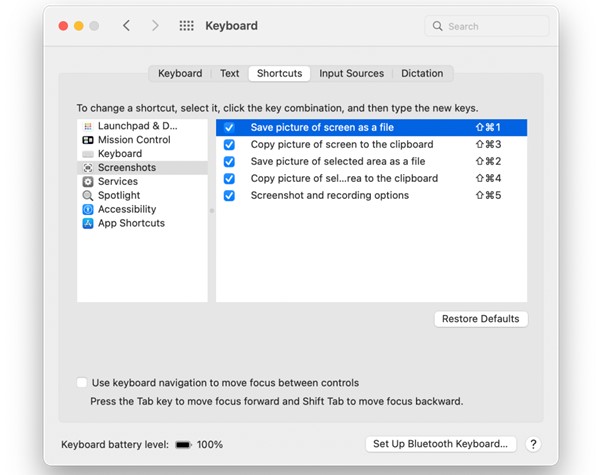
Once in the Keyboard window, click on the Shortcuts tab. Then, click on Screen Shots from the list on the left of the Shortcuts tab. Here, you will find all the available screenshot shortcuts you can enable. Check the boxes next to all the shortcuts you wish to enable. After selecting the desired shortcuts, close the window. Once you have done this, you should be able to take screenshots using the relevant keyboard shortcuts without any issues.
Also Read:
How to Fix Zoom Not Working on Mac >
How to Fix Mac Microphone Not Working >
How to Fix Screenshot on Mac Not Working?
If you encounter issues with your screenshot function not working correctly, it can be frustrating and hinder your workflow. Thankfully, several fixes can help resolve the issue and allow you to take screenshots, and this section will explore the 6 best fixes to help you take screenshots on your Mac. So, let us look into that and get your screenshot function working correctly again. Except for trying these solutions, you can also try other snipping tools for Mac.
Restart Mac Computer
The first fix is restarting your Mac Computer. It is an essential process that helps clear out any temporary data or software glitches that may be causing issues on your Mac, including the problems with taking screenshots, so let us look into the steps given below:
Restart Mac Computer
Step 1: Click the “Apple” menu in your screen’s top left corner. From the drop-down menu, select the “Restart” option.
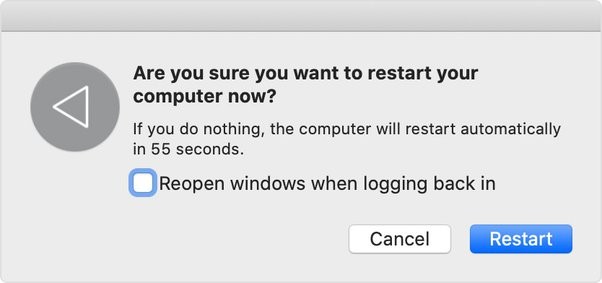
Step 2: Click on the “Restart” button to confirm when a pop-up window appears asking you to confirm your decision
Step 3: Wait for your Mac to shut down and restart, and once it has restarted, try taking a screenshot to see if the issue has been resolved.
Check the Keyboard Shortcut
A keyboard shortcut on a Mac combines keys that perform a specific function or command, such as taking a screenshot. Using a keyboard shortcut to take a screenshot on your Mac can help capture your screen quickly and efficiently, especially if you need multiple screenshots. So without any delay, let us look into the quick and easy steps to perform it:
Step 1: Press the “Apple” icon on the menu on top. And then click on “System Preferences”.
Press The Apple Icon
Step 2: Click “Keyboard” and select the “Shortcuts” tab.
Step 3: Click on Screenshots in the list of options on the left and make sure the checkbox for the type of screenshot you want to take is selected.
Check the Keyboard Shortcut
Check the Keyboard Settings
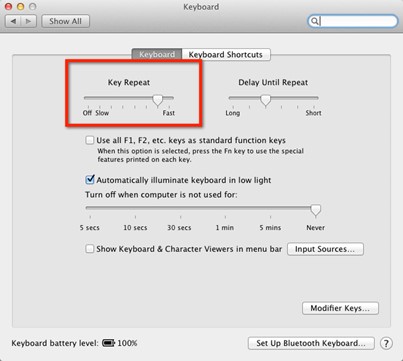
Keyboard settings on a Mac are the options you can adjust to customize the behavior of your keyboard, such as the key repeat rate, the delay before a character repeats when a key is held down, and other settings that affect the keyboard’s performance. This can be especially helpful if you are experiencing problems with the keyboard not registering certain keys when you try to take a screenshot. Let us look into the steps on how to adjust it:
Step 1: To begin, click the “Apple” symbol in your screen’s upper-left corner.
Step 2: Select “System Preferences” from the drop-down options after clicking on the menu.
Step 3: Click on the “Keyboard” option and select the “Keyboard” tab.
Click on Keyboard
Step 4: Adjust the Key Repeat and Delay Until Repeat settings to optimize your keyboard’s performance.
Check the Keyboard Settings
Check for Malware
Malware is malicious software designed to harm or compromise a computer system, network, or device. There are various types of malware, such as viruses, trojans, spyware, adware, and ransomware. It can cause various issues on a Mac, including interfering with the ability to take screenshots. Therefore, it is important to check for and remove any malware on your Mac regularly, and below mentioned are the steps to perform this task:
Check for Malware
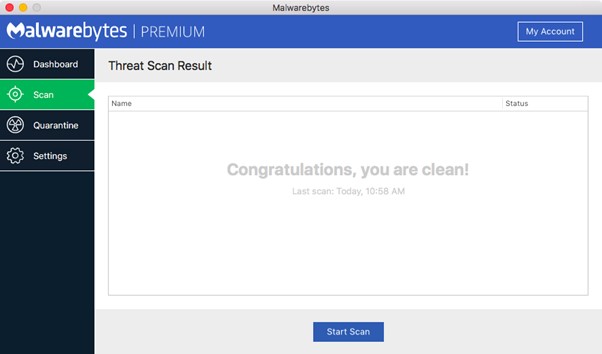
Step 1: Install and run trusted anti-malware software on your Mac, such as Malwarebytes or Norton.
Step 2: Run a full system by clicking “Start Scan” to identify malicious software on your Mac.
Step 3: Follow the prompts to quarantine and remove any detected malware. And then restart your Mac and try taking a screenshot again to see if the issue has been resolved.
Use Preview to Screenshot
Preview is a built-in application on Mac that allows you to view and edit images and PDFs, and it supports various image formats, such as JPEG, PNG, TIFF, and more, and provides basic editing features, such as cropping, resizing, rotating, and annotating. It also includes advanced features, such as scanning documents and digital signatures. Additionally, Preview can be used to take screenshots on Mac, as mentioned below:
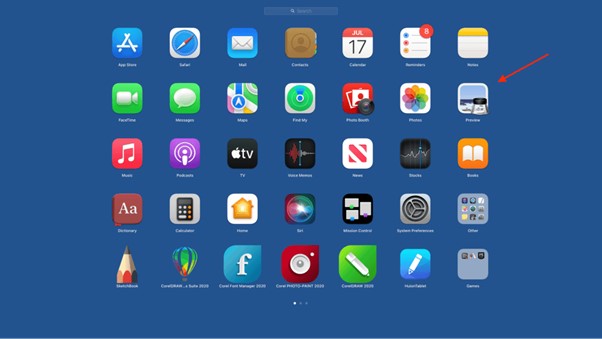
Step 1: Open Preview from the “Applications” folder or the “Dock.”
Open The Preview Application
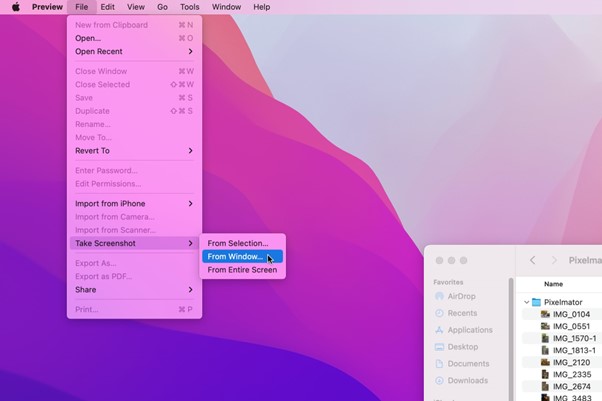
Step 2: From the top menu, click “File” and select “Take Screenshot.”
Step 3: Choose the type of screenshot you want to take: “From Selection,” “From Window,”or “From Entire Screen.”
Use Preview to Screenshot on Mac
Step 4: Make your selection and save the screenshot as a new image file in the Preview application or export it to your computer.
Further Reading: How to Fix Mac Preview Not Working >
Restart Mac in Safe Boot
Safe Boot is a feature of macOS that loads the operating system with only basic components, bypassing some unnecessary drivers and login items. It is useful for troubleshooting various issues, including problems with screenshots on Mac. Restarting your Mac in Safe Boot runs a disk check and disables all startup and login items, which can help resolve issues related to system resources and conflicting software.
Step 1: Shut down your Mac completely by clicking on the Apple menu and selecting “Shut Down.”
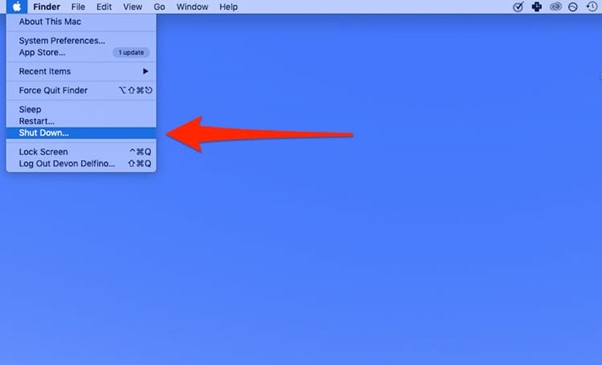
Click on Shut Down
Step 2: Hold the “Power” key from your keyboard and wait until it shuts down. Press and hold the “Shift” key immediately after you hear the startup sound.
Step 3: Release the Shift key when you see the login window, and you should see “Safe Boot” in red letters in the upper screen’s upper-right corner
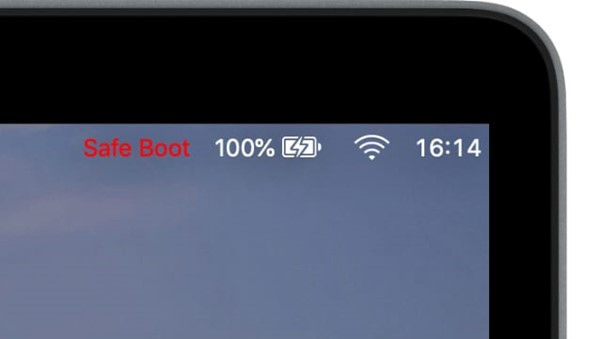
Restart Mac in Safe Boot
An Alternative Way to Screenshot on Mac
As a Mac user, taking screenshots is an essential part of our daily routine. Whether it’s for work, school, or personal use, we often need to capture what’s on our screen. While the built-in screenshot tool on Mac is convenient, it may encounter issues sometimes. If the mentioned methods fail to resolve the screenshot issue on Mac, you should better try an alternative way to take a screenshot on Mac.
Among many choices for 2023, you should give Gemoo Snap a try as it offers a wide range of screenshot features. With Gemoo Snap, you can capture full-screen shots, specific windows, selected areas, or even a scrolling web page. You can also add annotations, arrows, and text to your screenshots.
Step 1. Free install Gemoo Snap and log in to it following the on-screen instructions. On the welcome interface, tap on Quick Screenshot option.
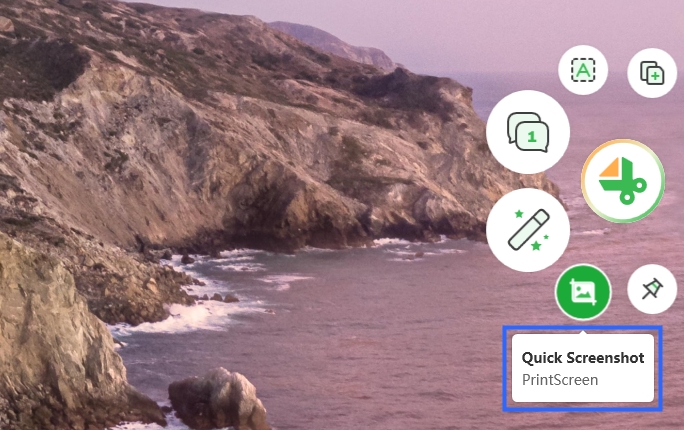
Quick Screenshot on Your Computer
Step 2. Choose a specific area to take a screenshot on your Mac.
Frame the Screen
Step 3. When the screenshot is uploaded successfully, you can click on the View image link to preview your works and share it with others.

Upload Successfully
Final Thought
In conclusion, taking screenshots on Mac is a straightforward process, but it can be frustrating when it needs to be fixed. We have discussed some common reasons for screenshots not working on mac and provided six solutions to help you get back on track.
Whether it is adjusting keyboard settings or checking for malware, there is a solution that should work for you. If you found this guide helpful, please share it with others experiencing similar issues. We also welcome any feedback or comments you may have and do let us know if there are any other topics you would like us to cover in the future. Thanks for reading!
