The print screen button (also known as the “PrtScn” button) is a key on your keyboard that allows you to take screenshots of your screen. When you press the print screen button, the image of your screen is saved to your clipboard, which you can then paste into a screen capture editing program or document to save the screenshot.

Print Screen Button Not Working
If the print screen button is not working on your Windows computer, it can be frustrating as you cannot capture screenshots according to your needs. There are several reasons why the print screen button can not work, including issues with the keyboard settings, keyboard hardware errors, or even a problem with the operating system. To troubleshoot and fix the issue with the print screen button not working on your Windows device, you can go through this guide in detail to solve the problem.
Also read: How to Fix Screen Recording Not Working Windows 10?>
Table of Contents: hide
What Is Print Screen Button Used For?
Why is the Print Screen Button Not Working on Windows
What Is Print Screen Button Used For?
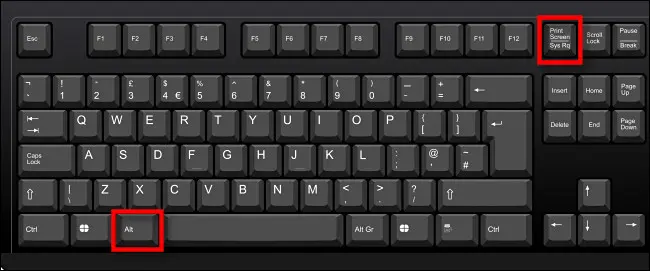
Take Screenshots via Alt Key and Print Screen Buttons
The print screen button is commonly used to quickly capture a screenshot of the current screen, which can be useful for sharing images or information with others. If you encounter an error message or other problem on your computer, you can use the print screen button to capture a screenshot of the error and send it to technical support for assistance. The print screen button can be useful for creating tutorials or instructions by capturing screenshots of different steps or processes. You can use the print screen button to capture a screenshot of an image or information that you want to share with others, such as a social media post or an online article.
Why is the Print Screen Button Not Working on Windows
Sometime, you may face the problem that your snipping tool not working on your computer. And there are several reasons why the print screen button (also known as the “PrtScn” button) can not work on your Windows device. Here’s why this happens!
Issues with the specific application – If the print screen button is not working in a specific application, the issue can be with that application.
Hardware issues – If the print screen button is not working even after checking the keyboard settings, there can be a hardware issue with your keyboard.
Keyboard settings – The print screen button can not work if your device’s keyboard settings are not configured correctly.
Operating system issues – The print screen button can not work if there are issues with your operating system.
How to Fix Print Screen Not Working on Windows 11/10/8/7?
On Windows 10 or 11, the problem of the Print Screen button not working might affect many users. You can fix the problem by following the remedies listed when the Print Screen option isn’t functioning properly.
Check If Your Keyboard Is Well Connected
Why is your print screen button not working, and your keyboard might not connect well to the system? Now there are two ways to check and fix this issue. You can use the following procedures to verify whether your keyboard is properly connected to a device running Windows
Method 1. Inspect the physical condition of the keyboard
Check to verify that the keyboard is connected to the correct port on your computer and that it is plugged in correctly. Make sure that the wireless keyboard is switched on and within range of the receiver if you use it.
Method 2. Check the device status
Follow these instructions to determine the current state of your keyboard.
Step 1: To access the power user menu on your computer, simultaneously press the “Windows” key and the “X” key on your keyboard.
Step 2: Choose “Device Manager” from the list of options on the menu.

Check the Device Status via Device Manager
Step 3: To access the “Keyboards” area of the Device Manager, click here.
Note: This section should provide a listing for your keyboard if the operating system can identify and use it. If it is not mentioned, there can be an issue with the connection.
Close All Running Programs
The Print Screen key on your keyboard may be occupied by one of the numerous secondary apps on your laptop, such as OneDrive, Notepad program, or Soundcloud. This will prohibit you from capturing pictures. For instance, snapshots you take using OneDrive could be automatically saved on the service’s server.
The problem of the Print Screen option not functioning properly can be remedied by modifying the configuration of these applications. On the other hand, for the sake of convenience, we strongly suggest that you exit each of these applications in the following order:
Step 1: To activate the Task Manager on your computer, simultaneously press the “Ctrl,” “Alt,” and “Delete” keys on your keyboard.
Step 2: Choose the “Processes” tab in the Task Manager to see your processes.
Step 3: Find the application running in the background that you wish to close, then select it.
Step 4: Use the “End task” button to finish the assignment.
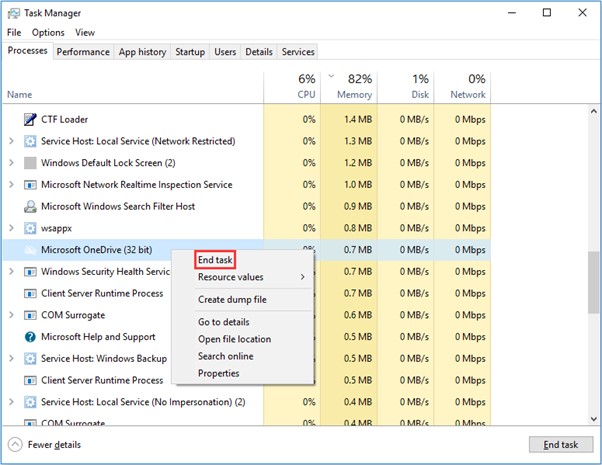
Close All Running Programs via Ending Task Running
Update Driver for Keyboard
Updating the driver for your keyboard can help resolve issues and improve the device’s performance. Here are the steps you can follow to update the driver for your keyboard on a Windows device:
Step 1: To access the Device Manager, click the “Windows + X” buttons on your keyboard and select it from the menu bar.
Step 2: After expanding the Keyboard layouts folder, right-click on the Standard PS/2 Keypad to choose it.

Update Driver for Keyboard
Step 3: Check the box labeled Always look for the most recent driver software and then stand in line for Windows to download the most recent driver for you instantly.
Step 4: The next step is to restart your computer and check to see if it resolves the problem. If this is not the case, you will need to repeat the procedures below to install the keyboard driver:
Tip: You can get the necessary drivers for your device by going to your manufacturer’s website and downloading them.
Step 5: The next step is to decompress the driver file if it has been compressed. Similarly, launch Device Manager, open Keyboards, hit on the Standard PS/2 Keyboard, and select Update driver from the context menu that appears.
Step 6: Select the option to look for driver software on my machine. After that, please choose the option that says Allow me to choose from a selection of components already installed on your computer. In the end, choose the updated driver from the menu, and press the Next button.
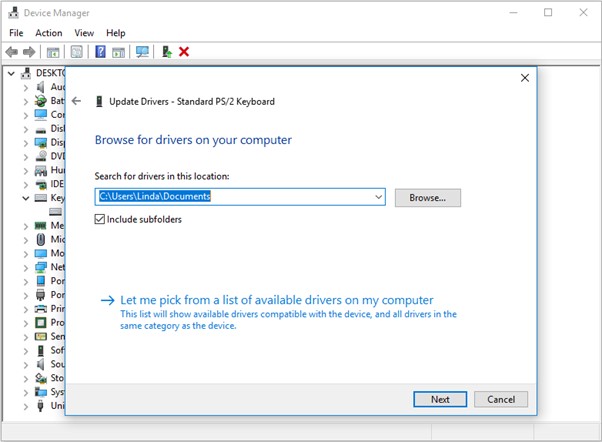
Click The Next Button
Step 7: After that, restart your computer to save your modifications and check whether the problem with Print Screen not functioning in Windows 10/11 has been resolved.
Repair by Hardware Troubleshooter
If the print screen button is not working on your Windows device and you suspect that there can be a hardware issue, you can try using the Hardware and Devices troubleshooter to fix the issue. This troubleshooter can be found in the Control Panel under the Hardware and Devices heading. This is the method:
Step 1: To launch the Settings app, simultaneously press the “Windows” and “I” keys on your keyboard.
Step 2: Navigate to the “Update & Security” section of the Settings app on your device, and then pick “Troubleshoot” from the left-hand menu.
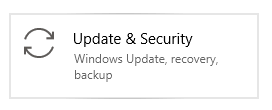
Update and Security
Step 3: To launch the troubleshooter, go to the Hardware & Devices menu.
Step 4: To finish the troubleshooting process, follow the on-screen directions. The troubleshooter will examine your gear in search of faults, and if it discovers any, it will attempt to rectify the situation.
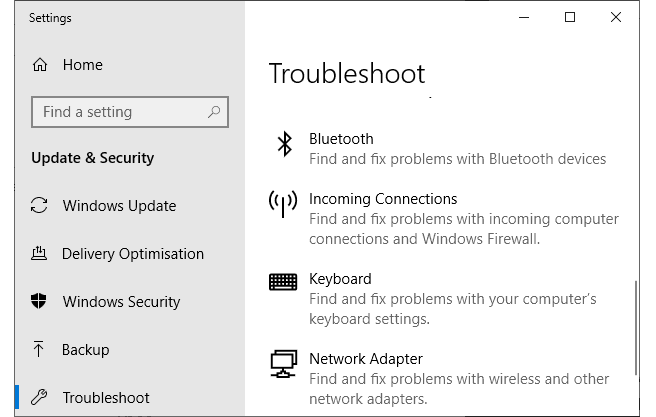
Repair by Hardware Troubleshooter
Note: To make the modifications take effect on your computer, restart it.
Update Computer System
By keeping the Windows operating system up to date, you can enhance the device’s performance and its level of safety. The following is a list of the actions that you can take to upgrade the operating system on your Windows computer:

Update Computer System
Step 1: Choose the appropriate option from the Start menu to access Settings. You can also access it more quickly by using the Windows key plus the I key on your keyboard.
Step 2: Select the tile labeled “Update & Security” with your mouse. Ensure you keep the Windows Update tab selected as the default.
Step 3: To search for available updates, select the icon.
Step 4: If an available update is available, you can install it by selecting the Install option and then waiting for Windows 10 to complete the installation and download the upgrade.
Step 5: Verify that the Print Screen key on your keyboard is functioning properly. Check to see whether a new image has been saved in the “C: UsersuserPicturesScreenshots” directory is a quick and easy way to determine whether or not the approach was successful.
Alternative Ways to Capture Your Screen
If the mentioned solutions fail to resolve the ‘print screen button not working’ issue, you can take alternative ways to capture your screen.
Capture Your Screen via Gemoo Snap
Among the most popular screen-capturing tool tools in 2023, Gemoo Snap offers a wide range of features to help you create high-quality screenshots. It allows you to capture the full or part of your screen, and add annotations and feedback to your content. Besides, you can also use Gemoo Snap to capture full or scrolling web pages and share your works with others via a simple link.
Like Window’s built-in screenshot tool, you can also customize your screenshot shortcuts according to different functions on Gemoo Snap. This can definitely increase your productivity when you take a large number of screenshots.
Install Gemoo Snap now and capture your screen via the following steps.
Step 1. Open Gemoo Snap and sign in to the welcome page. Click on the Quick Screenshot button to get started.

Quick Screenshot on Your Computer
Step 2. Capture part of your screen and take a quick screenshot.

Capture Part of Your Screen
Step 3. When the screenshot is uploaded successfully, you can tap on the View image link to preview and edit your screenshot.

Upload Successfully
Capture Your Screen via Windows Snipping Tool
Another alternative ways to capture your screen on windows is to use the windows snipping tool. If your print screen button is not working perfectly on windows, you can try using the Windows snipping tool. It’s possible to take screenshots in Windows with the help of the built-in Snipping Tool. It allows you to take screenshots of a selected window, a rectangular region, or the full screen.
Whether a social network post or an interesting article, you can use the Windows Snipping Tool to snap a snapshot of it and send it along. Capturing screenshots of individual actions inside a process with the Windows Snipping Tool can be helpful when writing guides or lessons.
Here’s how to use Windows Snipping Tool:
Step 1: Go to the Start menu and enter “snipping tool” into the search field that appears. This will launch the Windows Snipping Tool. From the list of results of your search, choose “Snipping Tool.”
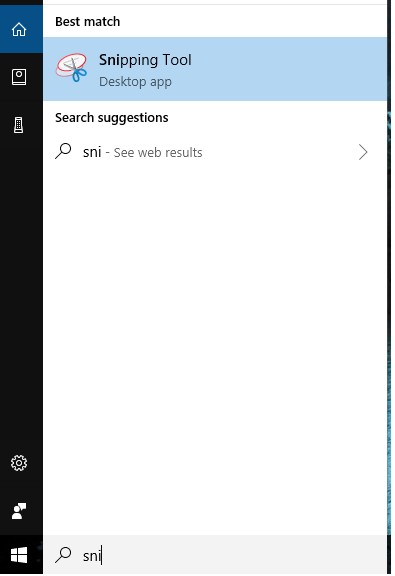
Capture Your Screen via Snipping Tool
Step 2: The Windows Snipping Tool gives users a variety of choices to choose from when taking screenshots. To pick a capture mode, locate the drop-down menu next to the “New” button on your screen and make your selection.
Note: The following choices are open to you:
- Free-from snip
- Rectangular snip
- Window snip
- Full-screen snip
Step 3: After you have decided on a capture mode, you can use the mouse to choose the portion of the screen that you want to record.
Note: After selecting an area, the Snipping Tool window will vanish, and that region will be highlighted.
Step 4: When you have finished taking the screenshot, the window for the Snipping Tool will return and include the picture you have just taken.
Tip: To save the screenshot, go to the “File” menu and choose “Save As” from the drop-down list. Select a place on your computer to store the screenshot, then click the “Save” button.
Final Thought
To recap, if the print screen button on your Windows device is not functioning properly, you can use the procedure described above to diagnose and solve the problem.
We hope that this post will assist in providing you with a better knowledge of how to diagnose and repair the problem with the print screen button on your Windows device not functioning properly. The Windows Snipping Tool is a great option for capturing screenshots and should be considered if you have any more inquiries or want additional assistance.
