How to Extend Background in Photoshop: Comprehensive Guides

In digital creativity, few tools rival the renowned prowess of Photoshop in image editing and graphic design. With its extensive range of capabilities, one feature stands out as a testament to its exceptional utility: the seamless extension of photo backgrounds. This transformative ability empowers artists and designers to transcend the limitations of reality, whether by turning ordinary portrait shots into sweeping landscapes, crafting space for additional textual elements, or enhancing visual equilibrium.
Extend Background in Photoshop
Within the vibrant world of visuals, the art of effortlessly stretching backgrounds opens up exciting creative possibilities. This guide takes you on a clear journey, explaining how to extend background in Photoshop. Each step is laid out clearly, offering a lucid understanding of the techniques required to expand backgrounds flawlessly. The potential of image editing can be fully realized by learning these crucial techniques. As a result, you may create interesting designs that captivate viewers’ attention and spark their creativity, in addition to improving the composition of your photos. Without any further ado, let’s get started.
Also read: How to Remove Black Background in Premiere Pro 2023 >
Table of Contents: hide
Option 1 using Content-Aware Fill
Content-Aware Fill is a powerful feature in Photoshop that enables you to extend backgrounds in your images seamlessly. It intelligently analyzes the existing content and fills the extended area with visuals matching the surroundings. This tool is incredibly useful when you want to add more space to your photos or modify their composition without leaving any visible traces of manipulation.
Using advanced algorithms, Content-Aware Fill in Photoshop saves significant time and effort compared to manual retouching. Its ability to consider colour, texture, and patterns within the image ensures that the filled area blends naturally with the original scene. Whether you’re refining landscapes, enhancing portraits, or removing unwanted objects, this feature remains an indispensable asset for photographers and digital artists alike.
Step 1: Open the image file in Photoshop to prepare for extending the image background.
Step 2: Use the Lasso tool from the menu bar to precisely choose the preferred image background area.
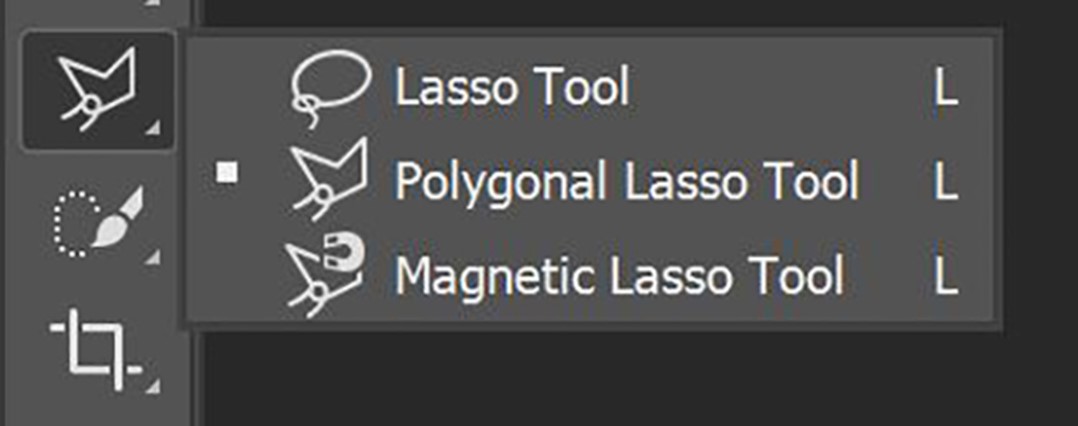
Access Lasso Tool
Step 3: Once your selection is complete, navigate to the screen’s top and click “Edit.” In the ensuing popup window, locate and select “Content-Aware Fill.”
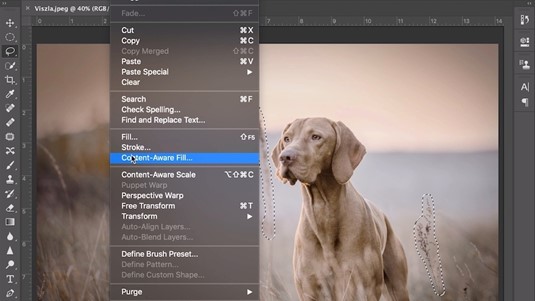
Select Content-Aware Fill
Step 4: Adjust the settings and options in the “Content-Aware Fill” dialogue box according to your requirements.
Step 5: Preview your adjustments; the Preview will display a red overlay representing the area to be expanded.
Step 6: To implement the background extension, either press the “Enter” key or click the “Ok” button within the “Content-Aware Fill” dialogue box.
Option 2 using the Crop Tool
The Crop Tool in Photoshop is a versatile feature that serves multiple purposes, one of which is extending the background of an image. This tool lets users modify the canvas size by cropping or expanding it. When extending the background, the Crop Tool helps by allowing users to drag the tool’s boundaries outward, effectively adding extra space to the canvas. This added space can accommodate a larger background or incorporate additional elements into the composition.
As users adjust the Crop Tool’s dimensions, a dialogue box displays the new canvas size, providing precise control over the extended area. This technique is very helpful for increasing an image’s visual appeal because it makes it possible to incorporate enlarged backdrops and improve the overall arrangement seamlessly.
Step 1: Open your image in Photoshop.
Step 2: Use the keyboard shortcut “C” to select the Crop Tool option from the toolbar and then you can move or navigate the Crop Tool pointer across the picture or canvas to extend the size.

Access Crop Tool
Step 3: Drag the Crop Tool in the direction you want to expand the canvas horizontally or vertically. Then, a Crop Tool dialogue box will appear, indicating the dimensions of the new canvas in pixels. Make sure the dimensions match your desired canvas size.
Step 5: Press the “Enter” key to confirm and apply the adjustments if you are satisfied with the proportions.
Step 6: Alternatively, go to the “Image” menu, choose “Canvas Size,” and type the specifications for your chosen canvas size in the popup box.
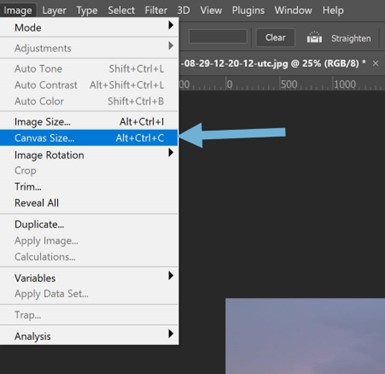
Choose Canvas Size
Option 3 using AI Generative Fill
Utilizing the recently unveiled “Generative Fill” feature necessitates familiarity with expanding image backgrounds by employing the Crop tool to augment the canvas dimensions. Following this step, the subsequent action involves employing the “Marquee Tool” to initiate the AI-powered background extension process. Extending an image’s backdrop using Generative Fill entails several crucial steps.
First, one must adeptly manipulate the Crop tool to enlarge the canvas size, as indicated earlier, effectively. Subsequently, the “Marquee Tool” comes into play, serving as the initial engagement point with the AI-driven background extender. This innovative tool revolutionizes the augmentation of image backgrounds, employing advanced algorithms to generate an extended backdrop seamlessly.
Mastering this process empowers users to transform their visuals by lengthening and enhancing the background, opening up new avenues for creative expression in digital imagery.
Step 1: Open your image file in Photoshop to prepare for extending the image background.
Step 2: Access the “Crop” tool using the shortcut “Ctrl + C” or locate it on the left dashboard.
Step 3: Utilize the Crop tool to enlarge the canvas size beyond the current image background. Apply the changes by clicking the “Apply” button.
Step 4: Choose the “Rectangular Marquee” Tool from the left toolbar to select the newly expanded canvas area.
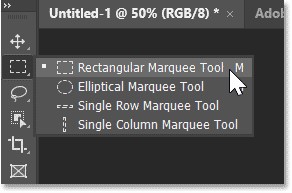
Select Rectangular Marquee Tool
Step 5: A new “Contextual Task Bar” will appear below the selection. Click on “Generative Fill” to proceed.
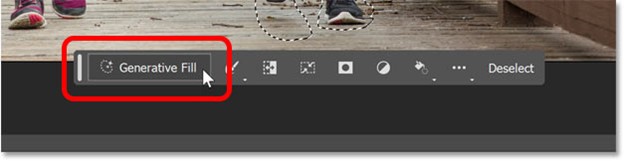
Click On Generative Fill
Step 6: Enter your desired prompts for the AI tool to automatically fill the extended background, resulting in a completed image.
Final Thought
In conclusion, learning how to extend background in Photoshop broadens your creative possibilities and showcases your dedication to refining your craft. You’ll be equipped to tackle diverse challenges by exploring various tools and techniques, producing impressive visuals that captivate audiences. Your investment in perfecting this skill will yield rewarding results in your digital artistry journey.
Although it may demand some initial practice, especially when dealing with intricate images, the time you invest in mastering this technique is undeniably valuable. It’s essential to remember that Photoshop offers many tools to achieve your desired results, granting you multiple pathways to success. Furthermore, tell us about your concerns in the comments section below!