How to Remove Black Background in Premiere Pro 2024

Video editing is a dynamic blend of technical know-how and creative expression. Every modern editor needs the skill of background removal, particularly when utilizing a robust platform like Premiere Pro 2023. Being adept at eliminating black backgrounds can significantly enhance the quality of videos, emphasizing subjects and foreground content.
Remove Black Background in Premiere Pro
The competition among editors intensifies as we enter a digital era of rich multimedia content. Only by mastering fundamental techniques like background removal can one truly stand out and deliver outstanding projects. Whether you’re a seasoned pro or just beginning your editing journey, this guide is your ally toward achieving seamless, professional edits related to how to remove black backgrounds in premiere pro.
Also read: How to Blur Background in Photoshop? >
Table of Contents: hide
How to Remove Black Background in Premiere Pro 2024?
Navigating the labyrinth of video editing can sometimes feel overwhelming, especially when faced with perfecting every detail. Imagine this: you’ve filmed a fantastic scene, but the black backdrop behind your subject isn’t aligning with the vibrant narrative you’re trying to convey. Or perhaps, you’ve incorporated graphics or animations with a pesky black background that stands out like a sore thumb. We’ve all been there; these little nuances can make or break the visual storytelling experience. Fortunately, Premiere Pro 2023, a trusted ally in the editing world, offers solace with two robust techniques tailored for distinct needs. Whether you’re after a speedy solution or pursuing meticulous perfection, there’s a method waiting for you. As we dive deeper, you’ll discover the steps to effortlessly erase those unwelcome black backgrounds and let your content shine.
Quick Background Removal
Video editing is vast, and with technological advancements, it has become easier to achieve professional results swiftly. One such indispensable skill in the video editor’s toolkit is background removal. For those facing time constraints or working on projects where pin-point accuracy isn’t the top priority, the quick background removal method in Premiere Pro is truly a game-changer.
This intuitive and straightforward approach is designed to eliminate uniform backgrounds, such as the solid black, often used as a backdrop for specific visual effects or graphic elements. What makes this method highly appealing to many editors is its simplicity. Without the need to dive deep into numerous settings or adjustments, one can effectively enhance the visual appeal of their video.
This balance of speed and satisfactory output quality makes it a go-to for those who want rapid results. Whether you’re working on a client’s project with a tight deadline or creating a personal video and need to eliminate that pesky black backdrop quickly, this technique is here to save the day. Below, we’ll walk through the steps to transform your content in minutes.
Steps:
Step 1: Import the desired video or asset into your editing scene.

Import Video Or Assett
Step 2: Once imported, click on the asset to ensure it’s active for editing.
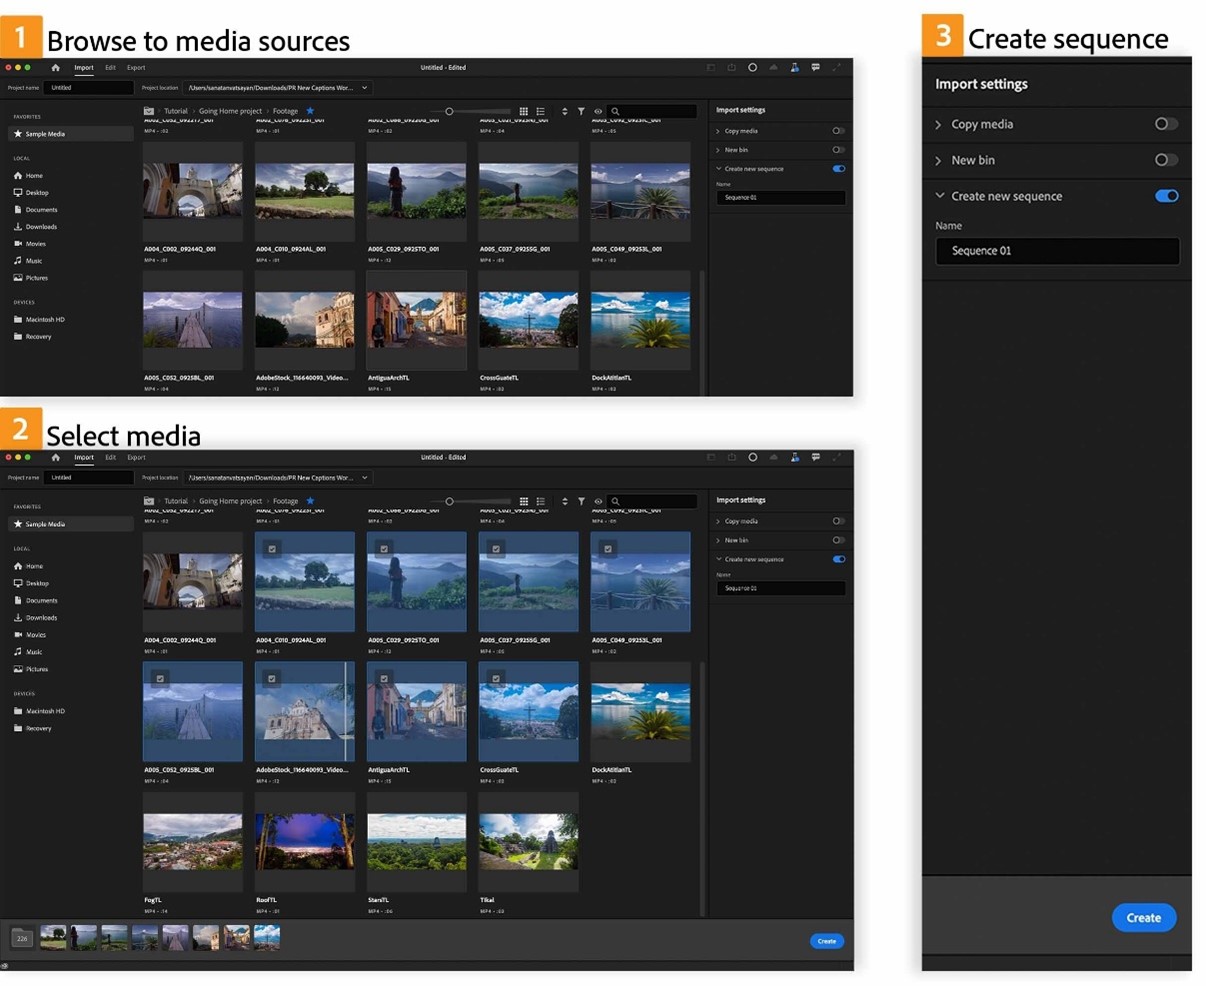
Choose Media To Edit
Step 3: In the panel, scroll down until you see the “Blend Mode” option.
Step 4: Simply change the blend mode to “Screen.” This action instantly eliminates the black background, leaving you with a clean and clear foreground.
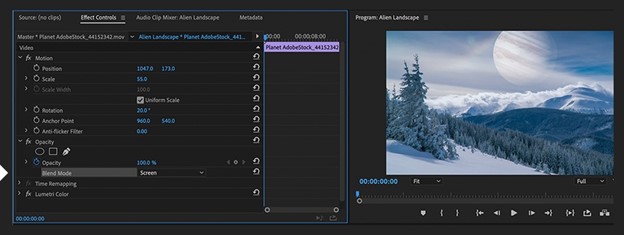
Choose Blend Mode
Further Reading: How to Remove Watermark from Video Premiere Pro >
Advanced Background Removal
In the multifaceted world of video production, every project comes with unique challenges and requirements. Sometimes, generic methods just won’t cut it, especially when perfection is the goal. This is where the advanced background removal method in Premiere Pro 2023 showcases its prowess.
Designed for editors who refuse to compromise on quality, this technique provides a meticulous approach to removing backgrounds, ensuring every edge is sharp and every detail is preserved. While the quick method serves well for basic edits, the advanced route is a haven for those working on premium projects requiring a flawless finish.
Whether you’re dealing with intricate objects against a black background, subtle shadows, or gradients that the more straightforward methods might miss, this strategy guarantees impeccable results. Embarking on this journey might seem more involved at first glance, but the outcome is well worth the effort. By delving into the deeper functionalities of Premiere Pro 2023, you’ll enhance your current project and hone your skills for future endeavors. Let’s dive into this comprehensive guide to achieve a pristine background removal.
Steps:
Step 1: Begin editing by importing the video or asset you wish to work with into your current scene.
Step 2: Once in the timeline, click on your imported asset to activate it.
Step 3: Navigate to the “Effects” tab. Under this, you’ll find the “Luma Key” effect categorized under Video Effects > Keying > Luma Key. You can also search for this effect in Adobe Premier Pro.
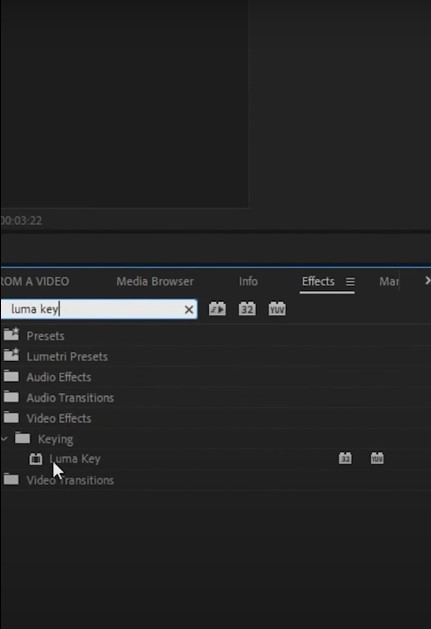
Luma Key
Step 4: Drag this effect directly onto your selected footage.
Step 5: In the “Effect Controls” panel, locate the applied “Luma Key” effect. Modify the offset value to ensure no gray light or spill is bleeding through. This step is crucial in achieving a clean removal.
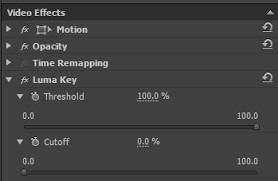
Luma Key Effect
Step 6: Locate the “Blend Mode” option after configuring the Luma Key effect and switch it to “Screen.” This will further refine the clarity of the remaining content.
Step 7: Now comes the art of balancing. Combine the “Luma Key” and “Blend Mode” effects. Adjusting them in tandem will often yield the best results, ensuring a seamless and professional outcome.
This straightforward guide provides a clear pathway to achieve quick and advanced background removals in Premiere Pro 2023.
Final Thought
Mastering the art of removing black background in premiere pro is more than just a skill; it’s a passport to creative excellence. It allows editors to tell stories without boundaries, making content more engaging and impactful. As technology and tools evolve, staying updated with such techniques ensures that your work remains at the forefront of the industry. Remember, every edit, every clip, and every project is a step forward in your journey. Stay curious, keep experimenting, and always strive for perfection. Your dedication to refining these skills today will shape the cinematic masterpieces of tomorrow.