Video recording and editing skills are becoming more popular with the prevalence of digital cameras and smartphones that can capture video footage. While advanced techniques are best suited for dedicated editing programs, straightforward trimming and joining video clips can be done in the free and commonly available Windows Media Player.
How to Edit Video in Windows Media Player
Studies have shown that many small business owners frequently use video material for marketing and social media. The good news is you don’t require expensive or complex applications for fundamental edits like trims and splices. Your computer’s built-in Windows Media Player has the tools to perform this type of editing. But the question arises: how to edit videos in Windows Media Player? This guide aims to provide a detailed walkthrough of video editing functionality within Windows Media Player. Let’s find out!
also read: How to Convert MP4 to MP3 File on a Mac? >
Table of Contents: hide
Can Windows Media Player Cut Video?
How to Trim/Crop Videos On Windows Media Player
How to Trim Video Using Windows App Instead of Windows Media Player
Can Windows Media Player Cut Video?
Yes, you can edit and cut videos in Windows Media Player. This tool comes built-in with the operating system by developers to play a range of videos and audio files. Except Windows Media Player, you can edit videos with the help of another video editor, Clippa.
Clippa allows you to splice and cut your video files easily. With just a few clicks, you can remove unwanted sections, combine multiple clips, and create a polished final video from your raw footage. Moreover, it utilizes the same backend as a web-based application and uses minimum resources.
You can perform multiple tasks on the Clippa video editor. Some of those tasks include:
- Trimming the videos to get rid of unnecessary parts.
- Video controls for adjusting the audio, colors, and video speed.
- Replacing or adding new audio tracks to the video.
- Add background music to the video.
- Add animated captions to the video.
- Beautiful transition effects to make the video engaging.
- A video library for creating interactive intros.
How to Trim/Crop Videos On Windows Media Player
Now that we have a handle on the basics, it’s time to jump into trimming and cropping videos step-by-step. With minimal effort, you can eliminate blurry or unstable sections, remove unnecessary footage, and focus on the ideal portions of the clips. Within a short time frame, you can refine your raw videos and produce polished, shareable content.
Let’s look at the steps required to trim the videos with the help of Windows Media Player.
Step 1. Open the Folder where your video is stored.
Step 2. Right-click on the video, bring the mouse arrow to Open with and select Media Player.
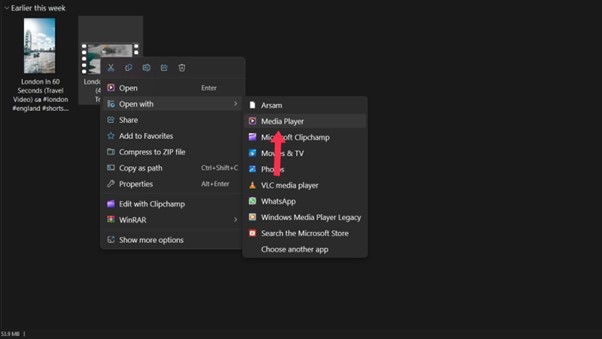
Right Click On Video
Step 3. Once your video is being played in Media Player, find and select the three-dot icon in the bottom right corner.
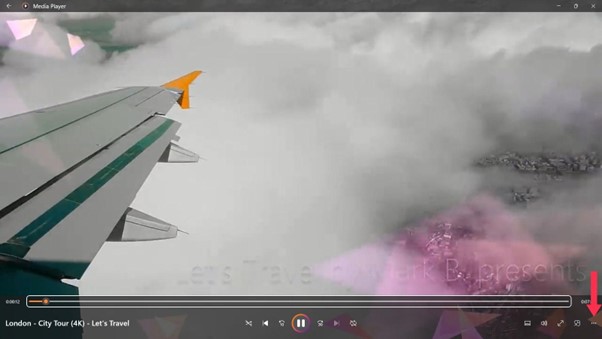
Click On Three Dots
Step 4. Drag and drop your video from the left media menu on the tool’s timeline. You can trim the video from both ends.
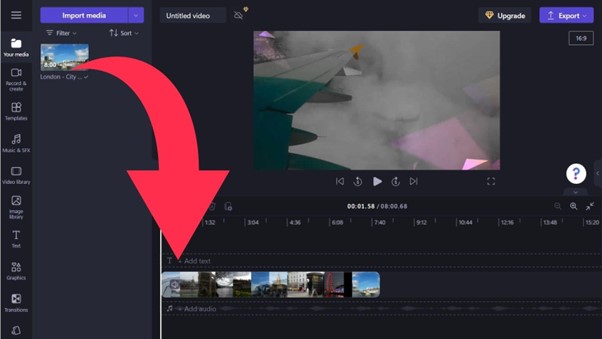
Drag Your Video
Step 5. Choose your video from the timeline, and adjustment sliders will appear at both ends. Drag the sliders to cut the section desired. The video will automatically trim after slider adjustment.
Step 6. Click the Export button on the top right corner and select your desired Video Quality. Your video will start exporting. You can also adjust the aspect ratio from the button right below the Export button. After exporting, the video will be saved in your download folder.
Further Reading: Text Video Maker >
How to Trim Video Using Windows App Instead of Windows Media Player
While Windows Media Player has some basic video editing capabilities, you may want to use Windows’s other native app, Photos. This app comes standard on Windows 10 and 11 for more advanced trimming, flipping, and splicing. Moreover, it provides additional professional-level tools for precision editing on your desktop.
Photos app mainly works as an image and video viewer, but in recent updates, Microsoft added Video trim functionality. This makes it a handy tool for trimming short, valuable pieces from a long video. With options like razor slicing, slow motion, and split trimming, the Windows Photos app gives you finer control over cutting your videos.
Here are the steps to follow for editing in the Photos app.
Step 1. Open the Folder where your video is stored. Right-click the video, and a dialog box will open.
Step 2. Bring the mouse arrow to Open with, and select Photos.
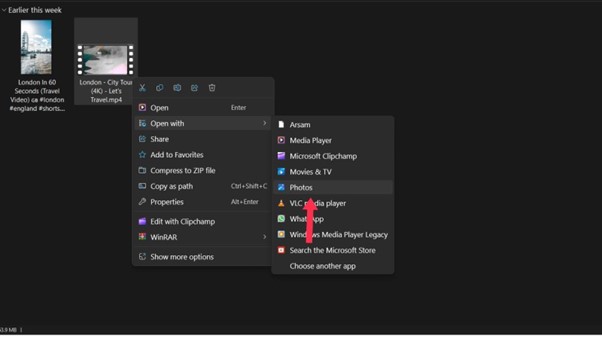
Choose Open With
Step 3. Locate and press the Video Edit button on the top ribbon of the app. It will take you to the editor of the Photos app.

Photos App Editor
Step 4. Grab the Video Heads with the left-click button and drag them to the opposite side of the part you want to trim.
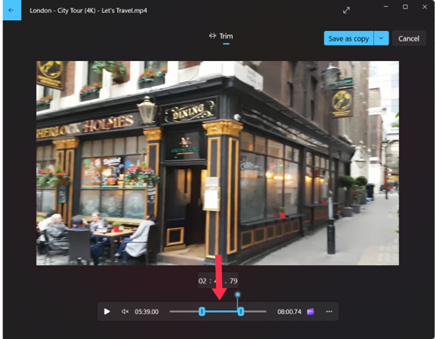
Drag The Slider
Step 5. Once you are done, click the Save as Copy button.
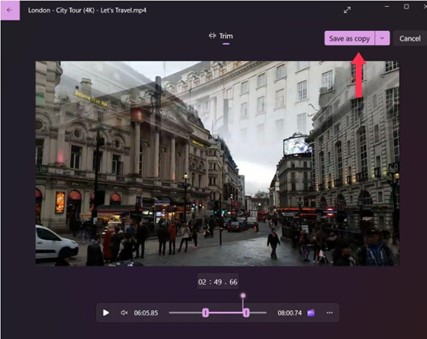
Click Save As
Step 6. Select the Folder where you want to save the trimmed video and press the Save button.
Final Thoughts
Concluding, editing videos has become necessary for almost everyone in this tech era. However, many tools provide basic editing without advanced software, such as Windows’ built-in Media Player. This app, along with the help of Microsoft Clipchamp (built-in editor), can help you perform simple tasks like cropping, trimming, or splicing videos. Moreover, another built-in tool, Photos, can help you if you want professional editing. Read the above guide for detailed instructions on editing videos with these handy tools.