Subtitles have become an essential part of modern video content. They not only make your videos accessible to a wider audience, including those with hearing impairments or different language preferences but also improve overall engagement and watch time. This guide will walk you through four simple methods to add subtitles to your MP4 videos, catering to various skill levels and resources.
Table of Contents: hide
Auto-generate Captions to Videos with AI
Adding Subtitles to MP4 with iMovie
Auto-generate Captions to Videos with AI
CapUp is a state-of-the-art AI-powered caption generator that is particularly well-suited for automatically generating accurate captions for short videos on TikTok, YouTube Shorts, and Instagram, saving you time and effort. Whether you’re creating content for social media, educational purposes, or marketing campaigns, CapUp’s auto-generated captions will enhance your video’s accessibility and engagement.
Highlight Features of CapUp
- Harness the power of AI to quickly generate accurate video captions.
- Automatic zoom effects enhance visual impact and captivate audiences.
- Multiple sound effects boost video effectiveness by incorporating popular sounds and effects.
- Video captions are matched with emojis, adding vibrancy and expressiveness to the content.
- Customizable video covers increase viewer engagement and popularity.
Here are the steps to add captions to short videos using CapUp:
Step 1: Log in to CapUp and easily upload videos by dragging and dropping them from your computer.

Log in and Upload the Video
Step 2: Select the language of the currently uploaded video from the drop-down menu. CapUp supports English, German, Spanish, French, Portuguese, and 12 other languages.

Select the Language that Matches Your Video
Step 3: Click on “Templates” and choose from various top influencer templates. Adjust fonts, sound effects, emojis, and other parameters according to your preferences. Then, click on “Save as Template” to save your default template as a custom template.
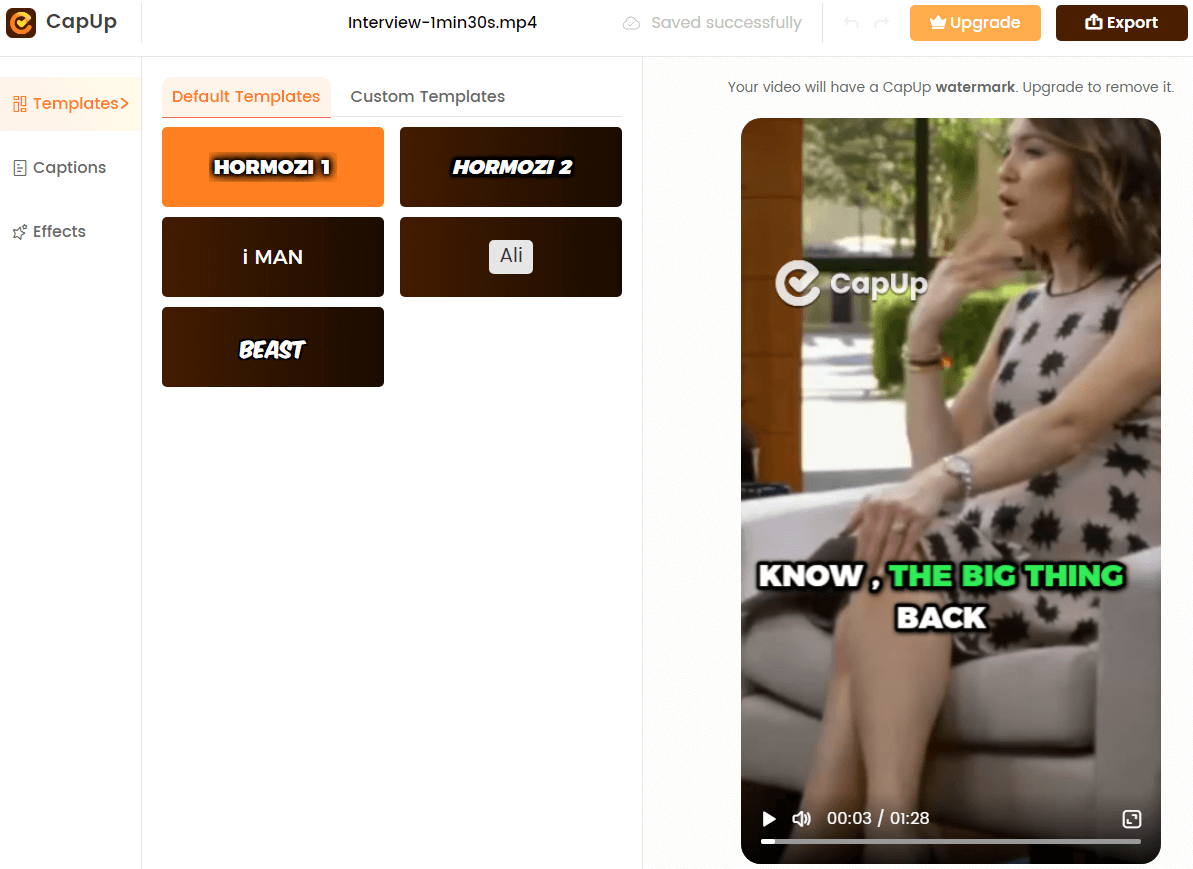
Add Captions to Videos Automatically with AI
Step 4: Wait for a moment, and CapUp will automatically generate captions for you. Then, click on “Captions” and “Effects” to customize the font, emojis, sound effects, and animations of the captions.
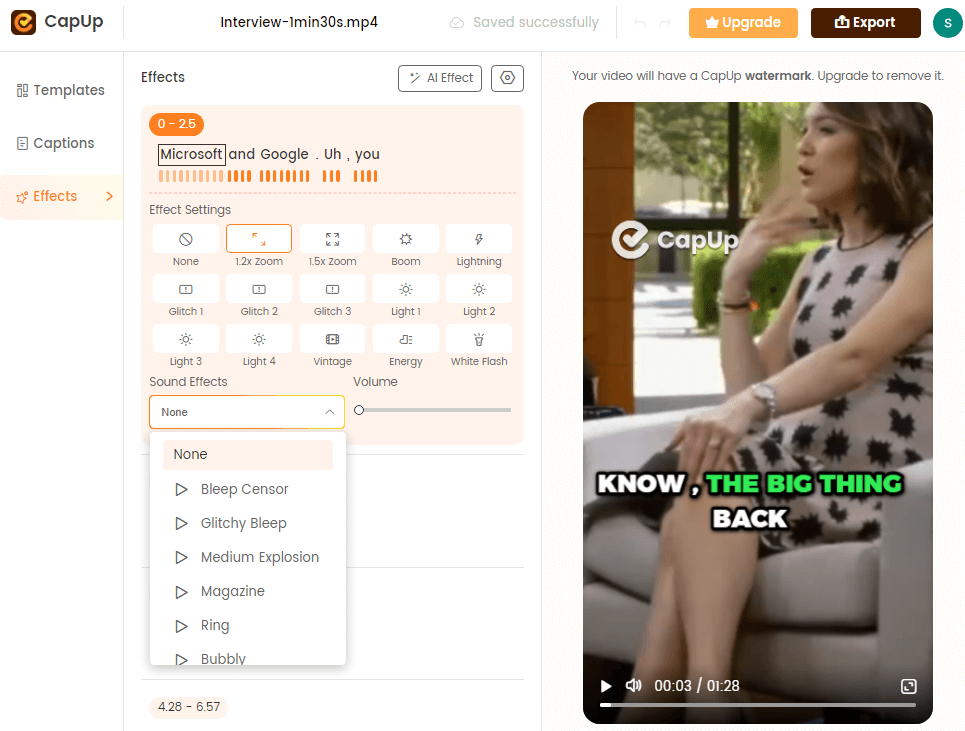
CapUp Outstanding Sound Effects
Step 5: Customize the video cover. Once satisfied, click on “Export” to download the video.

Export the Video
Using VLC Media Player
VLC Media Player is a popular, free, open-source media player that supports various video and audio formats. It also provides a straightforward way to add subtitles to your MP4 videos without the need for any additional software.
Step 1: Install VLC Media Player on your computer if you haven’t already.
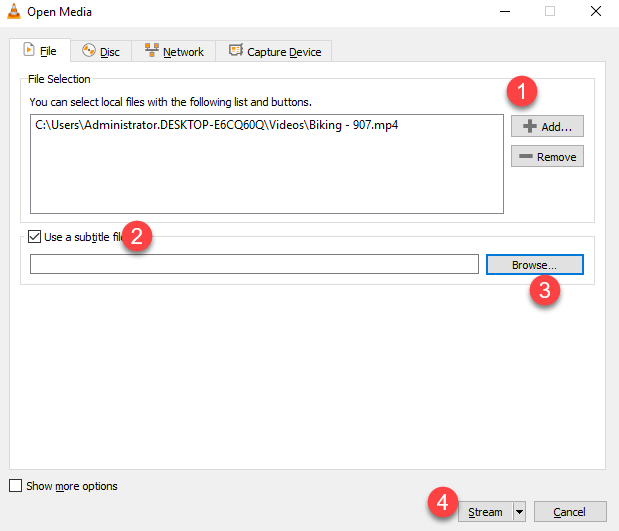
Add Subtitle File – VCL
Step 2: Prepare your subtitle file in a compatible format (e.g., .srt, .sub).
Step 3: Add subtitles to the MP4 video.
- Open the MP4 file in VLC.
- Go to “Subtitle” > “Add Subtitle File…” and select your subtitle file.
- Adjust subtitle settings, such as synchronization and font, in the “Tools” > “Preferences” menu.
Step 4: Save the MP4 video with subtitles by going to “Media” > “Convert / Save” and choosing the appropriate output settings.
Using Windows Media Player
Windows Media Player, a built-in media player for Windows operating systems, provides a straightforward way to add subtitles to your MP4 videos. This method is particularly useful if you prefer using native Windows applications.
Step 1: Prepare your subtitle file in a compatible format (e.g., .srt, .sub).
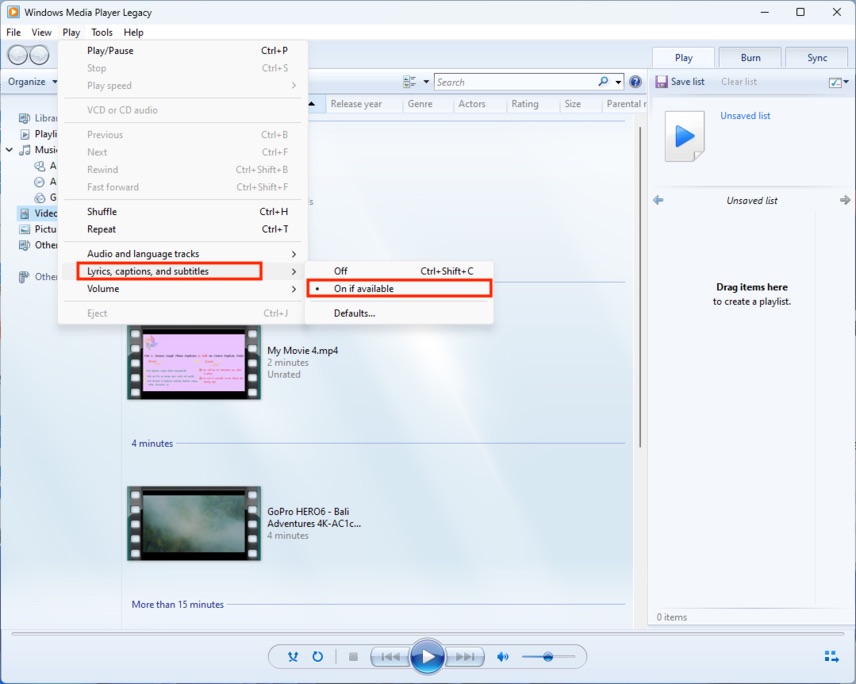
Add Subtitle to MP4 – Windows Media Player
Step 2: Rename the subtitle file to match the MP4 video file name (e.g., “video.mp4” and “video.srt”).
Step 3: Place the subtitle file in the same folder as the MP4 video.
Step 4: Open the MP4 video in Windows Media Player.
Step 5: Enable subtitles by right-clicking on the video, selecting “Lyrics, captions, and subtitles,” and choosing the subtitle file.
Adding Subtitles to MP4 with iMovie Video Editor
iMovie stands out from other software by offering a unique “Title” function that enables users to add subtitles or hidden meanings to specific positions in their videos with customizable styles. To add subtitles, users must select a title template and drag it to the desired location on the timeline viewer.
Adding subtitles in iMovie can be a time-consuming project, particularly for longer videos, as users need to manually input subtitles one by one and have full control over the timeline.
To add subtitles to an MP4 video using iMovie, follow these steps:
Step 1: Download and install iMovie on your Mac.
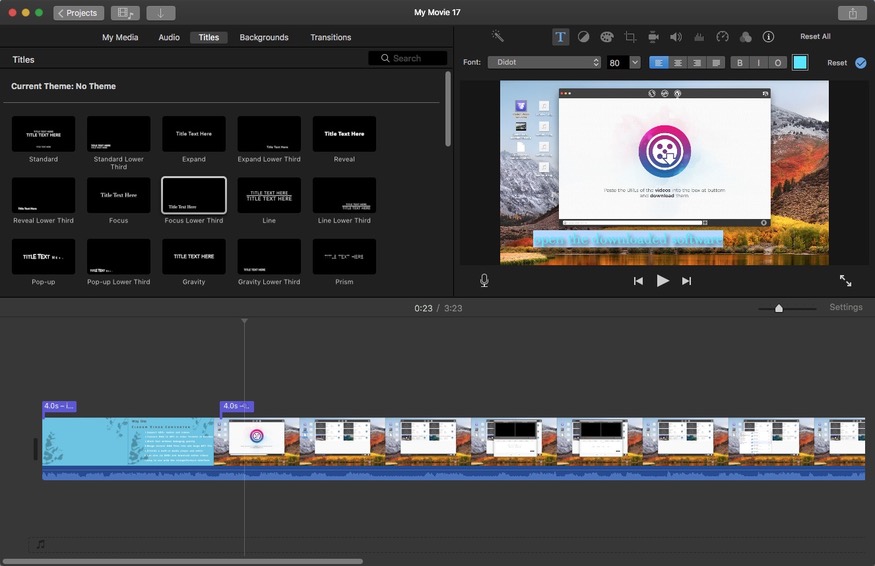
Add Subtitle to MP4 – iMovie
Step 2: Launch iMovie, create a new project, and upload the MP4 video to your source library before dragging it to the timeline.
Step 3: Navigate to the “Titles” section, select the desired title template, and drag it to the lower timeline.
Step 4: Manually input the required subtitles for the video. You can also customize the size, color, duration, font, and other settings according to your preferences.
Step 5: After completing the subtitles, click the icon in the top right corner and select the “File” option to configure output settings and export the MP4 video with embedded subtitles.
Using Adobe Premiere Pro
Adobe Premiere Pro is a professional video editing software that provides advanced tools for adding subtitles and customizing subtitles in your MP4 videos. This method is best suited for users with some experience in video editing and access to the Adobe Creative Suite.
Step 1: Import your MP4 video into Adobe Premiere Pro.
Step 2: Create a new caption track by going to “File” > “New” > “Captions”.
Step 3: Add and edit subtitles.
- Manually input subtitles using the Caption Editor.
- Import existing subtitle files by going to “File” > “Import” and selecting the file.
Step 4: Adjust the subtitle style and position using the Caption Panel.
Step 5: Export the subtitled MP4 video by going to “File” > “Export” > “Media” and choosing the appropriate settings.
Tips for creating effective subtitles
- Keep subtitles concise and easy to read, displaying no more than 2-3 lines at a time.
- Ensure accurate timing and synchronization with the video content.
- Choose an appropriate font and size for legibility.
- Maintain good color contrast between the text and background.
FAQs about Adding Subtitles to MP4 Videos
1. Can I add subtitles to MP4 videos on my mobile device?
Yes, there are mobile apps available to add subtitles, such as Kinemaster and CapCut.
2. Are there any free online tools for adding subtitles to MP4 files?
Yes, some popular free online tools include Kapwing, Amara, and VEED.IO.
3. How can I ensure that my subtitles are synchronized with the video?
Use professional subtitling software or online tools that allow you to manually adjust the timing of each subtitle.
Conclusion
Adding subtitles to your MP4 videos is a straightforward process that can significantly enhance your content’s accessibility and engagement. Whether you prefer using desktop software like VLC Media Player and Adobe Premiere Pro or opt for online tools like Kapwing, there’s a method suitable for every user. By following the steps outlined in this guide and keeping tips for creating effective subtitles in mind, you’ll be well on your way to producing more inclusive and captivating video content.

