Apple has made screen recording on iPads incredibly easy and accessible by introducing a built-in Screen Recording feature with the release of iOS 11. This feature allows users to capture high-quality videos of their iPad’s screen, along with audio from the device’s microphone or external audio sources. With just a few taps, you can start recording your screen and share your content with the world.
How to Screen Record on iPad
In this guide, we’ll dive into the world of screen recording on iPads, exploring the various methods and tools available to help you create stunning video content. We’ll cover everything you need to know to become a master of screen recording on your iPad.
Further Reading: Best Video Capture Software for Mac >
How Long Can You Screen Record on an iPad?
The length of your screen recording on an iPad is primarily limited by two factors:
- Storage space: The main limiting factor for the duration of your screen recording is the available storage space on your iPad. Screen recordings are saved as video files, which can be quite large, especially if you’re recording at a high resolution or over an extended period. Once your iPad runs out of storage space, the recording will automatically stop.
- Battery life: If your iPad is not connected to a power source, the battery life will also limit the duration of your screen recording. Once the battery is depleted, your iPad will shut down, and the recording will stop.
Assuming you have sufficient storage space and battery life (or your iPad is connected to a power source), you can record your screen up to 3 hours.
How to Record Video on an iPad?
In this section, we’ll explore 3 built-in tools on your iPad that allow you to record video independently.
Screen Record on iPad via Built-in Recording Tool
iPads running iOS 11 or later have a built-in Screen Recording feature that enables you to capture video of your iPad’s screen along with audio.
Screen Record on iPad via Built-in Recording Tool
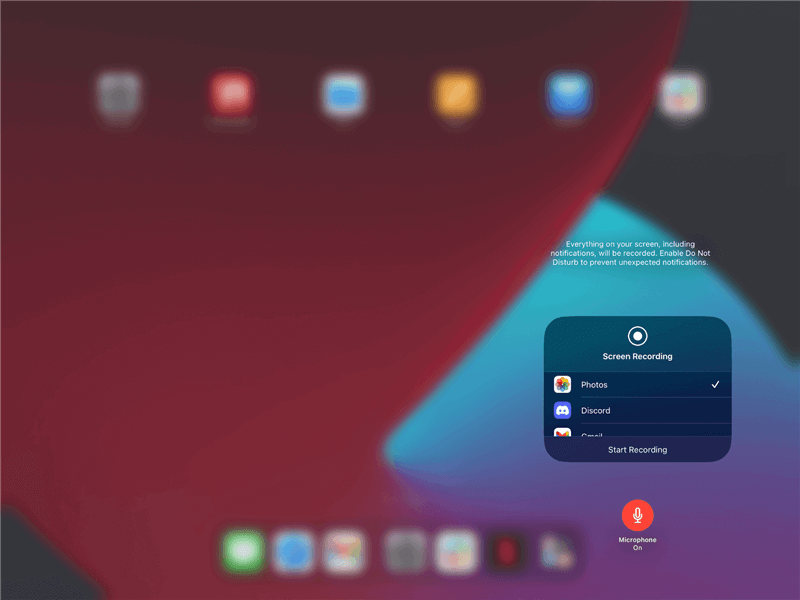
1. To access this feature, open the Control Center and tap the Screen Recording button (a circle with a dot inside).
2. Before starting your recording, you can enable your microphone to narrate or provide commentary.
3. Once you tap “Start Recording,” your iPad will capture everything that happens on your screen, including any audio playing on your device.
4. To stop recording, tap the red status bar at the top of your screen and select “Stop.” Your screen recording will be saved to your iPad’s Photos app.
Screen Record on iPad via Camera App
The Camera app on your iPad is primarily designed for taking photos and recording videos using the device’s built-in camera. However, it does not have a built-in screen recording feature like some third-party apps or the Screen Recording tool available in the iPad’s Control Center.
To use your iPad’s Camera app as a makeshift screen recorder, you can employ a workaround that involves using the iPad’s built-in screen mirroring feature and a separate device with a camera, such as another iPad, iPhone, or a computer with a webcam. Here’s how you can do it:
Screen Record on iPad via Camera App
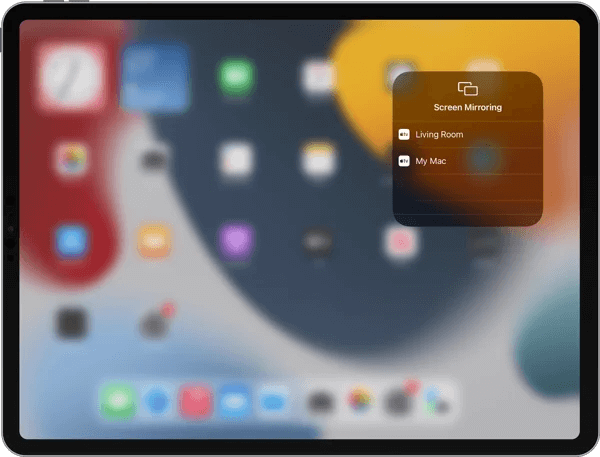
1. Set up your iPad to mirror its screen to another device, such as an Apple TV or a computer running QuickTime Player or a third-party screen mirroring tool.
2. On the receiving device (e.g., another iPad, iPhone, or computer), open the Camera app or a video recording application.
3. Position the camera of the receiving device to capture the screen of the iPad that you want to record. Ensure that the entire screen is visible and in focus.
4. Start the screen mirroring on your iPad and begin recording on the receiving device’s camera app or video recording software.
5. Proceed with the actions you want to record on your iPad’s screen. The receiving device will capture the mirrored screen along with any audio coming from your iPad. When you’re finished recording, stop the recording on the receiving device and end the screen mirroring session on your iPad.
Screen Record on iPad via Garageband
If you need more advanced audio recording and editing capabilities, you can use the free Garageband app. It allows you to record and edit multiple audio tracks, apply effects, and create more complex audio projects.
Screen Record on iPad via Garageband
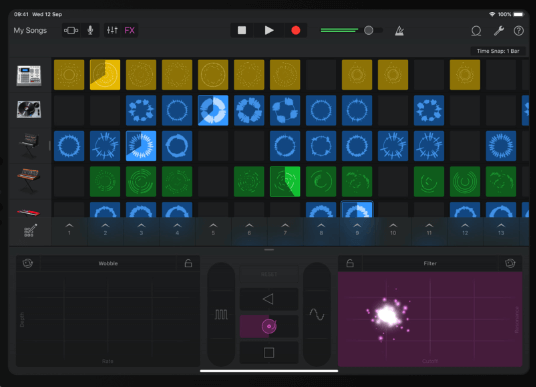
1. Open GarageBand on your iPad and create a new project or open an existing one. Set up your audio track in GarageBand and prepare the content you want to record on your screen.
2. Tap and hold the Screen Recording button, then tap the “Microphone” button to enable audio recording.
3. Tap “Start Recording” and wait for the 3-second countdown. Once the recording begins, navigate to the GarageBand app.
When you’re finished recording, open the Control Center again and tap the Screen Recording button to stop the recording.
Why Can’t iPads Screen Record?
If you’re using an iPad or an iPhone and you don’t see the screen recording option, there could be several reasons for this:
- iOS Version: Screen recording was introduced in iOS 11. If you’re running an older version of iOS, you won’t have access to this feature. Make sure your device is updated to at least iOS 11 or later.
- Control Center Customization: In iOS, the screen recording tool is not automatically available in the Control Center. You need to add it manually. To do this, go to Settings > Control Center > Customize Controls, and then add “Screen Recording.”
- Restrictions: If you have content restrictions enabled on your device, it might prevent you from accessing the screen recording feature. Check your Screen Time settings by going to Settings > Screen Time > Content & Privacy Restrictions.
- App Limitations: Some apps may disable screen recording to protect copyrighted or sensitive content. If you’re in such an app, you won’t be able to start a screen recording.
- Storage Space: If your device is running low on storage, you might not be able to start a screen recording. Free up some space by deleting unnecessary files or apps.
- Technical Glitch: Sometimes, a simple glitch could prevent the screen recording option from appearing. Try restarting your device to see if that resolves the issue.
- Physical Control Center Access: On some iPad models, you might need to swipe down from the top-right corner of the screen to access the Control Center, depending on the orientation of the device.
Bonus Tip. How to Screen Record on PC/Mac
FocuSee is an innovative desktop screen recording tool designed to simplify the process of creating professional-quality videos. It is an all-in-one solution that not only records your screen activities but also automatically applies a range of post-production enhancements to polish your content. Here’s how FocuSee stands out as a professional desktop screen recorder.
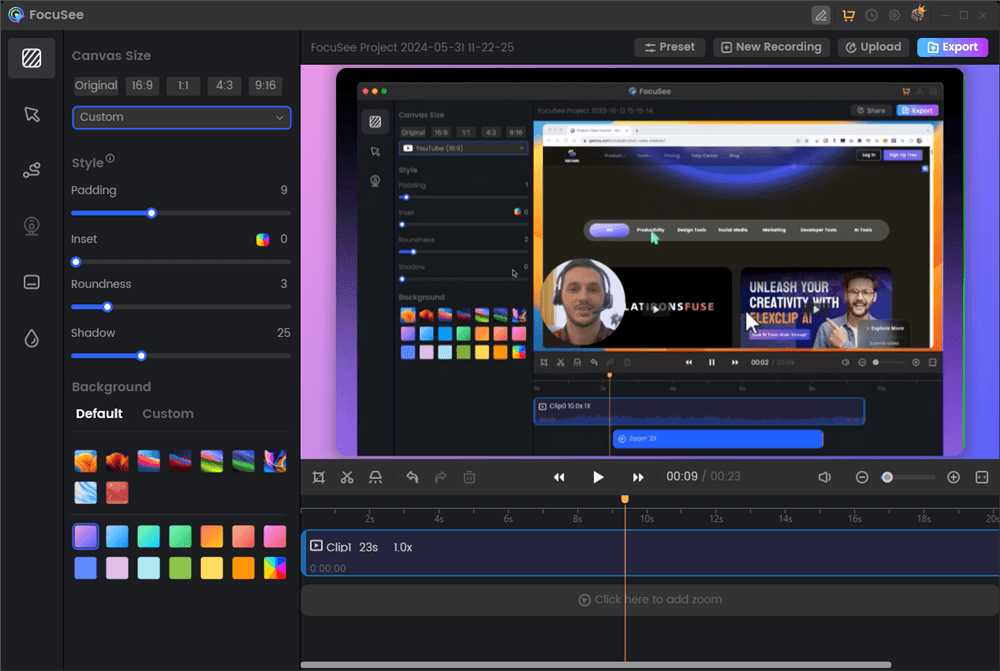
Screen Recording Editing Interface
- Auto Zoom-in Features: FocuSee provides a dynamic viewing experience by automatically adjusting the focus based on cursor movement and on-screen activity.
- Versatile Use Cases: FocuSee is suitable for a wide range of scenarios. You can use it to make demo videos, video tutorials, promo videos, product launch videos, pitch videos, and etc.
- Customizable Layouts and Appearance: You can select from various layouts to display your selfie and screen recording, as well as apply camera frames and filters to match your individual or brand style. The software also lets you adjust the video’s background, rounded corners, and other visual elements to make it more appealing.
- Add Interactive Elements: FocuSee allows you to add interactive elements to your videos, such as quizzes, forms, and call-to-action buttons, which can be used to collect feedback, emails, and prompt action within the video itself.
Final Thought
Whether you’re a seasoned content creator or just starting out, this guide has provided you with the knowledge and skills necessary to unlock the full potential of your iPad’s screen recording capabilities. So, let’s get started and discover how to create engaging, informative, and professional-looking screen recordings that will captivate your audience and elevate your content to new heights!