Since some websites have no download option, users record videos directly using their screen recorders. For recording video from website, this approach is quite effective. Nevertheless, many screen recorders will not record a DRM-protected video because of the blank screen. Digital rights management (DRM) is a technology that some websites use to secure copyrighted materials.
How to Screen Record Protected Videos
Protected videos should not be recorded due to the potential for regulatory violations. However, if necessary, the good news is you can record protected videos. And if you’re unaware of How to Screen Record Protected Videos, you’re at the right spot. In this article, you’ll discover the finest ways to record protected videos on Windows, Mac, and smartphones. Let’s dive into the details!
| Methods | Best for | Easy-to-use |
| FocuSee | Especially suitable for recording short marketing videos. | Super easy |
| iTop screen recorder | Record professional-looking videos of your screen, webcam, and audio. | Easy |
| Zoom | Capture audio, video, and screen sharing from online sessions. | Easy |
Can We Screen Record Protected Videos?
How to Record Protected Videos on Windows & Mac
You cannot screen-record protected videos because Digital Rights Management (DRM) technology encrypts or protects the content. These measures prevent unauthorized access, copying, or distribution of copyrighted material. However, some tools, such as iTop Screen Recorder, etc., claim to be able to bypass DRM and enable screen recording of protected videos but using them may violate copyright laws.
If you still want to screen-record protected videos, you can consider using screen-recording software, a capture card to record the video output from a device, or playing the video on a device that doesn’t have DRM protection and recording the screen using another device.
FocuSee, one of the best DRM screen recorders, offers a comprehensive solution for screen recording, enabling you to securely record your display with encryption while also capturing sound from your device’s microphone or additional audio inputs. Thanks to its hardware acceleration feature, it’s capable of seamlessly recording 4K UHD or 1080P at 60fps, even when dealing with content that has playback restrictions. It is compatible with Mac and Windows and enhances your screen recordings by automatically zooming in on mouse clicks, making it simpler to produce instructional content and demo videos.
Additionally, the tool allows you to enrich your recordings with unique cursor highlights, customizable backgrounds, spotlight effects, and the ability to zoom in on key points. FocuSee also provides the convenience of cloud uploads, so you can store, review, organize, and distribute your video recordings with ease once they are finished.
FocuSee Highlights
To learn the process of recording protected videos with FocuSee, adhere to the following instructions:
Step 1: Begin by downloading FocuSee for free, installing it on your Windows or Mac computer, and launching the application. FocuSee offers three recording modes: Full Screen / Custom / Windows. You can select a recording mode to start with.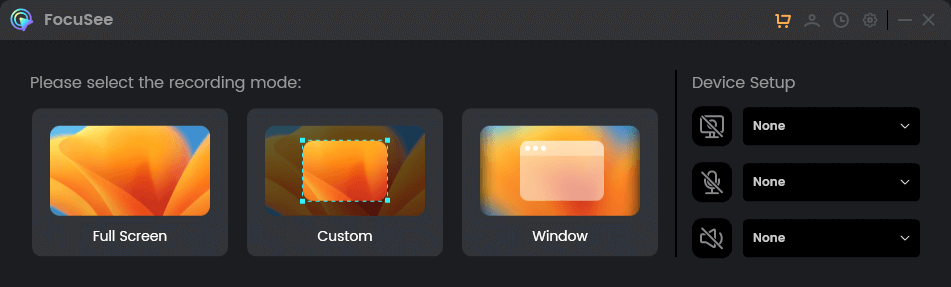
Choose a Recording Mode
Step 2: Define the region of your screen that you intend to record by adjusting the frame, then press the REC button to kick off the recording.
Step 3: Once you’ve completed capturing the mouse movements and clicks, click the Red Stop icon found on the toolbar. Post-recording, you have the option to modify the mouse cursor’s style, size, and click effects, introduce a spotlight, alter the zoom effect, and more.
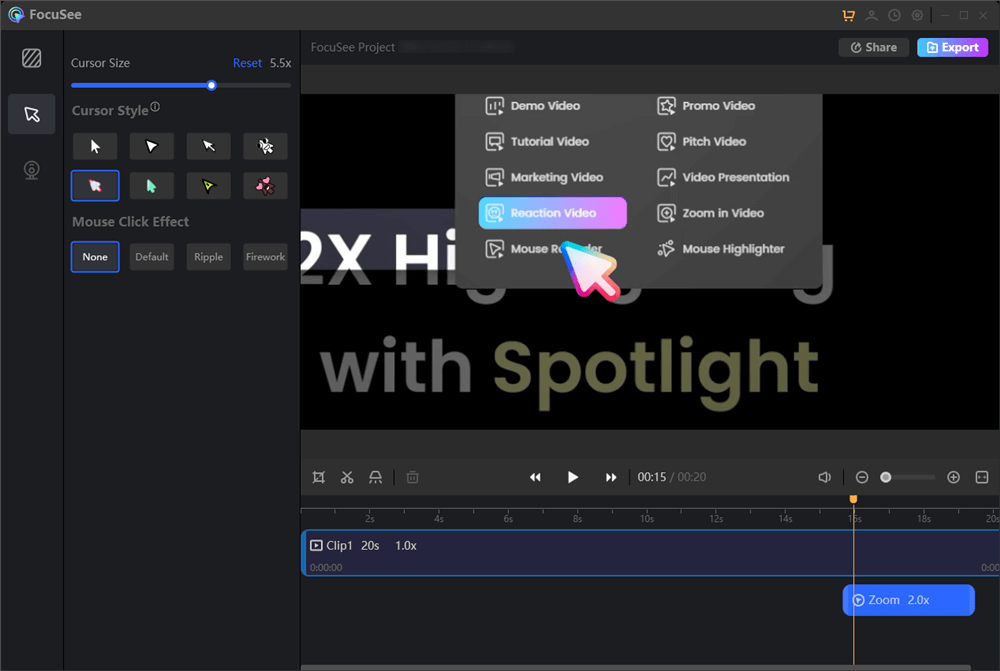
Edit the Recording
The information in this article is for educational purposes only. We do not promote or support any actions that infringe upon copyright laws. Please refrain from using this information for commercial purposes.
Wondering how to screen-record protected videos on Windows 10? This section has the answer! Since DRM-protected videos cannot be recorded by normal screen recording tools, such as OBS, Bandicam, or the Windows Built-in Xbox Game Bar. You need another specific DRM screen recorder for the job. Due to the plethora of screen recording app options in the market, finding one that can bypass the protection is difficult. To help you, we’ve reviewed the finest option, i.e., iTop Screen Recorder, in this section.
The iTop screen recorder allows you to record your screen in an encrypted format while recording from the device’s microphone or other audio sources. The tool’s hardware acceleration means it can capture protected 4K UHD or 1080P 60fps films without lagging. You can be sure that your CPU use won’t exceed 80% while recording, guaranteeing a fluid video capture of your screen. It can also export movies in various formats, including MP4, AVI, MOV, MKV, MP3, FLAC, and more, ensuring your videos play on various devices and platforms.
To understand how to record the protected videos using iTop Screen Recorder on Windows 10 PC, follow the steps below:
Step 1: Download and install the iTop Screen Recorder on your Windows 10 PC. After installing it successfully, launch it.
Step 2: First, you must set the preferences, such as microphone, webcam, mouse, and speaker. The iTop Screen Recorder records the screen in Full-Screen mode by default. Click the side arrow next to Full Screen to adjust the selected region. Moreover, you can also adjust the frame rate, bit rate, and other settings by clicking on the Settings icon.
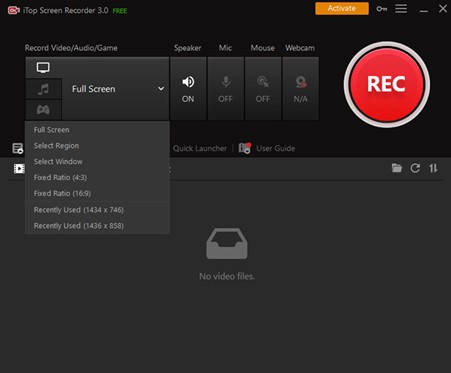
Select the Recording Region
Step 3: Now, click the red REC button to start recording the screen. After that, open the protected video you wish to record. Once done, press the F9 key on your keyboard to stop the recording, and the video will be saved to the My Creations folder.
Click the REC Button
Looking for a way to record a protected video on your smartphone? You’ll find the answer here! Since you cannot screen record a DRM-protected video, such as Netflix videos, with normal or built-in screen recorders on your smartphone, you need a high-quality screen recorder to bypass the DRM protection. And finding such an app, especially for smartphones, is no easy task. So, we came up with the best app, i.e., Zoom, to bypass the DRM protection on your smartphone.
Zoom is a popular video conferencing platform that allows you to conduct online meetings and webinars. In addition to its video conferencing feature, it also allows you to record the meeting. Its Screen Sharing feature allows you to broadcast the complete or a selected region of your phone’s display, while the built-in record meeting function allows you to record the meeting. It will be effective in getting over applications’ protection. However, these recordings will not be your local screen recordings, normally stored immediately on your device. Instead, these will be cloud recordings stored in Zoom’s cloud folder.
For screen recording the protected videos on your smartphone using the Zoom app, follow the steps below:
Step 1: Install the Zoom app on your iOS or Android smartphone. After successfully installing, open the app and create a new meeting by tapping the New Meeting option.
Step 2: In the Zoom Meeting screen, tap the Share Content (for iOS) or Share Screen (for Android) option in the bottom menu to share the whole screen.
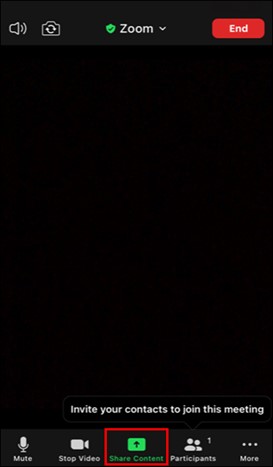
Tap Share Content
Step 3: Now, hit the More icon from the bottom menu and select the Record (for Android) or Record to the Cloud (for iOS) option to start recording the screen.
Note: To get the Record or Record to the Cloud option on your smartphone in Zoom, you need its premium account.
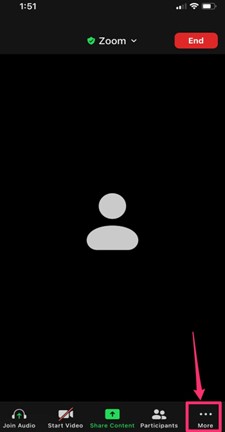
Tap More
Step 4: Go to the protected video you wish to record, and once you’re done, tap the Stop option in the Recording menu to stop the recording. After that, hit the End button at the top left to end the recording. You can access the recorded video in the My Recordings folder on Zoom’s official website.
1. What tools can I use to screen-record protected videos?
There are many screen recording tools available, such as OBS Studio, Camtasia, and ScreenFlow. However, not all of them may be able to record protected videos. You can try using a screen recording tool that allows you to capture audio and video from your computer screen, and see if it can record the protected video.
2. Is it legal to screen-record protected videos?
It depends on the circumstances. If you are screen recording a protected video for personal use, such as to watch later or to create a backup, it may be legal in some countries. However, if you are screen recording a protected video with the intention of distributing or selling it, it is likely illegal and may result in legal consequences.
3. Can I get in trouble for screen recording a protected video?
Yes, you can get in trouble for screen recording a protected video if it is illegal in your country or violates the terms of service of the website or platform where the video is hosted. You may face legal consequences, such as fines or even imprisonment, depending on the severity of the offense.
Videos on some websites, such as Netflix and Amazon Prime, cannot be recorded due to the protection. While screen recording those protected videos can be challenging due to DRM technology and copyright laws, there are still ways to do it. Using professional DRM screen recorders like FocuSee is worth trying. And we hope you know How to Screen Record Protected Videos after reading this article. Moreover, if you have any thoughts or experiences on screen recording protected videos, we encourage you to leave them in the comments. Also, feel free to share the article with others.
FocuSee
Can We Screen Record Protected Videos?
How to Record Protected Videos on Windows & Mac
How to Screen Record Protected Videos on Windows 10?
How to Screen Record Protected Videos on a Phone?
FAQs about How to Screen Record Protected Videos
Final Thought
60 seconds, let's create a better FocuSee together ✨
Join 1K+ innovators shaping 30+features✨ & claim your Gift! 🎁

Share your thoughts & earn a coupon instantly!
Warm reminder: This survey does not involve any of your private data.
Page 1 of 10

Coupon Code:
FSUS10
Note: Copy and use the promo code FSUS10 at checkout(valid within 24 hours)