Removing watermarks from graduation pictures has become a common desire for individuals who wish to showcase or cherish their special moments without the distraction of a watermark. Watermarks, typically added by the photographer or the organization responsible for capturing and distributing the images, serve as a means of protecting their copyright and ensuring proper attribution. While it is important to respect copyright laws and obtain proper authorization, individuals may seek graduation photo watermark removers for personal use.

Remove Watermark from Graduation Picture
This article aims to provide insights, senior picture watermark removers, and considerations for the topic of removing watermarks from graduation pictures, emphasizing the importance of respecting copyright and exploring legal alternatives when dealing with watermarked images.
Table of Contents: hide
Is It Legal to Remove Watermark from Graduation Picture?
Remove Watermark from Graduation Picture with AI
Is It Legal to Remove Watermark from Graduation Picture?
Watermarks are often used by photographers, studios, or educational institutions to protect their intellectual property rights and control the usage of their images. Removing a watermark without permission could be seen as an unauthorized alteration or unauthorized use of the copyrighted image.

Graduation Picture with Watermark
To ensure compliance with copyright laws and respect the rights of content creators, it is advisable to seek permission from the copyright holder before modifying or using watermarked images. This may involve contacting the photographer or the institution that owns the rights to the graduation picture and obtaining their explicit consent to remove the watermark.
Also Read: How to Remove Instagram Watermark >
Remove Watermark from Graduation Picture with AI
When it comes to removing watermarks from graduation pictures, using traditional image editing tools or graduation photo editors to manually remove them can be time-consuming. However, there is a more efficient solution available: AI Watermark Remover. This technology leverages the power of AI to quickly and effectively remove watermarks from images, making it particularly useful when dealing with a large number of pictures. In 2024, one popular Graduation Photo Watermark Remover you can try is Wipit, which offers a user-friendly interface and advanced AI algorithms for seamless watermark removal. Give Wipit a free try and see how it simplifies the process of removing watermarks from your graduation pictures.
Wipit Key Features
- Remove the watermark from graduation pictures with AI.
- Intellectually identify the border of the graduation picture watermark you want to remove.
- Preview the senior picture watermark removal effect.
- Upload to set a new watermark according to your needs.
Steps to Remove Watermark from Graduation Picture
Step 1. Free install Wipit and upload grad photos from your computer.

Upload Graduation Photo from Your Computer
Step 2. Select the AI Select Area option and frame to remove watermark from graduation picture.

Remove Watermark from Graduation Picture
Step 3. Click on the Preview button on the right panel. When you are satisfied with the output, click the green Export button to save your photo.

Preview the Senior Picture Watermark Removal Effect
Wipit only removes watermarks and elements from user-owned or authorized content. Users must avoid infringing on others’ intellectual property rights. Unauthorized use of copyrighted material is illegal, and Wipit and Gemoo strictly condemn such software usage..
Remove Watermark from Graduation Picture via Clone Tool
Removing watermarks or erasing stickers from a graduation picture or any other image online without proper authorization may infringe upon copyright laws or terms of use. However, suppose you have the necessary rights or permissions to modify the image. In that case, you can follow these general steps to attempt watermark removal using the online image editing tool’s clone tool – Photopea.

Remove Watermark from Graduation Picture Online
Photopea is a versatile and powerful online image editing tool that provides a comprehensive set of features similar to professional software like Photoshop. Accessible through a web browser, Photopea allows users to edit and manipulate images with ease, offering tools for retouching, compositing, and graphic design. With its intuitive interface and compatibility with various file formats, Photopea serves as a convenient and accessible option for both beginners and experienced users who seek to remove watermark from graduation pictures online.
Step 1. Open your web browser and go to the Photopea website. Click on Open from Computer to upload your graduation picture into Photopea. Alternatively, you can drag and drop the image directly into the Photopea workspace.

Upload a Photo to the Photopea Workspace
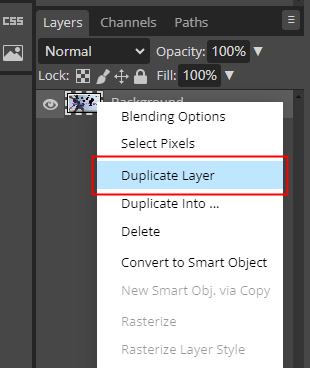
Step 2. In the Layers panel (usually located on the right side of the screen), right-click on the background layer and choose Duplicate Layer.

Choose the Duplicate Layer
Step 3. In the left toolbar, select the Clone Stamp Tool. It looks like a stamp icon. If you can’t find it, press the “S” key on your keyboard to activate it. Adjust the Clone Stamp settings: At the top of the screen, you’ll find the Clone Stamp Tool settings. Set the brush size according to the area you want to clone. You can adjust the size using the slider or manually input the desired size.

Locate the Clone Stamp Tool
Step 4. Hold the Alt key (Option key on Mac) and click on a nearby area that closely matches the background or texture you want to cover the watermark with. This samples the area for cloning. Release the Alt key and click and drag the Clone Stamp Tool over the watermark, covering it with the cloned pixels. Be careful to blend the cloned area smoothly with the surrounding pixels to make it look natural. If needed, sample from different areas to ensure a seamless blend.

Remove Watermark from Graduation Picture
Remove Watermark from Graduation Picture via Brush
PhotoDirector is widely regarded as one of the most professional and powerful editing tools available for desktop users. While it may be more complex compared to other software, its capabilities are unparalleled. Beginners may need to invest time in learning and watching tutorials to become proficient in using PhotoDirector. Once you grasp the concepts and techniques, you’ll find that no other tool can match its versatility and functionality.
When it comes to removing watermarks in PhotoDirector, there are multiple methods available. One commonly used technique is utilizing the “Clone Stamp Tool.” This tool allows you to clone a specific area of the image and use it to cover the watermark seamlessly.
Here is how to remove watermark with PhotoDirector:
Step 1. Launch PhotoDirector on your computer. Select “File” from the top menu and choose “Open” to import the graduation picture that contains the watermark into PhotoDirector. Alternatively, you can drag and drop the image directly into the PhotoDirector workspace.

Upload a Photo to PhotoDirector Workspace
Step 2. Layers panel (usually located on the right side of the screen), right-click on the image layer and select “Duplicate Layer.” This step ensures that you have a backup of the original image.
Step 3. Look for the retouching or removal tool in the toolbar, usually represented by an icon resembling a bandage or a brush. Click on it to activate the tool.

Locate the Retouching or Removal Tool
Step 4. Adjust the brush size, hardness, and opacity according to the size and complexity of the watermark. These settings can usually be found in the options bar or tool properties panel.

Adjust the Brush Size
Step 5. Carefully brush over the watermark using the retouch or removal tool. The tool will analyze the surrounding pixels and attempt to seamlessly remove the watermark as you paint over it. Make multiple passes if necessary and adjust the brush settings for better results.

Remove Watermark from Graduation Picture on PC
Zoom in and review the edited area. Use the eraser tool or refine the brush settings to fine-tune the removal and ensure a natural appearance. Pay attention to details and make any necessary adjustments.
Final Thought
Removing watermarks from graduation pictures requires careful consideration of copyright laws and ethical practices. While the desire to remove watermarks is understandable, it is crucial to respect the rights of photographers and copyright holders.
Seeking proper authorization or utilizing images with appropriate licensing is the best approach to ensure legal and ethical usage. It is important to remember that watermarks serve as a protective measure for the creators and distributors of the images, safeguarding their intellectual property and ensuring proper attribution. By understanding and adhering to copyright laws, individuals can find alternative ways to showcase or cherish their graduation pictures without infringing upon the rights of others.


