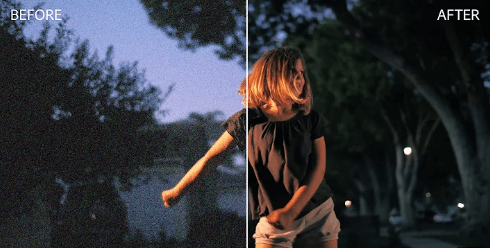
Grain or noise in video footage can be a frustrating issue that detracts from the overall quality and professionalism of your video projects. Whether caused by high ISO settings, low light conditions, or older camera equipment, grain can make your footage appear less polished and visually distracting. Fortunately, Adobe Premiere Pro, one of the popular video editing software, offers built-in tools to help you remove grain and achieve a cleaner, smoother look for your videos.

Remove Grain in Premiere Pro
In this guide, we’ll walk you through the steps to effectively remove grain from your video footage using Premiere Pro’s Denoiser effect. We’ll cover how to apply the effect, adjust its settings for optimal results, and fine-tune the grain reduction to strike a balance between noise removal and preserving important visual details. By following these techniques, you’ll be able to enhance the quality of your video projects and deliver professional-looking results, even if your original footage suffers from grain or noise issues.
Table of Contents: hide
What Causes Grain in Video Footage?
Will Removing Grain Affect Video Quality?
What Causes Grain in Video Footage?
Grain in video footage is typically caused by a combination of factors, including the camera’s sensor, the ISO setting, and the available light conditions. Here are some of the main causes of grain in video footage:
Remove Grain in Video Footage
- High ISO Setting: When shooting in low-light conditions, you may need to increase the camera’s ISO sensitivity to capture a properly exposed image. However, higher ISO settings amplify the electronic signal from the camera’s sensor, which can introduce noise and result in grainy footage.
- Small Sensor Size: Cameras with smaller sensors tend to produce more grain in low-light situations compared to cameras with larger sensors. This is because smaller sensors have smaller individual pixels, which capture less light and result in a higher signal-to-noise ratio.
- Insufficient Lighting: When shooting in dimly lit environments, the lack of adequate lighting forces the camera to amplify the available light, leading to increased noise and grain in the footage.
- Compression Artifacts: The algorithms of video compression, such as those used in formats like H.264 or H.265, can introduce compression artifacts that resemble grain. These artifacts are more visible in areas with low detail or high levels of noise.
- Post-Processing: Some video editing operations, such as applying excessive sharpening or noise reduction, can introduce or enhance grain in the footage. Additionally, compression settings during export or rendering can affect the final video quality and introduce grain.
- Older or Lower-Quality Cameras: Older or lower-quality cameras may have less advanced sensor technology, resulting in lower performance in low-light conditions and higher susceptibility to noise and grain.
Will Removing Grain Affect Video Quality?
Yes, removing grain from a video can affect video quality. While reducing grain can enhance the visual appearance of the footage, excessive noise reduction can lead to a loss of detail, softening of the image, and the introduction of artifacts. It’s important to find a balance between reducing grain and preserving important details while avoiding overprocessing which can result in an unnatural or plastic-like look. Additionally, aggressive noise reduction can impact the film or vintage aesthetic of the footage. Careful application of noise reduction techniques is necessary to maintain a high video quality and avoid unintended side effects.
How to Remove Grains in Video Premiere Pro?
To remove grains or noise from your video footage using Adobe Premiere Pro, you can follow these step-by-step instructions:
Remove Grains in Video Premiere Pro
Step 1. Import your video clip into your Premiere Pro project and drag the video clip onto your timeline.
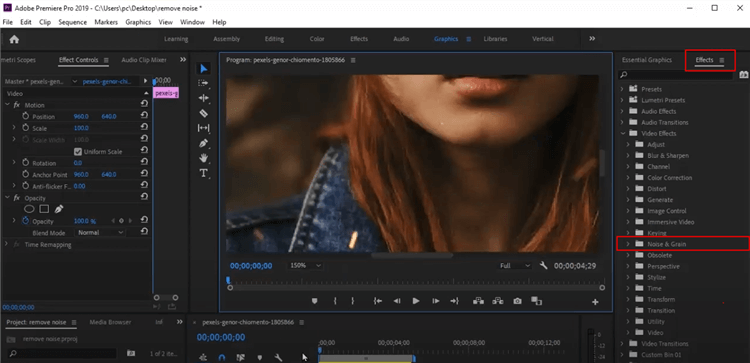
Step 2. In the Effects panel, search for “Denoiser” in the search bar. Under the “Video Effects” folder, locate the “Noise & Grain” subfolder and find the “Denoiser” effect. Drag and drop the Denoiser effect onto your video clip in the timeline.
Step 3. With your video clip selected, go to the Effect Controls panel. Under the Denoiser effect, you’ll find various settings to adjust the grain reduction. If your footage has color noise, increase the “Reduce Color Noise” value to minimize it.
Play back your video in the Program Monitor to see the effect of the Denoiser. Once you’re satisfied with the grain reduction, go to “File” > “Export” > “Media” to export your denoised video.
Further Reading: How to Remove Adobe Firefly Watermark >
How to Prevent Grain from Appearing in My Videos?
By implementing the following techniques and best practices, you can significantly reduce the appearance of grain in your videos and improve overall video quality.

Prevent Grain from Appearing in My Videos
- Use Sufficient Lighting: Whenever possible, try to shoot in well-lit environments to avoid underexposure and the need for high ISO settings.
- Lower the ISO: Use the lowest ISO setting that allows you to achieve a properly exposed image. Keep in mind that lowering the ISO may require additional lighting or a wider aperture.
- Upgrade to a Camera with a Larger Sensor: If you frequently shoot in low-light conditions and grain is a significant concern, consider upgrading to a camera with a larger sensor size, as they generally offer better low-light performance.
- Shoot in RAW Format: If your camera supports it, shooting in RAW format preserves more image data and provides greater flexibility for noise reduction and post-processing.
- Avoid Excessive Post-Processing: When editing your footage, be cautious with sharpening or noise reduction filters, as they can exacerbate grain. Use these tools judiciously and preview the results to maintain a natural-looking image.
Final Thought
In conclusion, removing grain from your video footage using Adobe Premiere Pro’s Denoiser effect is a straightforward process that can significantly enhance the visual quality of your projects. Following the step-by-step guide outlined in this article, you can effectively reduce noise and achieve a cleaner, more professional look for your videos.