When it comes to digital images, chroma noise can be a common challenge that photographers and image editors face. Chroma noise, also known as color noise, appears as random variations or specks of unwanted color in the image, affecting the accuracy and clarity of color representation. Understanding and exploring chroma noise is crucial for effectively addressing and minimizing its impact on image quality. By delving into the causes, effects, and reduction techniques related to chroma noise, photographers and image enthusiasts can gain valuable insights and skills to enhance the overall visual appeal and fidelity of their digital images.

Chroma Noise

What Is Chroma Noise
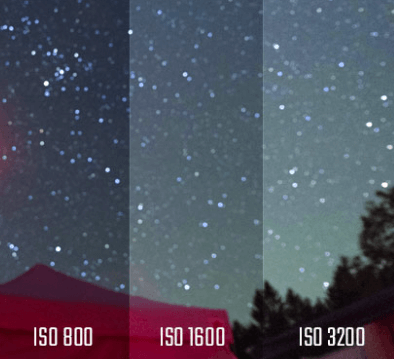
Chroma noise, also known as color noise, is an undesirable artifact that appears as random variations or specks of color in digital images or videos. It affects the color channels, such as red, green, and blue, and can result in color distortions, color speckles, or color blotches. Chroma noise is caused by factors like high ISO settings, low light conditions, sensor limitations, compression artifacts, or signal interference. It can degrade image quality and is commonly addressed through denoising techniques to reduce or eliminate unwanted color variations, resulting in cleaner and more accurate color representation in the final visual content.
Luma noise and chroma noise are two different types of noise that can occur in digital images or videos.
Differences between Luma and Chroma Noise
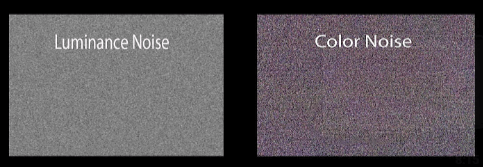
🔦 Luma noise: Luma noise, also known as luminance noise or grayscale noise, refers to the noise or unwanted variations in the brightness or luminance component of an image. It affects the overall brightness or lightness of the image and is typically seen as random variations in the shades of gray. Luma noise can result from various factors such as high ISO settings, low light conditions, or sensor limitations.
🎨 Chroma noise: Chroma noise, on the other hand, refers to the noise or unwanted variations in the color or chrominance components of an image. It specifically affects the color information, such as the red, green, and blue channels. Chroma noise is often characterized by random color specks, color shifts, or color blotches in the image. It can be caused by factors like sensor noise, compression artifacts, or signal interference.
In summary, the main difference between luma noise and chroma noise is the aspect of the image they affect. Luma noise affects the brightness or grayscale information, while chroma noise affects the color components of an image. Both types of noise can degrade image quality and are commonly addressed using denoising techniques in image processing or video editing software.
Chromatic noise, also known as chroma noise or color noise, can be caused by several factors in digital images or videos. Here are some common causes:
What Causes Chromatic Noise
It’s important to note that different factors can contribute to chromatic noise, and often, a combination of these factors can be present in an image or video. Understanding the causes of chromatic noise can help photographers and videographers employ appropriate techniques and tools for noise reduction and improve the overall image quality.
Chroma noise reduction refers to reducing or eliminating unwanted variations or specks of color. This involves applying specific algorithms or techniques to analyze the color channels and selectively reduce the noise while preserving the overall image quality. By reducing chroma noise, the resulting images or videos appear cleaner, more visually pleasing, and closer to the original intended colors, enhancing overall image quality and fidelity.
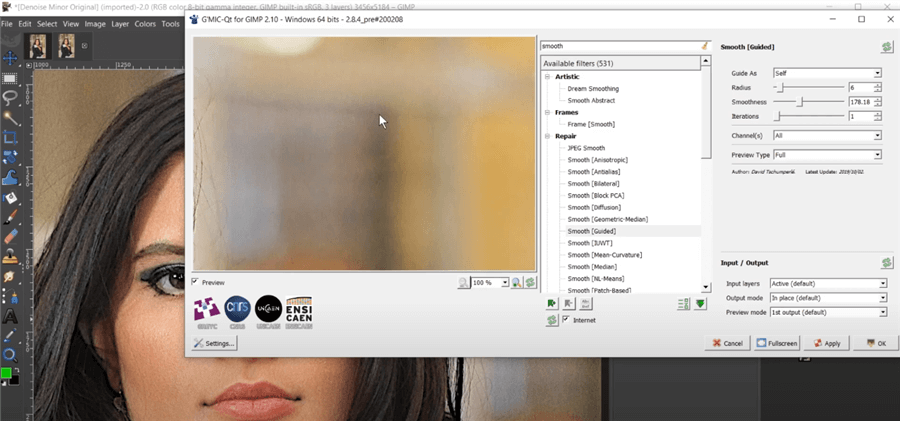
To reduce chroma noise in digital images, you can use GIMP, which offers a built-in noise reduction feature. Its filters like Despeckle, Gaussian Blur, and Selective Gaussian Blur can effectively reduce chroma noise while preserving image details. Besides, GIMP allows you to adjust parameters within the noise reduction filters, providing control over the strength and sensitivity of the noise reduction. This flexibility enables fine-tuning to achieve the desired balance between noise reduction and preserving image details.
How to Reduce Chroma Noise
Step 1. Launch GIMP and open the image you want to reduce chroma noise.
Step 2. Go to Filters -> Enhance -> Despeckle. This filter helps reduce both luminance noise and chroma noise in the image.
Step 3. Also, GIMP provides a dialog box with options for the Despeckle filter. You can adjust the “Radius” and “Threshold” parameters to control the strength and sensitivity of the noise reduction. Preview the changes in real-time to ensure the desired effect.
Step 4. Once you’ve adjusted the settings to your preference, click “OK” to apply the noise reduction filter to the image.
If you find that the noise reduction has affected image details or colors, you can use layer masks, brushes, or other editing tools in GIMP to selectively apply noise reduction to specific areas. This allows you to preserve important details while reducing noise in less critical areas.
Exploring chroma noise in digital images reveals the importance of understanding its causes, effects, and reduction techniques. By recognizing the factors that contribute to chroma noise, such as high ISO settings, compression artifacts, or sensor limitations, photographers and image editors can employ appropriate strategies to minimize its presence. Implementing noise reduction tools, selective editing techniques, and utilizing software like GIMP can significantly enhance the overall image quality by reducing chroma noise while preserving important details and accurate color representation. By continually exploring and refining our knowledge of chroma noise, we can consistently produce visually captivating and high-quality digital images that truly showcase the intended colors and aesthetics.

FocuSee
What Is Chroma Noise?
What Is the Difference between Luma and Chroma Noise?
What Causes Chromatic Noise?
How to Reduce Chroma Noise?
Final Thought