In today’s fast-paced world, online meetings have skyrocketed in popularity, offering a time-saving and efficient solution for connecting individuals across the globe. These virtual gatherings offer unmatched convenience, flexibility, and cost-effectiveness, allowing teams to collaborate seamlessly despite geographical barriers. However, the question arises: what if you need to involve absent participants in the discussions? The solution lies in recording your online meetings.

How to Record Online Meeting
By capturing these sessions, you can save valuable insights and important discussions for future reference or to share with those unable to attend. In this article, we’ll explore the ins and outs of how to easily and swiftly record online meetings. From essential tools and best practices to navigating potential challenges, you’ll learn everything you need to ensure smooth and successful recording experiences, enhancing collaboration and productivity in virtual interactions. So, let’s delve into the world of recording online meetings and harnessing their full potential.
Table of Contents: hide
Why Do You Want to Record an Online Meeting?
Record Online Meeting with Gemoo Recorder?
Why Do You Want to Record an Online Meeting?
Recording an online meeting serves several important purposes. Firstly, it allows participants to revisit and review the content discussed during the meeting. It can be particularly useful for complex or technical discussions, ensuring no crucial information is missed and facilitating better understanding. Secondly, recording meetings can aid in documentation and record-keeping. It provides an accurate and detailed account of decisions, action items assigned, and any commitments made during the meeting, which can be referred to later for accountability and follow-up.
Moreover, recorded meetings can be shared with absent team members or stakeholders who could not attend the live session, enabling them to stay informed and up-to-date with project developments. Lastly, recording meetings can be beneficial for training purposes, allowing organizations to create valuable resources for onboarding new employees or for ongoing professional development. However, it is essential to respect privacy and seek consent from all participants before recording any meeting to maintain trust and comply with data protection regulations.
Record Online Meeting with Gemoo Recorder?
Gemoo Recorder is the ultimate solution for recording online meetings, providing many exceptional features that elevate your recording experience. This remarkable tool seamlessly captures your screen, webcam, and microphone, empowering you to deliver impactful presentations easily. Gemoo’s user-friendly interface ensures effortless operation, enabling you to express yourself and convey ideas effectively.
With Gemoo’s advanced capabilities, you can conveniently store and organize recorded videos within the platform, streamlining your workflow and saving precious time. Its array of editing options allows you to refine your recordings, ensuring clarity and professionalism in your messages. Whether a complex discussion or a crucial presentation, Gemoo Recorder equips you with the tools to create compelling content effortlessly.
Key Features of Gemoo Recorder
- Effortlessly record screen, webcam, and microphone with Gemoo Recorder for comprehensive video presentations.
- Store, organize, and access recorded videos easily within the Gemoo platform.
- One-click sharing for seamless collaboration with others.
- Capture on-screen activities, webcam footage, or both simultaneously.
- Enhance videos with shapes, texts, memes, and annotations for clarity and impactful communication.
Step 1: Sign in using your account credentials after downloading and launching Gemoo Recorder on your Mac.
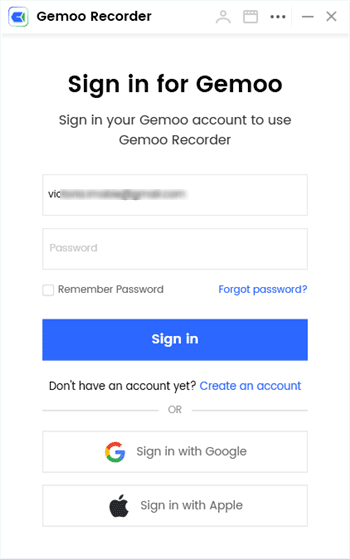
Sign in to Gemoo
Step 2: Opt for the “Screen & Camera” recording mode to capture your FaceTime calls.
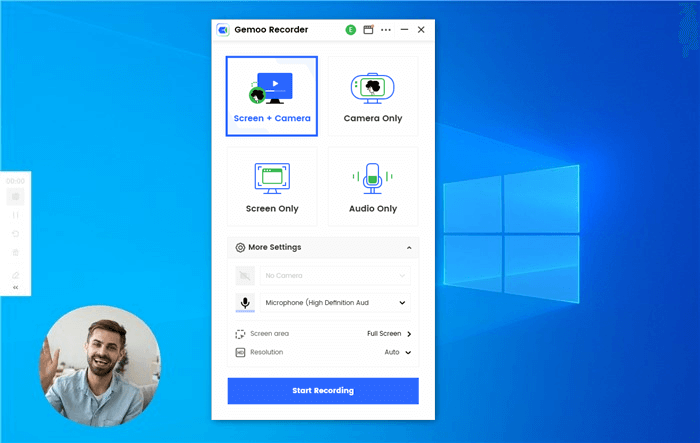
Select Screen & Camera Recording Mode
Step 3: Choose your preferred mode and initiate the recording by clicking the “Start Recording” button.
Step 4: Get ready during the 3-second countdown, and the recording will begin.
Step 5: Click either the red “Stop” or “Finish Recording” button to end the recording process.
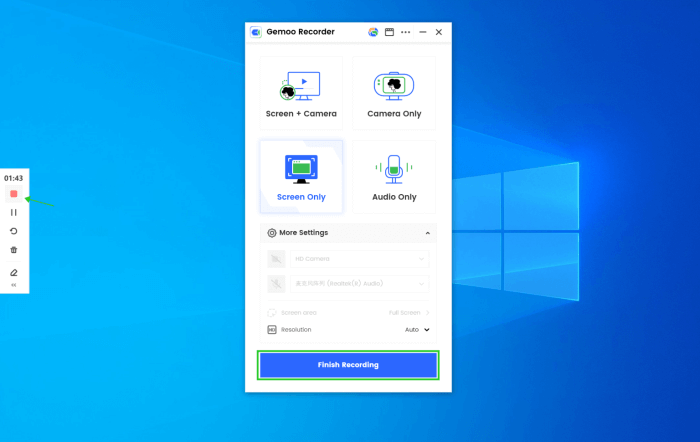
Finish Screen Recording
Capture Online Conference Using Xbox Game Bar
Originally designed as a game recorder for Windows users to capture gameplay on their computers, Xbox Game Bar is a built-in feature in Windows 10/11. Over time, it has evolved to support recording various activities beyond gaming. For instance, users can now conveniently clip the last 15 minutes of their PC activities. However, the tool has limitations, as it cannot adjust the recording area and is restricted to recording videos for up to 4 hours. Despite these restrictions, Xbox Game Bar remains a handy option for quick and straightforward screen recordings on Windows systems.
Step 1: First, open Windows settings and navigate to the Gaming section by clicking “Gaming” and then selecting “Game Mode.”
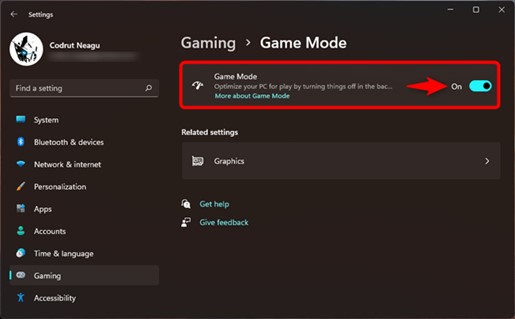
Click Game Mode
Step 2: Before starting the online meeting, close unnecessary windows or other audio sources to avoid capturing unwanted content.
Step 3: To access the recording options, simultaneously press the Win + G keys to open the Game Bar with various widgets displayed in the top navigation.
Step 4: Click on the Capture icon within the Game Bar to switch to the Capture widget. Then, select the camera icon to begin recording your online meeting. If desired, you can also record your microphone audio alongside the meeting.
Click Capture icon
Step 5: To end the recording, click the stop button in the recording bar or press Win + ALT + R keys.
Record Online Meeting via OBS
You can also record your online meeting via OBS. It is a versatile, free screen recording utility compatible with Windows, Mac, and Linux operating systems. Its remarkable capabilities extend beyond traditional screen recording, making it an ideal tool for various purposes.
One of OBS’s standout features is its effectiveness as a meeting recording software. With OBS, users can effortlessly record online meetings on platforms like Zoom, Google Meet, Webex Teams, and more without explicit permission. This functionality ensures that important discussions and presentations can be preserved for future reference or sharing with absent attendees. The customizable settings of OBS make it accessible to both novices and experienced users. It boasts an array of recording and streaming options, allowing for flexible configuration based on individual preferences and requirements.
Step 1: Launch OBS on your computer.
Step 2: Configure recording format at File > Settings > Output > Recording Format. Select your desired format, and click OK.
Step 3: Create a new scene by clicking the “+” icon. Add Audio Input Capture, Output Capture, and Browser.
Step 4: Add Video Capture Device to sources for the webcam feed.
Step 5: Start recording the meeting by clicking “Start Recording. Click “Stop Recording” when finished.
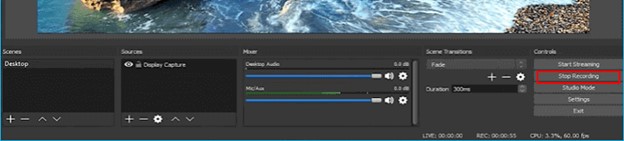
Click Stop Recording
FAQs about Record Online Meeting
1. Is it free to record an online meeting?
Yes, the methods and tools described in the article are completely free of charge. They utilize built-in features of popular online meeting platforms or free third-party software to record your meetings without additional cost.
2. What formats are the recorded meetings saved in?
The format of the recorded meetings depends on the method or software used. Some online meeting platforms may save recordings in proprietary formats, while third-party software might offer options to save in common formats like MP4, AVI, or MOV.
3. Is it possible to record an online meeting without obtaining permission?
If you have a legitimate reason to record the meeting, seeking explicit consent from all attendees beforehand is best. There are screen recording tools available that can record online meetings, but using them without permission may violate privacy laws and professional ethics.
Final Thought
In conclusion, the information provided allows recording online meetings to be easily accomplished on any software. Utilizing the guidelines outlined in the post, you’ll be well-equipped to record online meetings seamlessly. Remember to double-check the software’s recording settings, ensure sufficient storage space, and review any specific features the platform offers to optimize your recording experience. Considering these options, you can confidently preserve important discussions and valuable insights from your online meetings. Furthermore, share your thoughts in the comments section below!