Hey there, video maestro! You know what they say: a picture’s worth a thousand words, but a blurry video? Well, it’s a headache waiting to happen. Whether you’re a seasoned director or a budding content creator, nailing that perfect focus is key to cinematic success. But don’t fret, even the pros hit a soft spot now and then. The good news is, that there are tricks up our sleeves to dodge the blur and sharpen up those frames.
In this guide, we’ll tackle the causes, share some slick prevention tips, and show you how to finesse those out-of-focus clips with pro editing software. Let’s get those pixels in check!
What is an Out-of-Focus Video?
Out-of-focus video is a common issue that plagues many videographers and filmmakers. By definition, an out-of-focus video is one where the picture appears unclear and lacks distinct focus points. This can be frustrating for both the creator and the viewer, as it detracts from the overall quality and impact of the video content.
What Can Cause A Video to Be Out of Focus?
There are several reasons why a video may end up out of focus. Some of the most common causes include:
- Wrong AF Mode on Camera: If the autofocus mode on your camera is set incorrectly, it can lead to focusing issues.
- Dirty AF Sensors: Over time, the autofocus sensors on your camera can accumulate dirt and debris, affecting their performance.
- Dirty Lens Contacts: Similar to AF sensors, if the contacts on your lens are dirty, it can cause communication problems between the lens and the camera body.
- Lens Calibration Issues: If your lens is not properly calibrated, it may not focus accurately, resulting in out-of-focus footage.
- Tough Subject Matter or Incorrect Sensor Choice: Certain subjects, such as fast-moving objects or low-contrast scenes, can be challenging for your camera’s autofocus system. Additionally, using the wrong sensor for a given situation can lead to focusing problems.
2 Methods to Fix Out-of-Focus Video
While prevention is always the best approach, there are times when you may need to fix an out-of-focus video in post-production. Here are 2 popular methods using industry-standard software:
How to Fix Out-of-Focus Video in Premiere Pro
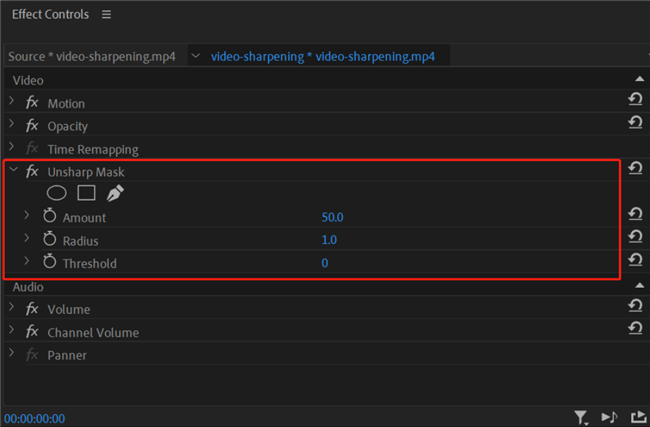
Adobe Premiere Pro is a powerful video editing software that offers a range of tools for fixing out-of-focus footage. One of the most effective methods is using the Unsharp Mask (USM) effect for sharpening. The USM effect has three adjustable parameters: Amount, Radius, and Threshold.
Steps to fix out-of-focus video in Premiere Pro:
Step 1. Create a new project and import the out-of-focus video.
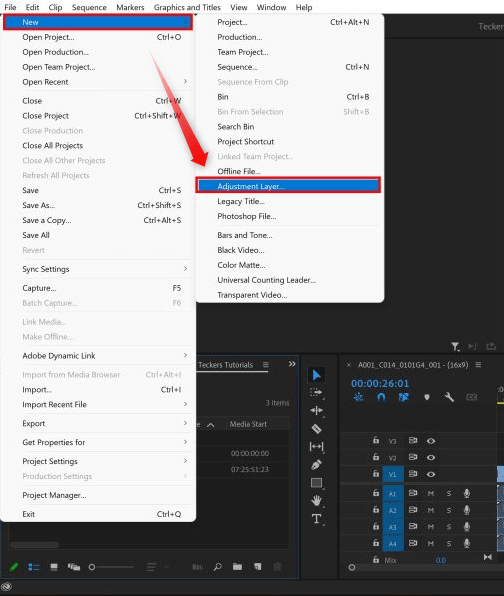
Step 2. Add an adjustment layer above the video clip.

Add an Adjustment Layer
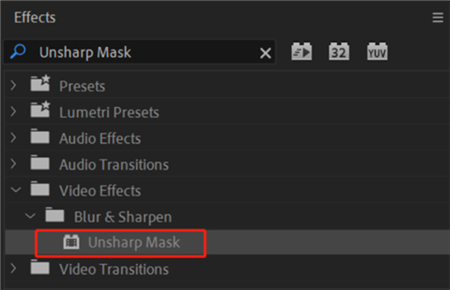
Step 3. Apply the Unsharp Mask effect to the adjustment layer.

Apply the Unsharp Mask Effect
Step 4. Adjust the Amount, Radius, and Threshold parameters until you achieve the desired level of sharpness.

Adjust the Effect Settings
Step 5. Render and export the video.
How to Fix Out-of-Focus Video in DaVinci Resolve
DaVinci Resolve is another popular video editing and color-grading software that offers a range of tools for fixing out-of-focus footage. In addition to standard sharpening tools, DaVinci Resolve also features facial detail enhancement for shots where the subject’s face is the main focus.
To fix out-of-focus video in DaVinci Resolve:
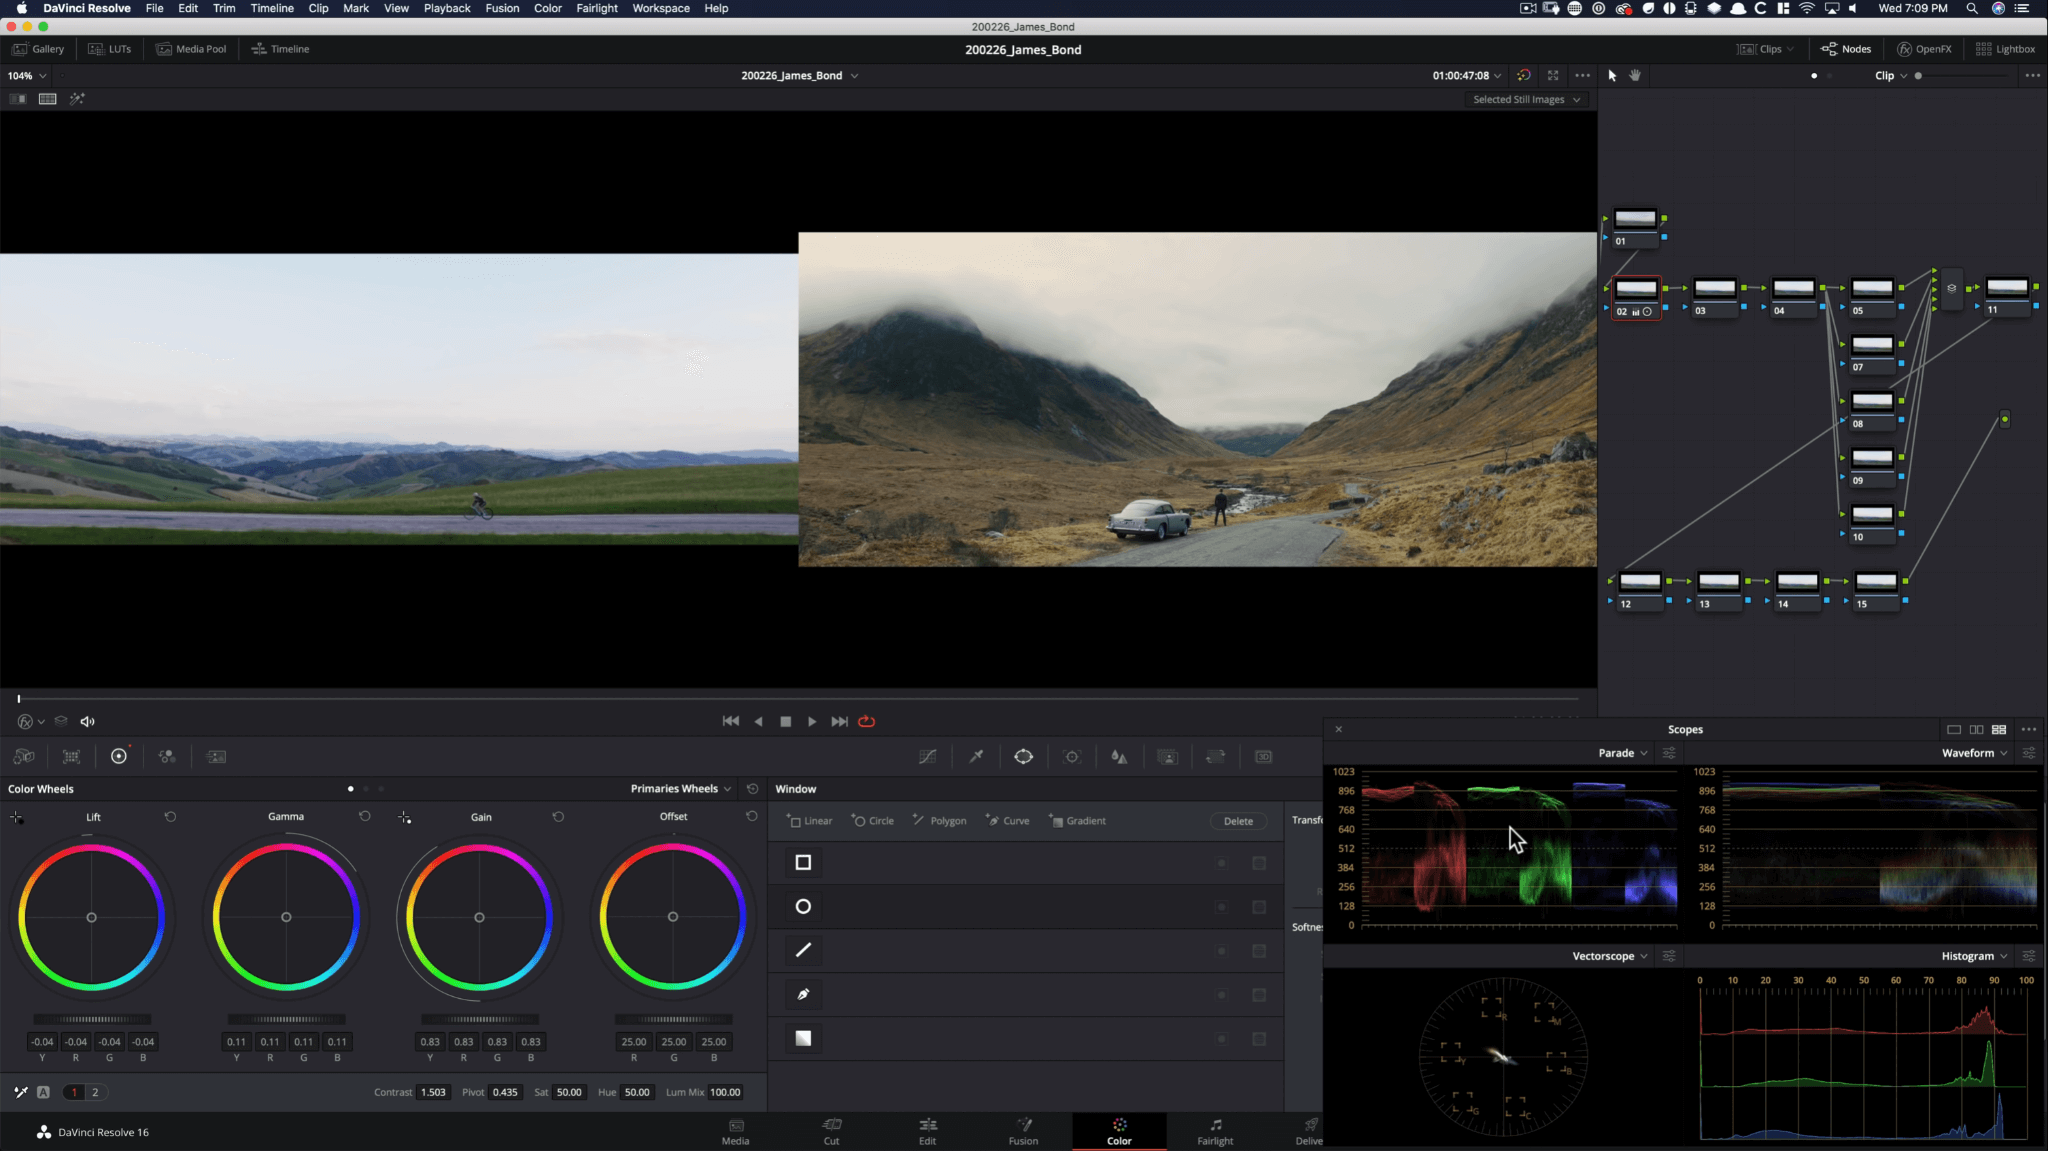
Step 1. Use a circular power window to isolate the area that needs sharpening.

How to Fix Out-of-Focus Video in DaVinci Resolve
Step 2. Adjust the Radius, H/V Ratio, and Scaling parameters to fine-tune the sharpening effect.
Step 3. If working with a facial shot, use the facial detail enhancement tool to bring out more clarity in the subject’s features.
How to Prevent Your Video from Going Out of Focus
While post-production fixes can be effective, it’s always best to aim for properly focused footage during the filming process. Here are some tips to help prevent out-of-focus video:
- Use proper camera settings: Ensure that your camera’s autofocus mode is set correctly for the given situation.
- Manual focus: In challenging focusing situations, switch to manual focus for more precise control.
- Focus peaking and zebras: Many cameras offer focus peaking and zebra patterns to help you achieve accurate focus.
- Adequate lighting: Good lighting can make it easier for your camera to achieve and maintain focus.
- Stable camera support: Using a tripod, gimbal, or other stabilizing device can help minimize camera shake and maintain focus.
The Focus Finale
So, there you have it—out-of-focus video, the enemy of epic storytelling, can be outsmarted. By knowing what causes the blur and applying our prevention pointers, you can dodge the fuzz. And if the blur strikes, Adobe Premiere Pro and DaVinci Resolve are your post-production knights. With the right know-how, you can rescue even the blurriest of scenes.
Remember, while post-production can work wonders, there’s no substitute for nailing the focus from the start. Master your camera’s focus settings, resort to manual focus when needed, and ensure you’ve got the lighting and stability to match. With these in your arsenal, you’re on the path to producing video content that’s sharp, slick, and utterly captivating.
FAQs on Out-of-focus Video Fix
Can I fix an out-of-focus video on my smartphone?
While some smartphone editing apps offer basic sharpening tools, they may not be as effective as desktop software like Adobe Premiere Pro or DaVinci Resolve for fixing out-of-focus footage.
Is it better to use autofocus or manual focus?
It depends on the situation. Autofocus is generally reliable in most cases, but manual focus can be more precise in challenging focusing scenarios or when you need to maintain focus on a specific subject.
How can I tell if my camera’s autofocus sensors are dirty?
If you notice that your camera is consistently struggling to achieve focus, even in well-lit situations, it may be a sign that your autofocus sensors need cleaning. Consult your camera’s manual for instructions on how to clean the sensors safely.
Can I fix an out-of-focus video without using an adjustment layer in Premiere Pro?
Yes, you can apply the Unsharp Mask effect directly to the video clip. However, using an adjustment layer allows you to make changes without altering the original footage, providing more flexibility in your editing process.
What if I can’t fix my out-of-focus video in post-production?
In some cases, an out-of-focus video may be too blurry to salvage. If post-production fixes don’t yield satisfactory results, consider reshooting the footage if possible, or explore creative workarounds, such as using the blurry footage as a stylistic effect or incorporating it into a montage sequence.


