Video quality plays a crucial role in creating engaging and professional-looking content. However, noisy videos can detract from the overall viewing experience, making it difficult for viewers to focus on the content itself. Common issues with noisy videos include grainy or pixelated footage, color distortions, and reduced clarity.
To address these concerns, this article provides a comprehensive guide on how to remove video noise. It covers a range of methods, from utilizing conventional video editing software to employing advanced AI video enhancers. By following the techniques outlined here, you can significantly improve the quality of your videos and create a more enjoyable viewing experience for your audience.

How to Denoise Video
What is Video Noise?
Video noise refers to the unwanted random variations in brightness or color information in a video signal. There are several types of video noise:
- Gaussian noise: Evenly distributed across the image, removing grain or snow.
- Shot noise: Caused by the random nature of light and appears as pixel-level fluctuations.
- Speckle noise: Multiplicative noise that appears as small, isolated dots in the image.
Video noise can be caused by various factors, including:
- Low light conditions: When shooting in low light, cameras often struggle to capture enough information, resulting in noisy footage.
- High ISO settings: Using high ISO settings to compensate for low light can introduce noise into the video.
- Sensor limitations: Smaller camera sensors are more prone to noise due to their limited light-gathering capacity.
The presence of video noise can significantly impact the overall quality of the footage, making it appear unprofessional and distracting viewers from the content.
What are the Benefits of Denoising Videos?
Denoising videos offers several benefits, including:
- Improved visual quality: By reducing or eliminating noise, denoising techniques can enhance the clarity and sharpness of the video.
- Enhanced viewer engagement: Cleaner, noise-free videos are more visually appealing and help keep viewers engaged with the content.
- Increased compression efficiency: Denoised videos require less data to store and transmit, making them more efficient for streaming and sharing.
- Better post-production flexibility: Denoised footage is easier to work with in post-production, allowing for more creative control and better results when applying effects or color grading.
How to Denoise Video via Adobe Premiere Pro
To effectively reduce noise in your videos using Adobe Premiere Pro, you can take advantage of its integrated denoising tools. One such tool is the Median effect, which can be used to achieve optimal noise reduction. To denoise a video in Premiere Pro, follow these steps:
Step 1. Import and Prepare Your Video
Import your video into Premiere Pro using “File > Import” or the keyboard shortcut (Ctrl + I for Windows, Cmd + I for MacOS). Create a new sequence by dragging your video onto the timeline.
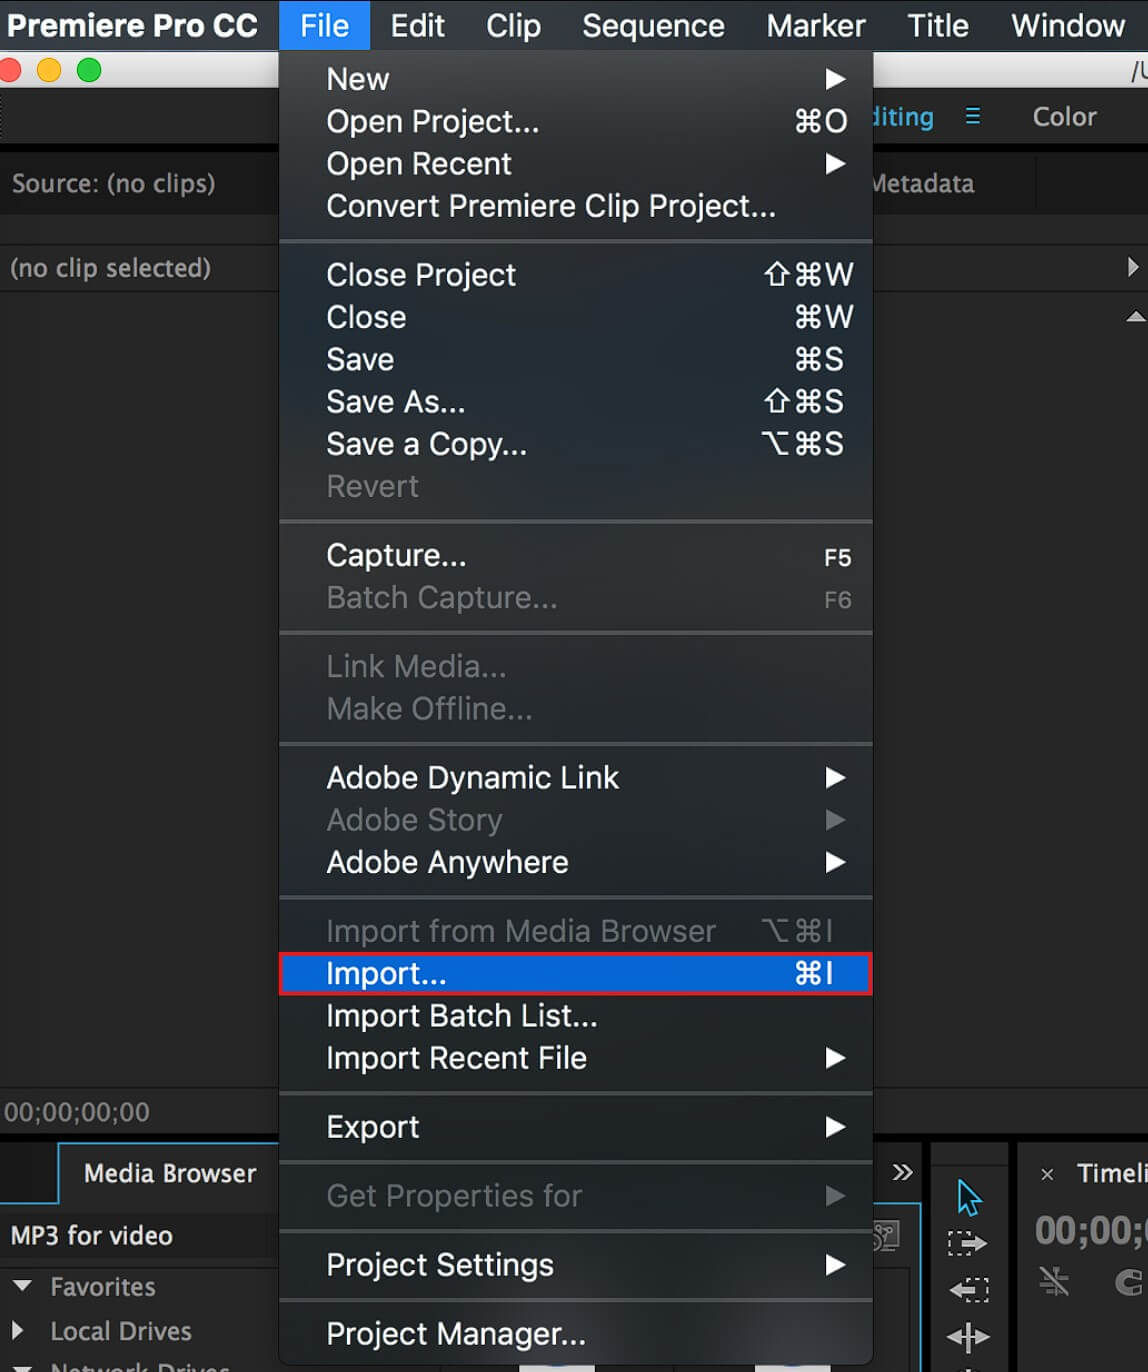
Import Your Noisy Video
Step 2. Apply the Median Effect
In the Effects panel, search for “Median” under “Video Effects > Noise & Grain.” Drag the Median effect onto your video clip in the timeline.
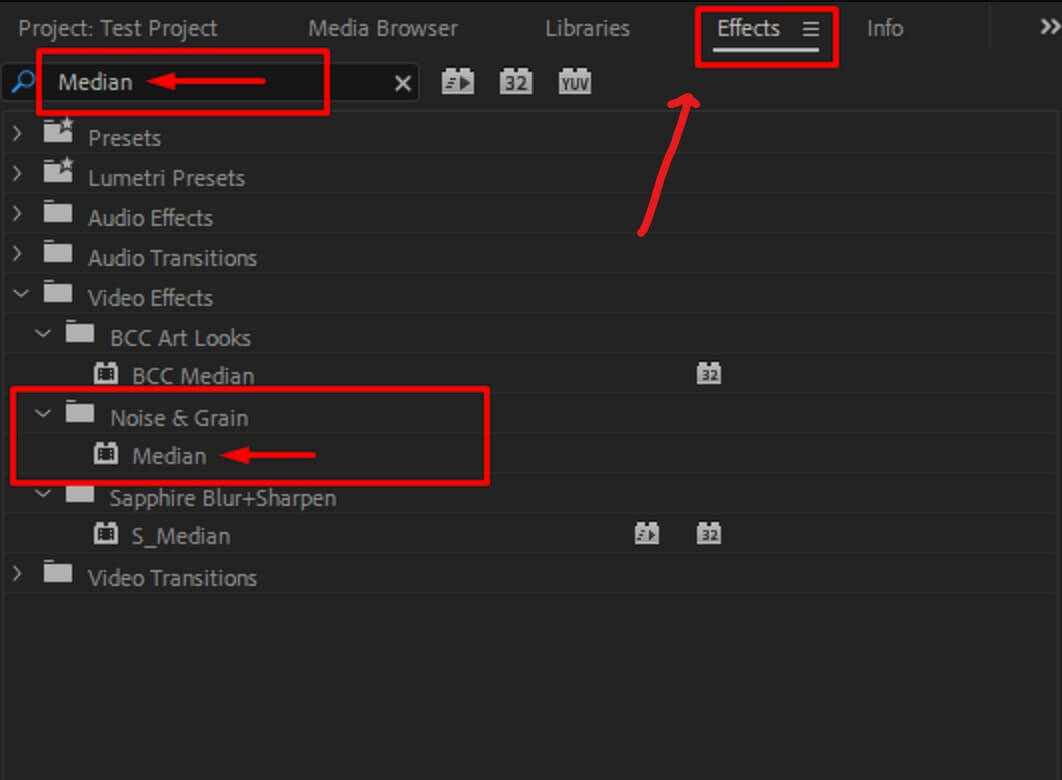
Apply the Median Effect
Step 3. Adjust Median Settings
In the Effects Control panel, find the Median effect and expand its settings. Start adjusting the “Radius” setting from its default of 0. Increase the value to reduce noise, but be cautious of over-blurring the image.
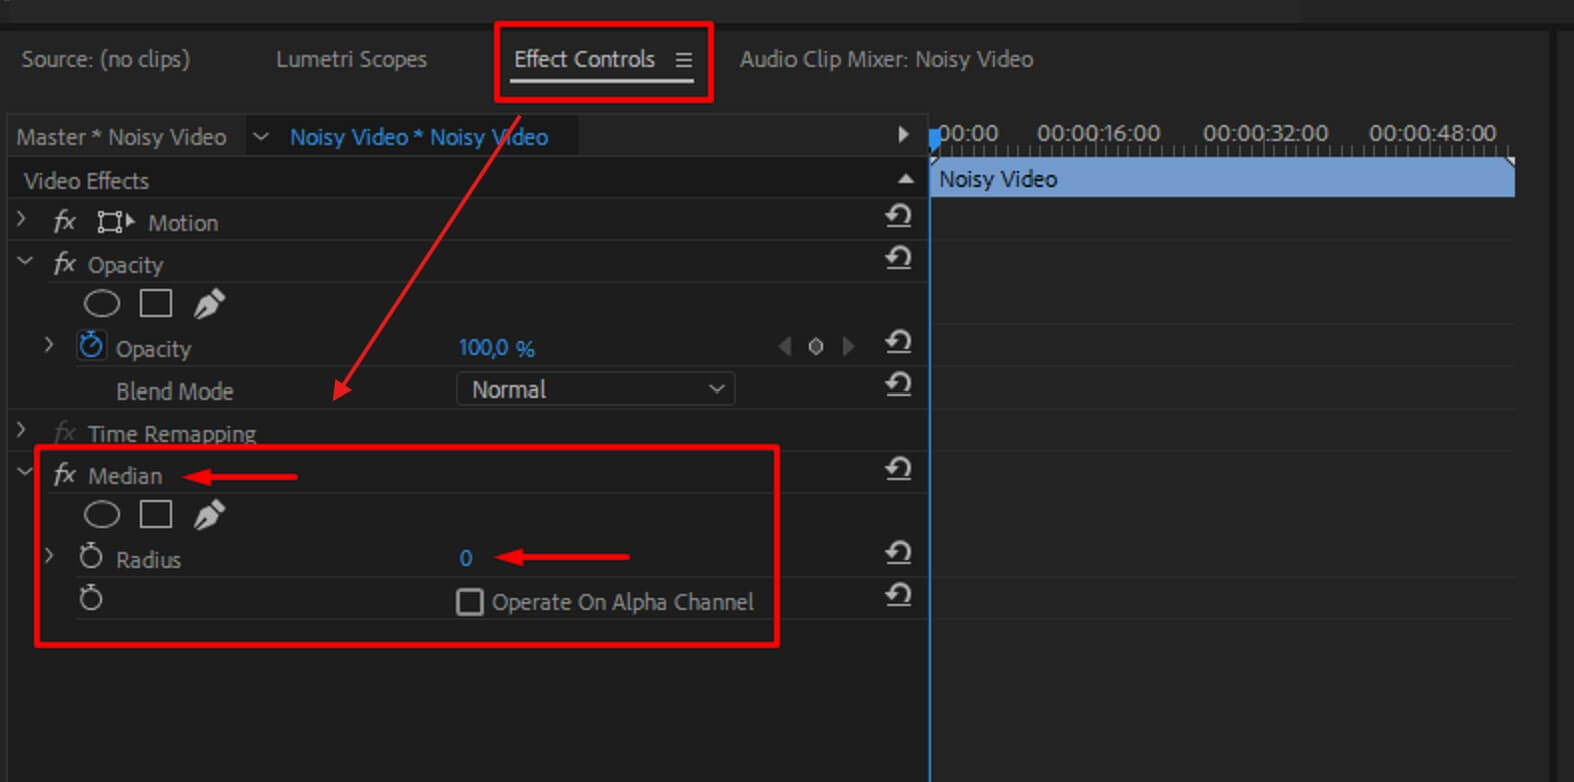
Adjust Median Settings
Step 4: Use Masks for Targeted Noise Reduction
If necessary, apply masks to target specific noisy areas without affecting the entire clip. Use the Pen tool to draw masks or select a pre-defined mask shape.
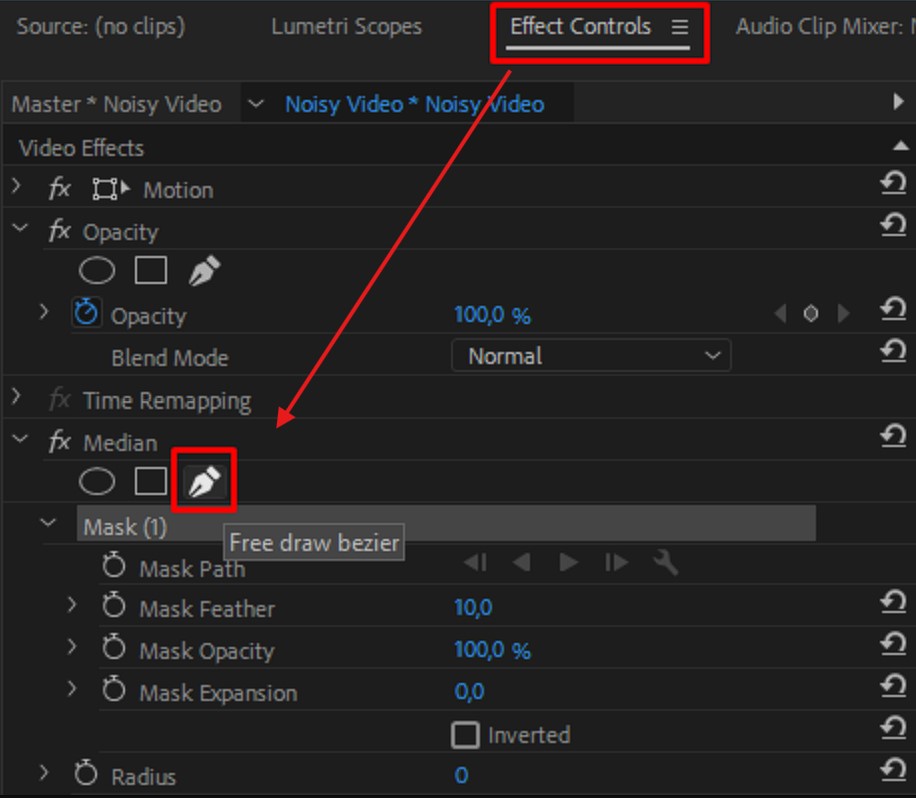
Use the Pen Tool to Draw Masks
Adjust the “Feather” setting to blend the mask edges naturally and increase the “Radius” to find a balance between noise reduction and detail preservation.
How to Denoise Video via Final Cut Pro
Final Cut Pro includes a powerful denoising tool called “Noise Reduction.” To use it:
- Select the noisy clip in your timeline.
- Go to the “Effects” browser and search for “Noise Reduction.”
- Drag the “Noise Reduction” effect onto the selected clip.
- Adjust the “Amount” and “Preserve Details” settings to balance noise reduction and detail retention.
How to Denoise Video via DaVinci Resolve
DaVinci Resolve Studio offers advanced denoising capabilities through its “Temporal Noise Reduction” and “Spatial Noise Reduction” tools. Here’s how to use them:
- Select the noisy clip in your timeline.
- Go to the “Color” page and open the “Motion Effects” panel.
- Under “Noise Reduction,” adjust the “Temporal Threshold” and “Spatial Threshold” settings to remove noise while preserving details.
- Fine-tune the “Luma” and “Chroma” settings for more targeted noise reduction.
How to Denoise Video via Topaz DeNoise AI
Topaz DeNoise AI is a dedicated denoising software that uses artificial intelligence to effectively remove noise from videos. To use Topaz DeNoise AI:
- Open the noisy video in the software.
- Select the appropriate denoising model based on the type and level of noise in your video.
- Adjust the “Noise Reduction” and “Sharpening” settings to achieve the desired balance between noise removal and detail preservation.
- Process the video and export the denoised result.
Comparison of Software-Based Denoising Methods
Each software-based denoising method has its strengths and weaknesses:
Adobe Premiere Pro and Final Cut Pro offer convenient built-in denoising tools that are easy to use and integrate well with the editing workflow.
DaVinci Resolve Studio provides advanced denoising controls and excellent results, but may require more technical knowledge to use effectively.
Topaz DeNoise AI uses AI algorithms to deliver impressive denoising results, but requires exporting and reimporting the footage, which can be time-consuming.
Ultimately, the choice of denoising method depends on the user’s specific needs, workflow, and the type and severity of noise in the video.
Hardware-Based Denoising Solutions
In addition to software-based methods, hardware solutions can also help reduce video noise:
- In-camera denoising settings: Many modern cameras offer built-in noise reduction settings that can be adjusted to minimize noise during recording.
- External denoising hardware: Dedicated hardware devices, such as the Blackmagic Design Teranex Mini Noise Reduction and the AJA FS-HDR Real-Time HDR/WCG Converter, can provide real-time noise reduction processing.
Hardware-based denoising solutions offer the advantage of real-time processing and can be beneficial for live productions or situations where immediate results are required. However, they can be more expensive than software-based methods and may offer less flexibility and control over the denoising process.
Conclusion
Denoising video is an essential step in creating high-quality, professional-looking content. By understanding the types and causes of video noise, as well as the various denoising techniques available, content creators can effectively minimize noise and improve the overall visual appeal of their videos.
Experimenting with different denoising methods and finding the right balance between noise reduction and detail preservation is crucial for achieving the best results. As video technology continues to evolve, future developments in denoising algorithms and hardware will likely lead to even more effective and efficient ways to minimize video noise.
FAQs about Video Denoising
Preprocessing Techniques for Denoising
Before applying specific denoising methods, several preprocessing techniques can help minimize noise and improve overall video quality:
- Adjusting exposure and white balance: Ensuring proper exposure and white balance during shooting can help reduce noise and maintain accurate colors.
- Stabilizing shaky footage: Shaky footage can exacerbate the appearance of noise. Stabilizing the video can help minimize this effect.
- Cropping and resizing: Cropping out noisy areas or resizing the video can help reduce the visibility of noise.
- Color grading: Careful color grading can help mask noise and create a more cohesive look for the video.
What is the best denoising software for video?
The best denoising software depends on your specific needs and workflow. Adobe Premiere Pro, Final Cut Pro, and DaVinci Resolve offer built-in denoising tools, while dedicated software like Topaz DeNoise AI can provide advanced denoising capabilities.
Can denoising remove all noise from a video?
While denoising techniques can significantly reduce noise, completely removing all noise may not be possible without compromising image quality. The goal is to find a balance between noise reduction and detail preservation.
Is it better to denoise during shooting or in post-production?
Ideally, it’s best to minimize noise during shooting by using appropriate camera settings and ensuring optimal lighting conditions. However, denoising in post-production allows for more control and flexibility in achieving the desired results.
Can denoising improve the quality of low-resolution videos?
Denoising can help improve the overall appearance of low-resolution videos by reducing noise and enhancing clarity. However, it cannot increase the actual resolution of the video or restore lost details.

