Hey, video enthusiasts! 👋
If you’re already familiar with CapCut, you know it’s a go-to for crafting compelling content. But did you know there are ways to really boost the quality of your videos with this tool? Let’s dive into some top-notch strategies and tricks to make your CapCut creations pop!
CapCut, with its wide range of features and tools, allows you to create stunning videos for various platforms. However, to make your content stand out, focusing on video quality is essential. In this article, we’ll explore expert tips and techniques to help you enhance the quality of your videos using CapCut. 👇
How to Enhance Video Quality in CapCut [Step-by-step Guide]
We’ve been playing around with CapCut lately and found some amazing ways to really up the ante on video quality. Here’s how I did it:
Step 1. Run CapCut and Upload Your Video
Download and run CapCut on your PC, signing in with TikTok, Facebook, or Google account credentials. Start a new project and import the video you want to enhance by clicking the “Import” button.
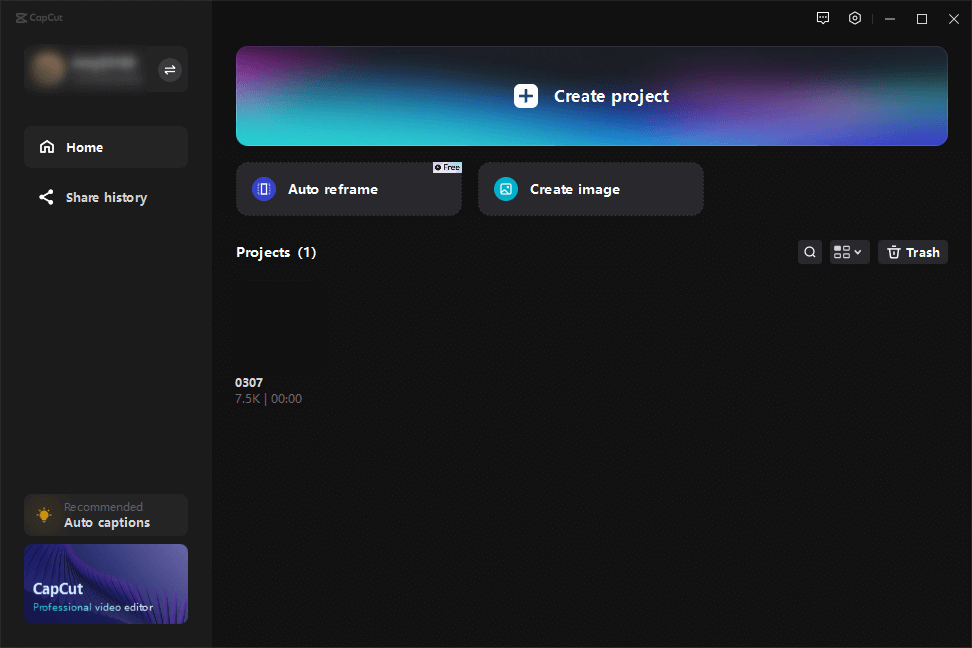
Open CapCut and Sign in to Your Account
Step 2. Add Effects to the Video:
Drag the video to the timeline, navigate to the “Effects” tab and select “Video Effects.” > Browse the “Comic” category to locate and select the “B&W Sketch” effect.
Within the same “Effects” tab, look for the “Lens” section to find the “Blur” effect. > Drag the “Blur” effect onto your video timeline, adjusting it to match the length of your video. > After applying the effects, click the “Export” button to save the edited video to your desktop.
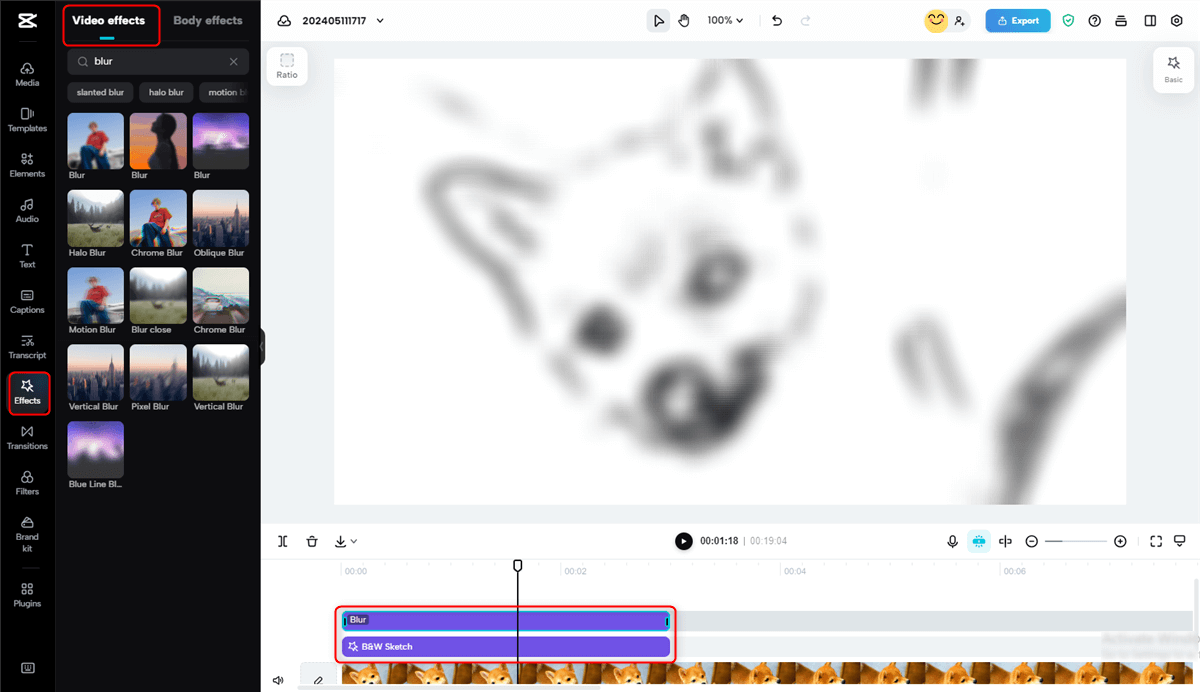
Add Bulur and B&W Sketch Effects to the Video
If you are using a version of CapCut older than 1.5.0, the “Blur” effect might be located under “Basic” or within the “Opening & Closing” section.
Replace with Neon Effect:
To switch the effect, first remove the “B&W Sketch” from the timeline. > Again, head over to the “Comic” section and this time, select the “Neon” effect. > Add the “Neon” effect to your video, making sure it covers the entire video length. With the new effect in place, use the “Export” function to save the modified video to your desktop.

Add Neon Effect to the Video
Step 3. Import Processed Videos as Overlays:
Remove all effects from the timeline, retain the original video, and import the two processed videos. Use blending modes like “Color Burn” and “Color Dodge” to adjust opacity.

Apply Blending Modes
Step 4. Adjust Color Settings:
Use the “Adjustment tab” to manually improve brightness, saturation, and contrast for a more vibrant and captivating look.
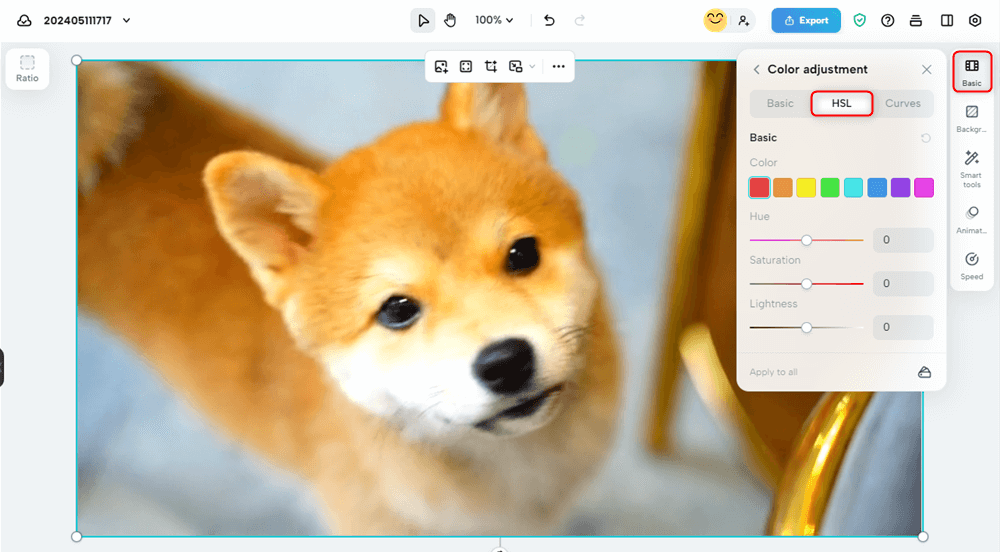
Adjust Color Settings
Step 5. Export the Final Video:
Preview the final result, then export your project with your desired output resolution.
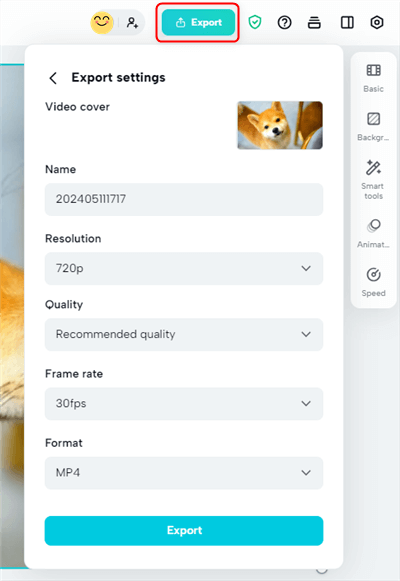
Export the Final Video
How to Get Good Quality on CapCut [7 Ways]
Adjust Brightness and Contrast
Understanding brightness and contrast settings in CapCut is crucial for achieving optimal video quality. By adjusting these settings, you can fix underexposed or overexposed footage and create a balanced, visually appealing video. Experiment with the brightness and contrast sliders to find the perfect combination that enhances your footage without losing detail or creating an unnatural appearance.
Improve Color Grading
Color grading is a powerful tool that can significantly impact the overall quality and mood of your videos. CapCut offers a range of color correction tools that allow you to fine-tune the colors in your footage. Adjust the temperature, tint, saturation, and vibrance to create a visually stunning look. You can also apply LUTs (Look-Up Tables) to achieve a specific cinematic style or atmosphere that complements your video’s content.
Sharpen Your Footage
Sharpening your footage can help add clarity and detail to your videos, making them appear more professional and engaging. CapCut’s sharpness tool allows you to enhance the edges and textures in your footage, creating a crisp and defined look. However, it’s important to find the right balance when applying sharpness to avoid over-sharpening, which can introduce unwanted artifacts and make your video appear artificial.
Reduce Noise and Grain
Noise and grain can be common issues, especially when recording in low-light conditions or with older cameras. These artifacts can distract from the overall quality of your videos. CapCut offers a noise reduction feature that helps minimize noise and grain, creating a cleaner and smoother appearance. Additionally, by following best practices during recording, such as ensuring adequate lighting and using a high-quality camera, you can minimize noise and grain from the start.
Stabilize Shaky Footage
Shaky footage can be a major distraction and detract from the professionalism of your videos. CapCut’s stabilization tool is designed to smooth out unwanted camera movements and create a more stable and polished look. Whether you’re shooting handheld or in challenging conditions, the stabilization feature can help improve the overall quality of your footage. To further enhance stability, consider using a tripod or gimbal during recording.
Enhance Audio Quality
While visual quality is important, don’t overlook the significance of good audio in your videos. CapCut provides tools to adjust audio levels, apply EQ, and add audio effects to enhance the overall sound quality. Ensure that your voice or other important sounds are clearly audible by balancing the audio levels. You can also use CapCut’s audio effects, such as reverb or echo, to create a more immersive and professional sound. However, be mindful not to overuse effects, as they can distract from the main content.
Experiment with Filters and Effects
Filters and effects can be powerful tools to enhance the visual quality and creative style of your videos. CapCut offers a wide range of filters and effects that you can apply to your footage to achieve a unique look or mood. Experiment with different options to find what works best for your content. Subtle enhancements, such as a vignette effect or a slight color filter, can add depth and atmosphere to your videos. However, be cautious not to overuse filters and effects, as they can make your videos appear gimmicky or unprofessional.
The Limitations of Increasing Video Quality with CapCut
While CapCut provides various tools to enhance video quality, it’s important to understand that there are limitations. CapCut, like any other video editing app, cannot magically fix poor-quality footage. If your original recording suffers from issues such as extreme blurriness, severe underexposure, or excessive noise, there’s only so much that CapCut can do to improve it. It’s always best to start with high-quality footage captured using proper techniques and equipment.
Conclusion
Enhancing video quality is essential for creating engaging and professional-looking content. CapCut offers a range of powerful tools and features that allow you to fine-tune your videos and achieve stunning results. By following the step-by-step guide and implementing the seven ways to get good quality on CapCut, you can take your videos to the next level. Remember to find the right balance and avoid overusing any particular effect. With practice and experimentation, you’ll develop a keen eye for what works best for your content.
FAQs on How to Increase Video Quality on CapCut
How can I fix blurry or out-of-focus videos in CapCut?
While CapCut’s sharpness tool can help enhance clarity to some extent, it’s not a magic solution for severely blurry or out-of-focus footage. It’s always best to ensure your camera is properly focused during recording. If the blurriness is minor, you can try applying a subtle amount of sharpening in CapCut to improve the overall clarity.
What’s the best way to color grade my videos in CapCut?
Start by adjusting the basic color settings such as temperature, tint, saturation, and vibrance to achieve a pleasing overall look. You can then experiment with applying LUTs or custom color grading presets to create a specific mood or style. CapCut offers a variety of built-in LUTs, or you can import your own. Remember to keep the color grading subtle and consistent throughout your video.
How do I remove background noise from my audio in CapCut?
CapCut doesn’t have a dedicated background noise removal tool, but you can minimize background noise by adjusting the audio levels and applying EQ. Lowering the volume of the background noise track and using the EQ to reduce low-frequency rumble or high-frequency hiss can help create a cleaner audio track. For more advanced noise removal, you may need to use a separate audio editing software before importing the audio into CapCut.