You can make magnificent movies with iMovie – Apple’s user-friendly video editing app, by skillfully organizing and improving your clips and images. One of its pivotal features is the exporting capability, which transforms your meticulously crafted project into a shareable format. This process encapsulates your video, making it playable on various devices and platforms. When you’re ready to share your masterpiece, iMovie’s export function steps in, packaging your creation into a format other computers, phones, and video players can easily understand.

Fix iMovie Not Exporting
However, as with any technology, glitches can arise, leading to frustrating moments when your iMovie project won’t export as expected. This article aims to guide you through troubleshooting the “iMovie not exporting” issue. We will start by exploring the issues that can lead to this problem. So, without wasting too much time, here’s what you must know!
Further Reading: Top 10 Afdah Alternatives to Watch Movies Online >
Why Is iMovie Not Exporting?
Discovering that iMovie is not exporting your created videos or video recordings might be upsetting. This widespread problem may occur due to various causes, ranging from technological issues to compatibility difficulties. Let’s look at a few important issues and potential solutions.

iMovie Not Exporting
Why does iMovie freeze when exporting?
Several causes might cause iMovie to freeze during export. It may be having difficulty dealing with the complexities of your project, leading the program to become unresponsive. Inadequate system resources, such as RAM or processor power, may also contribute to the freeze. Another cause is corrupt project files, which might halt the exporting process.
To address this problem, consider shutting superfluous programs to free up resources while ensuring your project is well-organized with a few complex parts. If the issue continues, you should restart your computer or reinstall iMovie.
Why is iMovie so slow to export?
The sluggishness you encounter during iMovie export might be due to the size and complexity of your project, as well as the capabilities of your machine. Large video files with extensive changes need more processing power and render time.
Reduce the project’s complexity, cut unneeded clips, or decrease the export resolution to speed up the export. Upgrading the hardware on your computer, such as adding more RAM or employing a faster CPU, may also greatly increase export speeds.
Why is iMovie not exporting as MP4?
If your iMovie export isn’t producing an MP4 file, it might be because of export settings. Check that you choose the right format throughout the export procedure. An incompatible codec inside your project may sometimes block MP4 conversion.
To fix this, consider exporting to a different format and converting it to MP4 using a video converter program. Remember that certain earlier versions of iMovie may not directly support MP4 export, so upgrading to the most recent version may help.
Also read: How to Fix Videos Not Playing on Twitter >
How Do I Fix Export Errors in iMovie?
While it’s irritating to run into an export issue in iMovie, there are a few easy fixes you can try to get your video production back on track. Let’s examine a few typical problems and their solutions to guarantee a trouble-free exporting procedure.
Ensure There’s Enough Storage
Insufficient storage space on your device is a prevalent factor contributing to export errors in iMovie. When exporting a video in iMovie, it is important to note that the software requires a certain amount of temporary space to process and generate the final output efficiently. Your device’s storage capacity might restrict process efficiency, causing mistakes. To efficiently manage Mac storage, remove unnecessary files, programs, and media. You just need to:
Step 1: Go to Apple Logo in the menu bar and click About this Mac.
Step 2: Navigate to the Storage tab to check your Mac storage.
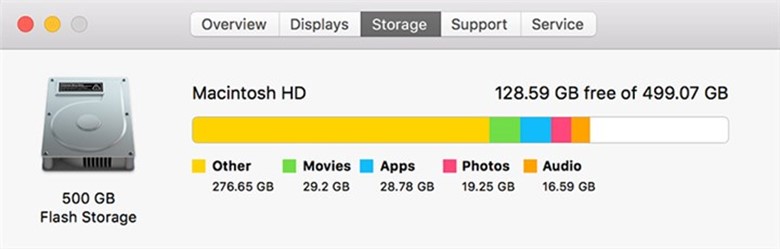
Check Mac Storage
Note: Try deleting or eliminating certain files if your Mac runs out of space.
Check the Internet Connection Speed
If you export your video directly to an online service, such as YouTube or iCloud, a sluggish or unstable internet connection can cause export errors. A too-slow connection may disrupt the upload process and cause interruptions.
Before attempting the export, ensure you are connected to a stable and quick internet connection. Consider moving closer to the gateway for a better Wi-Fi connection. An Ethernet cable may be used to connect your device to the internet for a more reliable connection. By addressing your Internet performance, you eliminate a potential exporting roadblock.
Restart Your Mac
If you’re having trouble exporting a movie using iMovie, you may find that restarting your Mac is the simplest and most effective solution. Temporary files and running programs may build up on computers over time, potentially contributing to performance issues. The hiccup in your export process might be fixed by restarting your computer to clear up any problems. You can restart your Mac by following these steps:
Note: Be careful to save your iMovie project and any other open work before restarting your computer. No data is lost, and no modifications are lost if this is done.
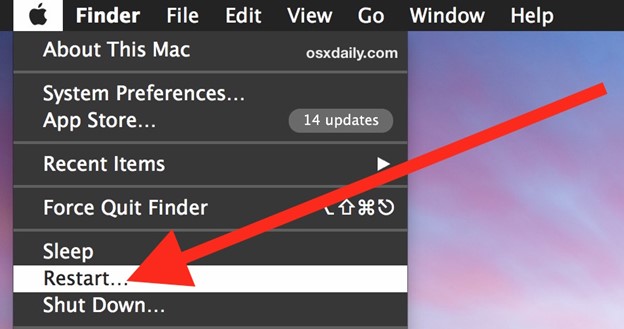
Restart Your Mac
Step 1: Head over to the Apple logo in the top bar.
Step 2: Access the restart menu by clicking the “Restart…” button. A dialogue asking for confirmation will show up.
Step 3: Use the dialogue box’s “Restart” button to restart. The restart procedure for your Mac will begin. Your Mac will go to sleep and then restart.
Update macOS and Restart iMovie
Updating your macOS would help in such a situation. An outdated macOS version can sometimes lead to laggy software performance, and bugs creep in. If your current version is macOS Mojave or later, you need to:
Step 1: Select System Preferences > Software Update from the Apple menu. This function will verify for update availability.
Step 2: Select the Update Now icon if an update is available.
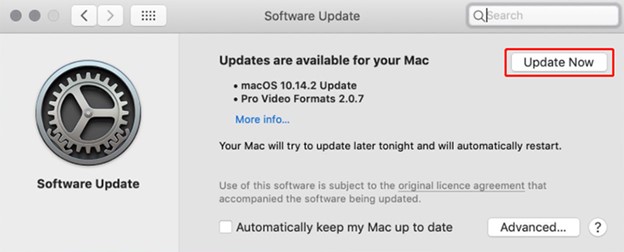
Click Update Now
Note: If running an older macOS version (High Sierra, etc.), open the Mac App Store and select the Updates tab.
Once you’ve updated your Mac, it’s time to restart iMovie and then use it to see whether the problems are fixed. It would help if you first exited iMovie and then resumed it. But, before you resume iMovie, save the project to avoid losing your work. Also, remember that hitting the red close symbol in the top-left corner of iMovie does not force the software to end. To exit iMovie on your Mac, follow these steps:
Step 1: Double-click on iMovie in the Dock.
Step 2: Select the Quit option on the following screen.
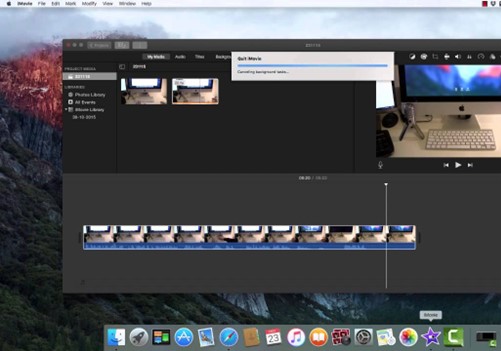
Quit iMovie
Step 3: Please wait a few seconds after quitting iMovie before relaunching it. Check to see whether you can export your project right now.
Reset the iMovie Preferences
Sometimes, the problem is with the exporting preferences in your iMovie app. This happens when you are trying to export a video and the app doesn’t allow you to export since the preferences are incompatible. You’ll need to change a few options in your export preferences to repair that. Here’s a step-by-step guide on how it’s done:
Step 1: Click the Share button while still in iMovie.
Step 2: Then, using QuickTime, export your video.

Use QuickTime
Step 3: Select Options & Settings. Then change the following settings: MPEG-4 Video Compression, Key Frames: Automatic, Compressor Quality: High, Date Rate: Auto.
Boot Your Mac into Safe Mode
If none of the methods mentioned work, you can try booting your Mac into Safe Mode to fix the problem. A Mac searches the Startup drive and clears some system caches in Safe Mode. Many users could resolve the iMovie export problem by booting their Mac into Safe Mode. If you’re experiencing difficulties using iMovie, try booting into Safe Mode to clear any system caches causing it to slow down. Here’s a step-by-step DIY on how you can boot your Mac into Safe Mode:

Boot Your Mac into Safe Mode
Step 1: Press and hold the power button to shut down your Mac.
Step 2: Restart your Mac and hold down the Shift key until you see the Apple logo.
Step 3: Congratulations! Your Mac is now in Safe Mode. Restart your Mac normally to exit Safe Mode.
Does Exporting in iMovie Lose Quality?
A common concern among iMovie users is whether exporting their videos might result in a loss of quality. While iMovie is designed to maintain the quality of your videos during the export process, certain factors can impact the result. One exporting option that users often choose is “Share > Publish to iTunes.”
Some users have complained that their exported movies don’t play back well, regardless of the quality level they choose (Mobile, Medium, Large, HD 720p, or HD 1080p). The quality problem can even be caused by the selected export method.
When you export a video from iMovie, the software aims to preserve the visual integrity of your project. However, the choice of exporting settings can play a significant role in the output quality. While convenient for iTunes compatibility, the “Share > Publish to iTunes” option might not yield the best results for general playback due to potential compatibility issues with other devices or platforms.
Final Thought
iMovie is a versatile application for creating captivating visual narratives. While exporting projects might pose occasional challenges, armed with the right knowledge, these hurdles can be easily overcome. Remember that iMovie is designed to preserve the quality of your exported video, but selecting the appropriate exporting option is crucial.
Exploring alternative exportation routes, such as “File > Export Movie,” gives you greater control over formats and resolutions, allowing you to ensure that your creative endeavors look fantastic on various devices. Adhere to the above-mentioned solutions one by one to fix the problem!